Translate

Friday 29 January 2016

I know what love is because of you.


What a wonderful sentiment. New one from the Tonne. Can you see that blurry look???
I can see it and nothing I did could fix it or stop it from being then I remembered this happened the other day on some photos I had taken and I thought it was reflection. Well of course its not, it just takes me a while to work out...... a smudge on the front lens of the camera, perfect for soft focus when taking photos of myself and I want to hide the wrinkles but doesn't do much for my cards. Of course it only took me like a week to work it out, camera lens is now smudge free lol.


Tilted the card here (yes the smudge is noticeable here) so you could see the sparkle on the hearts. Really neat piece of card stock glitters but also has a weaved look which is the same as the card base that isn't showing up here.

Anyway I cut the main heart die then temporarily attached the heart, glued down all the hearts within it, then removed the main heart to be used for something else. I love the fact that they are all different sizes and some are even hearts within hearts.


It's a pretty card and very easy when using the Press N Seal to hold everything together in one place as I added glue to all the little hearts. So easy and quick.

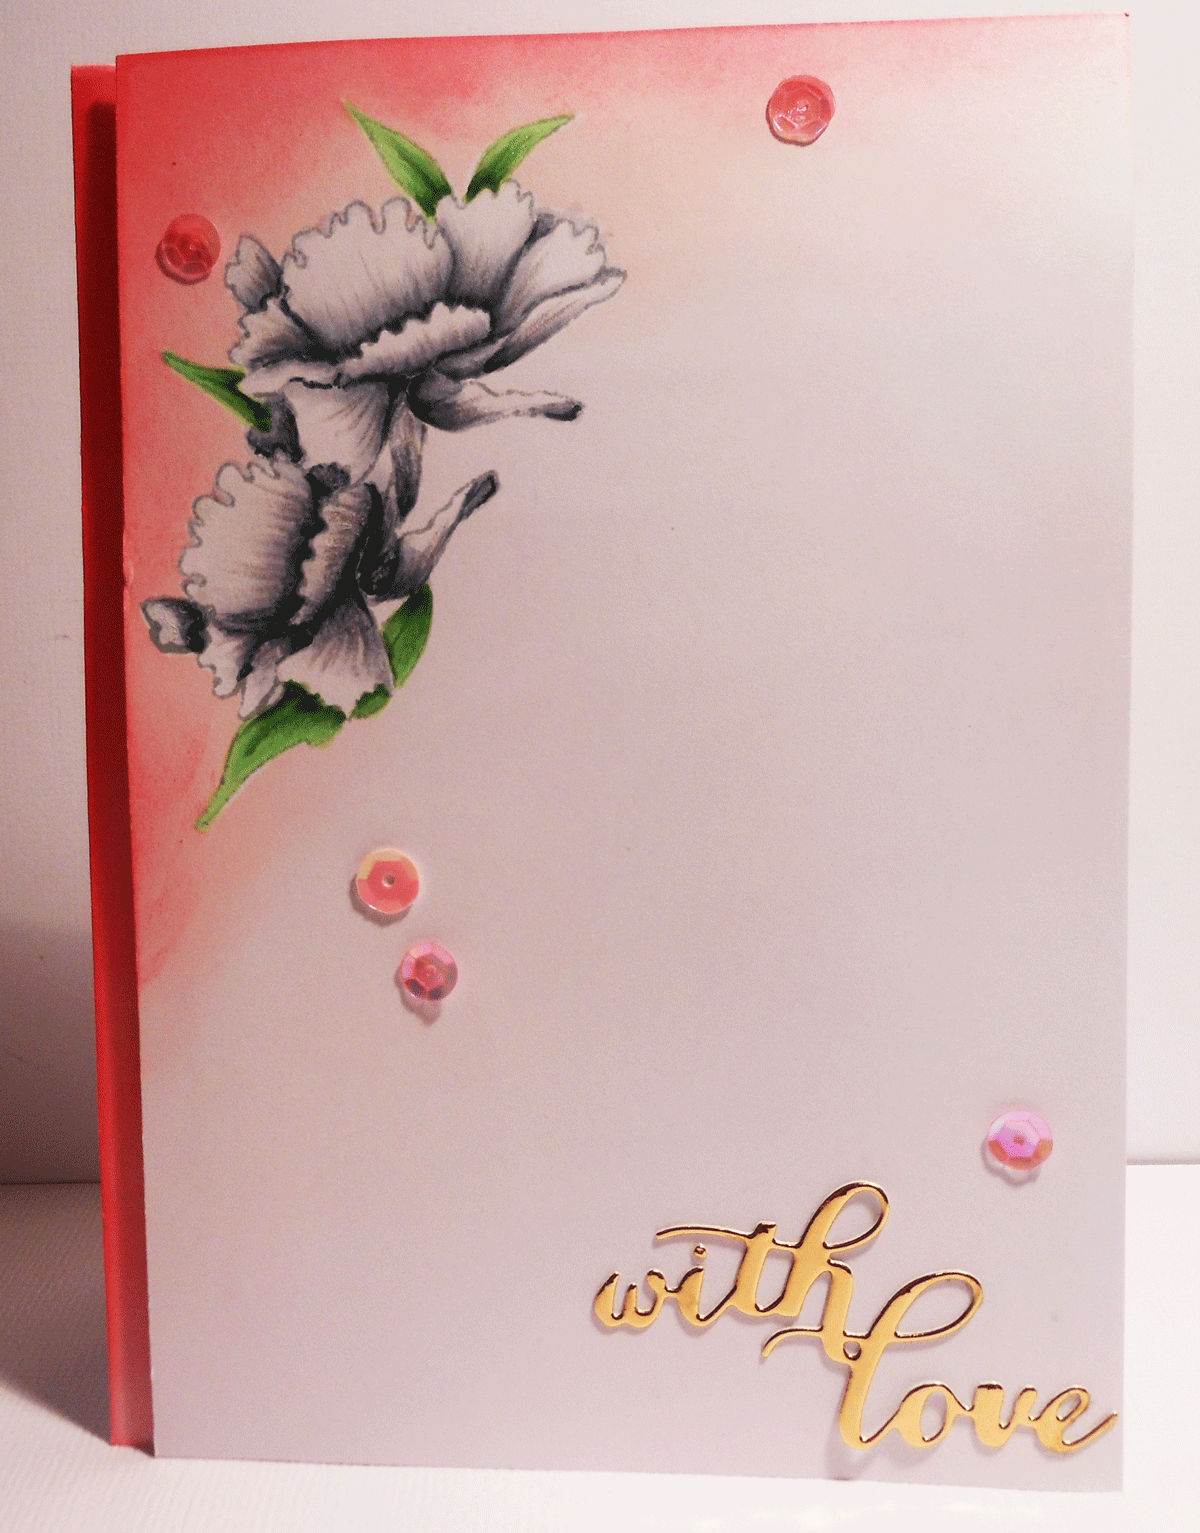
Stamped the sentiment using the Misti as the card base has a bit of a weave to it and I knew there would be a need to double stamp.

On the last photo I was playing around with watermarks and made what I thought was one in png file but couldn't add to the next photo without the background. So deleted all and will continue to try. I am afraid these things just become so time consuming.

Anyway time to post this.


I have used Red Die Cut and Heart

Thank you for coming to visit and I hope you come again soon.


Wednesday 27 January 2016

With Love


This is my second card for the Time Out Challenge. I  was happier with this card, I think because the flower is bigger so they grey doesn't look as heavy. Also I think I placed the 'with love' sentiment better. I won't go into what I did with this card as the previous post has all the information.


Once I had finished with the Copics and pencils I added a little green to the centre of the flower and felt that worked well. I had to do a little improvising as I found my masking of the flower was a little off and I had some blank areas near the flower that it was too late to add purple blending to.


I just added to the top of the petals as though there was more overhang on the petal and felt that looked alright.

I have enjoyed using my Altenew Inks on both of these card bases for blending as they blend nicely and here I like the contrast I got with the two darker colours in the purples. 

This time I have used a silver die cut for the sentiment and silver sparkly gems.

My own twists are, single flower, adding colour to the centre of the flower and not using leaves, heavier colour ink blending, die cut sentiment, gems rather than sequins, no thread or band down the side, but it is a definite case of Marika's beautiful card. I hope I have done her proud.
I tell you what if you haven't checked out her blog before its a must, I have a dream. It is to be able to create my own cards with half as much artistic style. Truly magnificent.

I would like to enter this at:


I would also like to enter this at:


Not sure if its CAS enough but please just delete if its not.

Anything Goes With a twist - use some flowers or a flower.

Okay thanks for coming to visit and I hope you come again soon.


SHARED HINT FOR MINI  INK PADS

I like to have a foam pad for each colour I do blending with and sadly the small round foam ones won't fit inside the under section of the mini ink pads so I had to find another solution. 

I laminated a piece of paper added velcro dots and added the small round foam pads in colour groups and just wrote the name beside each. 
Was easy enough to grab the sheet and leave on my desk when doing some more blending rather than trying to work out which foam pad goes with which ink pad). 
Also because the mini ink pads for Altenew are black and the writing hard to read I ended up first cutting a pile of 1" squares, swiping each piece of card stock with the ink and glued to the lid and wrote the name on there as well. Much easier to find them.

I then did the same on my mini Hero Art ink pads, this gave a better indicate of ink colour and I can now see colours that will work well together from the Altenew and Hero Art mini's. They all fit into a storage box together perfectly so I can grab the box, go through and pick colours in reference to the true colours on the lids.

I haven't tried blending with the Hero Art Inks yet but intend to as there are some lovely colours there that I think will blend quite nicely and will do the foam blending pads the same way. 


Tuesday 26 January 2016

'With Love' and 'Make a Wish'


First I thought I would start with a picture of Australia Day that my daughter sent to me on Facebook.


Two for one on this post then another to follow. I have done two cards for the Timeout Challenge so need to post separately as I cant link both if they are together.


This card couldn't be any easier. The pattern I have stamped is as you see it minus the two lower circles. Those I add after stamping the main stamp. I have used one of those multicolour stamp pads that goes from orange to pink to purple. When you use the ink pad you push a lever that moves the pads close together and when finished you separate them again. If you forget to separate them and leave for a while you end up with a muddy yucky stamp pad, yes I admit it I did that ,and need to replace one of them.

I have had these ink pads the longest of any I have and they still work fantastic and have not been reinked (don't know if you can actually) and they do stay a bit wet so can be embossed and you need to wait for it to dry a minute or two.


Back to the card. After stamping the ink pattern I added a die cut Make a Wish in Silver and that was without measuring in the first place. Talk about lucky it actually just fit perfectly.


Finished off with some gems in the colours of the stamped circles. These are wonderful gems as they are coloured glass but smooth not like the usual gems. (No longer available sorry). I know CAS is meant to be without layers like gems but really sometimes they just have to be there. This card was designed with Seize the Birthday challenge (CAS).


Okay now this card is with lots of blending of ink on the card base and next layer and copics colouring. This is the first one I wish to enter at Timeout Challenge where we were shown this card done by Marika

and we are to CASE with our own twist. I have certainly done my own twist, I did start planning to be very very similar but I am much more heavy handed with both my blending and copic colouring so  my card looks quite different. 
I have used the same idea of colouring with Copics then grey colour pencil. A wee bit of green. A separate layer for the flower part and added blended ink then the card layer that is slightly wider than the top layer and also did some blending on this layer.


I am happy with the flowers I used (they are Dee's design) but the grey is very heavy and I will continue to practice this once I get more greys in the Copics.


I attached the top layer to some fun foam first to slightly lift off the base card.
I finished it off with a gold foil card 'With love' sentiment and some sequins. These are cleverly placed to cover the dropped grey copic splat made just as I finished the card off.

Alright now to enter my cards in some challenges.


(Just scrapped in on that one Ruth!!)

Glad to say I have used my sequins on my With Love card.


Thank you for coming to have a look and I hope you come again soon.


Monday 25 January 2016

Hello, Sunshine


Another of Mo's Digital Pencil digital stamps. I don't know if you are aware of this but a lot of Mo's images are also available as rubber  & clear stamps. Not sure of all the different businesses that sell them but Penny Black has a great range to choose from so if you aren't into digital images you can still have the beauty of many of Mo's images as actual stamps.

Okay back to my card, nice simple image, such a little cutie and makes me think of one of my granddaughters who just loves to dress up and play make believe with me.


If you look closely you will see I have added Glossy Accents to the flowers on her clothes and in her hair and her dress up shoes.

After colouring her in with Copics and the Glossy Accents had dried I cut a piece of cardstock to frame the image with an older die that I have then placed both on

the pretty piece of flowers patterned paper I had attached to the front of the card.
Stamped 'hello Sunshine' because thats what these wonderful grandchildren of mine make me think of 'Sunshine, happy days, hugs and kisses, lots of laughter and such magical imagination'.  

Now I need to get this off in the mail because there is no baby sitting tomorrow as its Australia Day and a Public Holiday. Last week as I was looking through some of the blogs I follow there's Sophie sitting with me commenting on the cards and putting in orders on what I need to do for her next. All of 3 years old.

Okay I would like to add this to:


Just a note to anyone who read my post labeled 'Wooohooo Triplets' just thought I would share the latest update. They have arrived........13 weeks early and only very small. 

One of the girls is 1 kg and the other two (another girl and a boy) are both less than a kg each, a kilo is approx 2.5 lb so yes they are all very small but the delivery went well and the doctors are happy. The babies are all doing ok, mum needed a transfusion but is going well.
They don't want up to share photos or names yet as they want to hold to themselves these precious babies till they know they are out of danger. Dad is in the army and hasn't been allowed home yet but I'm sure it won't be long.
Please keep them all in your prayers and thoughts and next time I share I hope its with photos.

Thank you for coming to visit and I hope you come again soon.


Sunday 24 January 2016

My Heart Beats for You


This card is quite a simple card and looks so eye catching but really doesn't show to its best here so you will have to trust me as I am sure you totally do anyway!!!

I used a die I have had for quite a while and sorry I cant think where its from, it cuts out one solid heart and two outline hearts at the same time. The die is all in one piece, will have to think about the name and put here if it ever comes back  to me.
Sooooo, I cut the hearts out on the red card base then I attached a layer of soft pink inside for contrast. Then I cut out another set of hearts from red glitter cardstock and also from some foam. I then attached the main outline  inside on the pink base and the heart in the middle.


In this shot the inside looks yellow, don't ask me why cause I have no idea but I kept the shot cause it shows the true glitter of the hearts.


Here you can see the card open a bit so you can see the empty heart on the front of the card. I stamped the sentiment using my Misti which came in handy as I needed to stamp three times to get the ink on perfectly having used a weave cardstock.

Love this sentiment 'My heart beats for you'


This is a shot of the inside of the card and another one of my 'disaster stories'.
I decided to finish this card off with the stamped sentiment 'I Love...... everything about you'
didnt notice the edge of a packet under the card. It looked flat and of course was not so as I pressed the stamp down it rocked at the 'you' as it caught the bump and ended up smeared and ruined. Another of those 'bloody hell moments' .........as you can see I saved it by using my scalpel to basically scrape away the inked 'you' very very lightly so it did not tear the paper, minimal rubbed look and glued the 'you' from a 'love you' die cut sentiment in place and ta daaa, its saved.


If not for that botch up it would have been over all very quick to do.

I would like to enter this in:


2nd entry


Thank you so much for coming to visit and I hope you come again soon.


Amazing


Anyone who follows my blog knows I love colour, bright colour. I love colouring in, blending, watercolouring anything that entails colour.

Today I have combined a pile of my favourites:
I love Hero Art background stamps
I love Distress ink blending
I love white embossing
I love die cutting words from the centre of all that colour then putting them back
I love Glossy Accents
I love Wink of Stella
I love enamel dots


Don't think I forgot anything and my loves basically tell you exactly what I did.
Stamped image, white embossed, blended Distress inks, die cut my brand-new 'Amazing' die from the image and 4 times from white card stock. Glued coloured image on white card base, added the four white layers of 'amazing' then the coloured version.
Added Glossy Accents to the die cut word and Wink of Stella to some of the flowers and enamel dots to the centres of some of the flowers.

You can see the glossy accents here and a bit of sparkle. You all know where theres a bit theres really a lot of sparkle.


Inside: 'You are truly amazing and I love you'.
Easy short post.

I would like to add this to:


I hope the glitter from the Wink of Stella is enough glitter.

Made my mark with Distress Inks. Second card.


Okay thats it for today. Thank you so much for coming to visit and I hope you come again soooon.


Friday 22 January 2016

Love you and stencilled heart


Quick second post. Decided to wait till the last minute and enter The Paper Players Challenge. Well actually I forgot, was getting ready to hit the sack and thought ohhhh I wanted to enter. So here is a quick card.

I love this stencil - pretty sure its a Simon Says one and I have used and reused it. It looks wonderful with blending which is what I did this time using a couple of different pinks and a light red in the Distress Inks. I have also made cards with gold embossing paste, clear embossing paste and opaque embossing paste with different colours added.
 I wanted it to look as though it is fading away on the outside and more intense inside so was very happy with the look. I did this straight onto the card base so 'one layer'. Finished off with a 'Technique Tuesday' love you die cut. This was cut from glossy cardstock where I have smooched in alcohol inks. Love the look of this effect and will find a way to use the negative as well as it would be a shame to throw it away.


I don't know why but I have ended up with a section on the heart that looks smudged near the 'l' yet the card is perfect. I looked at all three photos and this mark is there and all I can think of is maybe reflection. Sorry I don't have time or energy to take photos again, maybe tomorrow.

Left the card with no enamel dots or gems as I felt it looked perfect as it is especially as a CAS card.

Would like to enter this in


I  am not sure what the rules are when entering a challenge if there is no stamping on the card. Because I stencilled the heart and die cut the sentiment if I have entered your challenge and this is incorrect please let me know and I will remove from your challenge.

Thanks for coming to look and I hope you come again soon.