Translate

Monday 27 August 2018

Home Sweet Home........


I made this sweet little card 

having been inspired by Kims Wonderful card for this weeks Muse Card Club Challenge

This is Kim's card and its just so wonderful, I love those birds and her design. My 
inspiration is the branch and birds and clean white card and stamped sentiment.


I was going to stamp some leaves, then I was going to cut a die cut branch but then more of my wonderful Purple Onion Designs, Stacey Yacula stamps arrived. I do so love her stamps, all the critters are so cute and she now has some amazing scenes as well and now I have to make sure as usual that I use some stamps. So.......

I stamped the branch and coloured with Copics as Spring is starting over here and the lovely  pink and white blossoms  are blooming. Its a new home for my little birds (they are from a previous purchase).  One of course needed to be in his rainbow coloured vest cause there is a chill in the air at night. Their making a new nest  for their home.


The Home Sweet Home sentiment is also one of Stacey's and because I order so many and so often there always seems to be lovely little sentiments gifted to me with my order. I find this happens quite a bit with smaller businesses and think its amazing that they go this extra step. Also after paying if my postage is less I always end up with a refund, how cools that.

So I thought the sentiment would work perfectly for my nesting couple.
I really pleased with how this card turned out and thank Kim for her inspiration.
Now Im thinking I need to go do another with the other idea she sparked......

Thanks so much for coming to visit and I hope you come again.


Challenges:


Without the Twist this time.


MFT Summer School Inspiration, 5 cards


I decided that since I did the first session I should do the second session as well. I watched the videos earlier this week and had ideas going in my head. I planned to make my cards Friday/Saturday and was convinced I had plenty of time as I was thinking the link closed on Monday, thats overseas Monday so Tuesday for me.

Well I ruined my plans by playing with my alcohol inks and isopropyl which is a thinning agent and has a very strong smell. You are warned and I warn people all the time to make sure the area is well ventilated etc but I sat there mixing leaning over the workbench no fan going thinking I'm fine, I'm fine then leant back and wowwww.

I then had a shocking headache for two days - don't do what I did - how to ruin your weekend.

Anyway now I have just over an hour before the links close because I was also out by two days, don't ask me how just be amazed that I cooked dinner looked it up to confirm what time the link closed on Monday and wahhhhhhh it was 4 and 1/2 hours.

I did it, now my cards are here, I learnt a lot from the videos and love how they all turned out. The photos aren't the best as its now 12.30 in the morning and light is certainly gone.

My first card is Ombre. Distress Ink Antique Linen, you can see the difference better IRL. A bronze glitter paper behind. Love this lace background stamp from MFT.


Can you see the glitter, I think the reflection is stopping it showing properly but this really works well and will make an amazing wedding card.


The darker side is on the right and it really lightens to the left. After blending remember to wipe down your white embossed image so it shows up properly.

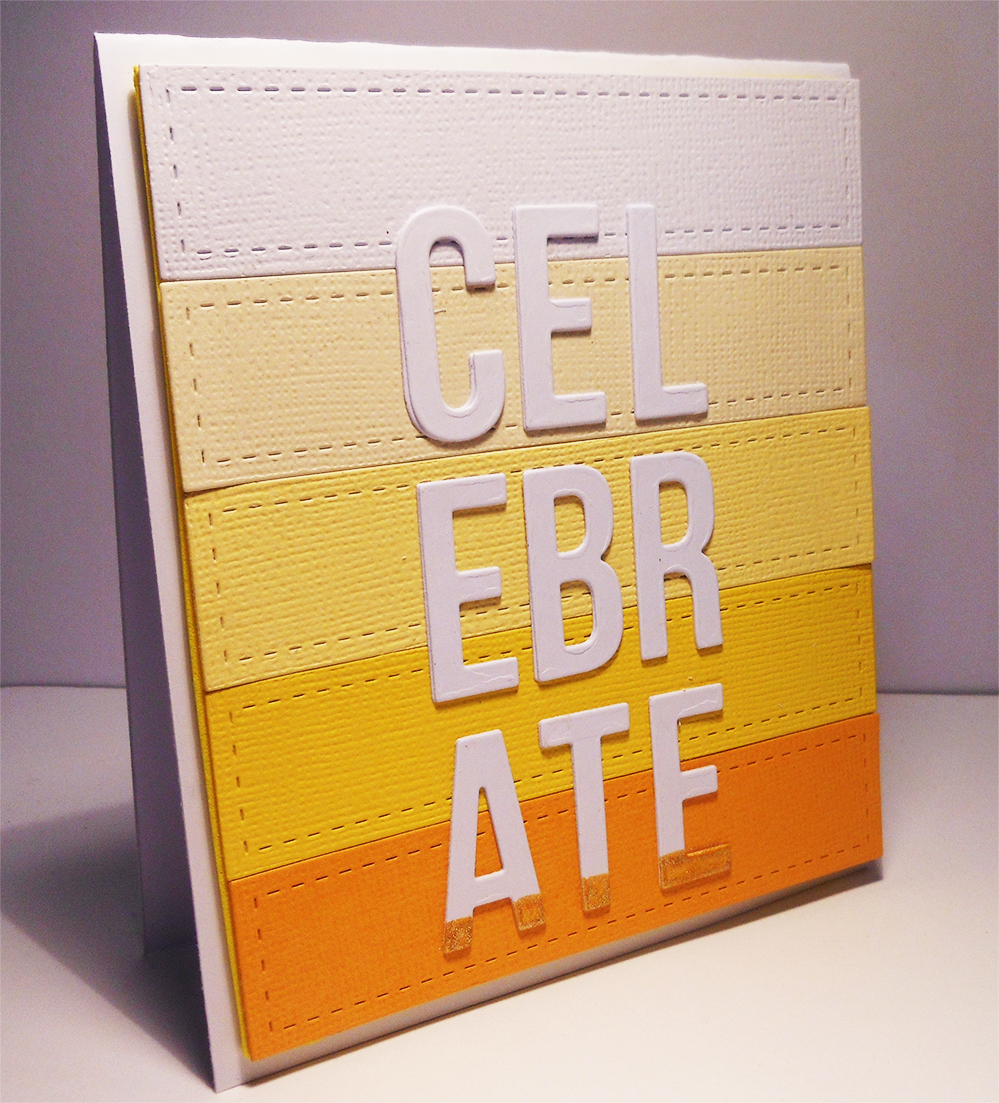
I had a different idea for Monochromatic but because of the shortness of time I went with the same design as we were shown on the video as I had this amazing die that cut the rectangle stitched pattern. Mine was thinner so I was able to add an extra tone in there starting with white.


I have then cut the MFT 'Celebrate' out twice, glued them together then attached to the card, using the negative from the die to help line the letters up properly.


rather than glue and glitter I used a new to me Nuvo glitter pen to add colour to the bottom letters. I also added to my card my adding a layer of yellow fun foam to lift my panel up.

Visual triangle is a new to me idea so I am hoping I interpreted it correctly.


the Hippo's are a MFT stamp set I had already coloured my hippo's. when designing my scene I couldn't find the stamp set, time was running out, you know how it goes!! So I used a sentiment from another MFT set. the balloons are ring ins as I didn't have any left. I had used elsewhere.

I used MFT stencils for the background added the balloons, made a banner for the sentiment then drew in the strings and hoped for the best.


I cant think of the brand for the stitched die cut. the critters are coloured with copics and everything is attached with dimensional foam.


I think this one speaks for itself - Rainbow. Lots of cardstock cut into strips, added double sided tape sheet to a piece of cardstock then added the strips in a colour run that worked well. I ended up making this yesterday along with 5 other fronts so I used up all the pieces. great way to use up pieces of cardstock.


Used the wonky stitches die for card outline. Cut the MFT Wishes word out from the rainbow panel and again in white glitter paper.

Added the glitter pieces then attached the stamped and white embossed sentiment.


Love how this turned out.

Last card - Focal Point and again I am hoping I got the right idea. To draw the eye to a particular spot of the card.


I used the Wish die cut which I also cut out twice in orange fun foam, stuck the letters together then again used the negative to help line the letters up properly.

Added shimmer to the letters for some sparkle - looks cool hey!!!


Added a stamped and white embossed sentiment, the little bird and balloons from the MFT
Hippo stamp set - yep thats where the balloons went.


Well thats it its all added, now time to link them up. thanks for coming to visit and I hope you come again.


Editing to add some Challenges:


'Make a Wish' Hippo Birthday card.


I tried to find a badge to put here for Kitty Bee Designs
as I have linked to the challenge but couldn't find one.

Birthday Card 'Wish you another year of
joy and laughter.


'Celebrate' card - all lace and glitter


mmm which one???
Its Bright and Sparkly too
Wish you a Happy Birthday and Many More to come


'Make A Wish' Hippo Party


'Make A Wish' Hippo Birthday


Wish you another year of joy and laughter.


Monday 20 August 2018

Thinking of You & Hugs were invented........


Yep its that time of the week again and as per my usual its a last minute idea and entry for the Muse Card Club Challenge.

But first another idea came together as I was painted the background for my Muse card.


I spent a day playing with inking up my stencils, spraying with water and lifting and laying onto my watercolour card stock. I made some amazing backgrounds with both the first squish and spraying again with water and doing a paler version. I made that many backgrounds that then I had to decide which one to use for the challenge I had made them for.

Im pleased to say in the process I managed to ink up lots of my stencils (not all but a pretty good amount). This card I have used the stencil from Altenew that looks absolutely amazing done with ink blending and just as good here with ink on the stencil, strayed with water then press onto watercolour cardstock.

I used Distress Inks for this rather than Oxides as I wanted a slight wet look that the Distress Inks manage to do. This colour in 'Blueprint Sketch' love it, it has a slight mauve tinge to it.


So easy and CAS, added a die cut Hugs sentiment from MFT and the sentiment to follow are part of a set that automatically go with Hugs die.

Perfect for the CAS Mix Up Challenge
Stencil Mono-printing which is the name of the technique used, stamped sentiment and die cut sentiment.


My next card was inspired by Tracy's wonderful card. I loved her blue watercolour panel with most of the colour to the top half of the card, the fussy cut flowers on top and stamped sentiment.


I have done a watercoloured panel concentrating on the top half of the card, but I went further by using 5 different Distress Ink blues (the mauve looking one is the 'blueprint sketch'. I don't seem to know the word light watercolouring, I just have to keep playing as I love mixing colours but have to say it was totally inspired by Tracy's beautiful light watercolouring.

I have Copic coloured the flower, I went with pinks. I fussy cut around the flowers but also added copic dots in blue to make the outline blend a bit better.


I then stamped the 'Thinking of You' as I didn't need any more Missing You at the moment.


Now before the Challenge closes I had better get my card up on their sight.


Challenges:

Thinking of you


Hugs were invented........


Thinking of you


Hugs were invented.........


I know its a 'Thinking of You' card
but it is bright to lift anyones spirits.


Thank you so much for coming to visit and I hope I see you again soon


Thursday 16 August 2018

Reminder for The Flower Challenge #23 One Layer Card


It's time for a reminder post, I have used the same stamp set, Forever and Always from Altenew, that I used for my other one layer card. Its a beautiful set of roses in a bouquet and sentiments perfect to go with them. 

I stamped then coloured with Copics. Very quick colouring on these as they are quite small so I only did one layer starting with darkest colour Y18 Y08 Y02 Y00 and leaving white on the top edge of the petals. No real blending in this type of colouring. Works well. The leaves are in the 'G' range sorry cant remember exactly but from palest G00 and then next two blends up. Ferns YG00 YG01

Nuvo Glitter Gloss for the roses. Of course it looks much more impressive IRL.


When I was ready to stamp the sentiment (again one from the set) I realised I had dripped coffee on the top left edge of the card. One layer you cant disguise with washi tape or gems so I cut a cple of sentiments off. It took the edge of the leaves but I think the card still works ok. Bit jinxed with this challenge but at least there was no big Copic leak this time.

I love that sentiment

"You Make My Life Blossom"


Now its time to go to The Flower Challenge and check out what the rest of the team and 
our Guest Designer Milla have been up to. 

Thank you so much for coming to visit


Challenges: