Translate

Monday 29 February 2016

Seriously YOU'RE THE BEST My Friend.


This is another of those late at night inspirations. I loved what I saw over on Muse

This card is done my Jenni Murray, and I love the three little squares. I thought on it off and on over the week but had Dad's 90th birthday to deal with so it wasn't till tonight that an idea actually came to mind.

I used a die that cuts out the 3 curved squares.

I decided to add acetate to the inside so I could use a bigger flower and it could be supported on the front of the card. I stamped 'My Friend' on the inside of the card and lined it up so you could see both words when the card is shut.
I put some leaves on the inside on the stem and one on the outside on the acetate.

I then put a slightly smaller flower on the inside and it was able to sit at the top of the stem. This is not the flower for the leaves or stem/sentiment but it was what I wanted to use.


From here you can see the flower on the front and inside the card.


Here you can the acetate behind the flower and the lovely shimmer on the flower which was watercoloured with Zig Markers and Wink of Stella pen.


I also decided to add some patterned paper along the side but wanted to do full length as it just didnt look right as 2/3rds. I then added a pelmet along the top of a die cut piece of pale yellow paper that went with the stripes. Hence they now look like curtains in a formal room.

Finished off by stamping 'Seriously You're The Best' at the bottom. I really like how this turned out. When the card is shut you only see the top flower but when opened the inside flower allows the stem and leaves to be connected to something.

So I took my inspiration from the pale yellow patterned paper; the three little squares and the lone flower.

Would like to add this to :


There we go, all done and still 2 hrs to go. Thank you so much for coming to visit and I hope you come again soon.


I love it when you smile.


Don't have a heart attack. Yes I have done something different to copics for a change lol.
Few techniques in this one.
First I stamped and gold embossed the Hero Arts Background Stamp
on cardstock then I blended pinks from Distress Inks. Started with one idea then changed my minded just ended up blending all together. I set this aside as a lost cause, then thought of something else soooo I got out the butterfly die I had purchased quite a while ago and not used (Simon Says Drift die)


Here you can see how pretty it looks cut from this coloured and gold embossed piece of card.
Instead of leaving in its own frame I die cut again in white card stock but left the butterflies and frame still in the negative. I then attached a piece of plain card to the back inside to hold all the pieces in place. I will cover this when I attach the insert I add to the inside of all my cards so no worries about it looking messy.


I then glued all the coloured butterflies back into their correct spots with the ones with complete wings bent upwards and those with parts missing because they are covered by the butterfly above or below I glued on flat.

I then used the stamps and die from the Simon Says set. I cut the sentiment in half so it fit better, used the Misti to stamp the sentiment. Layered up the die cut sentiment three times, attached and added a small sparkly gold gem for the dot in the word 'smile'.

I also ended up cutting out watercolour mixes of butterflies, plain ones, Inktense coloured ones and patterned paper ones. Its amazing how you start off with one thing then get sidetracked along the way. Of course they areal cut but still need to be made up.

I would like to enter this:


Blending inks is certainly one of my favourite ways of making my mark


Butterflies made from distressed Ink blending.


Thanks for coming to visit and I hope you come again soon.


Sunday 28 February 2016

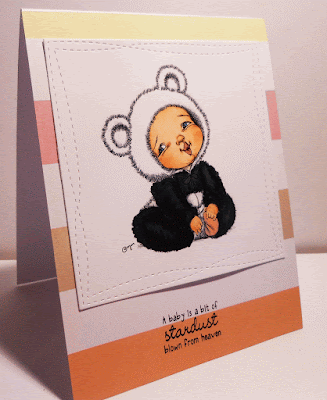
A baby is a bit of stardust blown from heaven.


Another baby card I have coloured with copics. This was an interesting challenge as I only have black copic and a couple of greys that are very light grey so I didn't know if I was going to be able to get a decent look to my colouring of the pandas outfit. If you click on the image to enlarge you will see it didn't turn out too bad at all.


What a little cutie, very light shading around the fluff of the head piece and light skin colouring for the baby. Added a very small amount Glossy Accents to the eyes and those luscious lips. Very simple.


I cut out with the Wonky square die and placed on a piece of patterned paper that I felt worked well with the image.

Finished off with a lovely stamped sentiment.

Add this to


Okay thanks so much for coming to visit and I hope you come again soon.


Friday 26 February 2016

Sending a little sunshine your way.


This is another of Stamping Bella's stamps. I love every one of them but restrict myself to a collection  that doesn't include all (only cause our dollar is so low really). I wanted to colour her in softly which is something I struggle with.

This time I have done pretty well I think keeping the colours soft. She looks so wistful just sitting there and though she comes with a funny sentiment she would work just as well with 'Miss You' 'Thinking about you' ' Wish you were here' and of course my sentiment that I put together. Its from a set from Simon Says with words and die but I used a smaller die to get them to fit.

I was going to use the funny sentiment that comes with this stamp but of course I die cut the coloured image first and low and behold it was too small for the sentiment so I had to rethink.
Used a stitched rectangle die (new), then added the stamped part of the sentiment by using the mist for nice clear even stamp.
Die cut the sentiment four times and layered them up. Stuck a pretty yellow gem on for the dot on the 'i' as the original dot was so small I could barely see it. added some fun from to the back of the die cut image to lift it slightly off the card base. Used a piece of patterned paper behind the coloured image.

Happy with this and don't feel it needs anything else.

Add to:


Thanks for coming to visit and I hope you come again soon.


Sometimes the smallest things take up the most room in your heart.


I needed some baby cards so decided to do a bit of colouring over the last couple of days and now I have made the cards up.


Isn't he the cutest little man. This is another of Mo's Digital Pencil images that was released recently. I think he is so cute, the eyes just staring at you and he's sucking away on his dummy, the same as his teddy. All coloured with copics. A little Glossy Accents added to eyes and dummy for both child and teddy for a bit of depth.


I die cut the baby image with my brand new and much waited for wonky square die. Added a piece of patterned paper to the base of the card then the wonky stitched die at a slight angel.
Finished of with the lovely sentiment 'Sometimes the smallest things take up the most room in your heart'. These are the times you say 'thank God for the Misti, three times stamped to get everything nice and sharp and the card didnt move a mm.

Add this to


Thank you for coming to visit and I hope you come again soon.


Thursday 25 February 2016

You Are Amazing. Remember That.


I know, I know, I am posting again. I thought I would share how I did this card, its just a photo tutorial and I hope I took photos of the most important steps so its easy to understand. So the post itself is photo heavy and hopefully enjoyable.
To start with I have to say this is not my idea I have seen this type of use of die's done on cards before, but it is the a) first time I have used the Quotable dies from Paper Smooches and b) the first time I have used this technique.

I picked out half a dozen colours in this weaved style and cut them all to 4 1/2 inches x 6 inches. I then decided to add a white one as well in case I wanted a sentiment to stand out.


I then laid my piece of card stock across the embossing plate (I have the genius platform that I use with my good old cuttlebug). This plate is well used but still has clear markings on it that I could use to place the die cuts and keep them straight.
 I didnt have enough of the Quotable dies to fill the whole panel and I didnt want to be removing  and having to place in different spots to cover the whole front of the cardstock so I added the die cut at the top that is like a fluffy cloud with a stitched border and this gives a nice finish for the top of the card.
I used washi tap first to hold the pieces individually in place then a long piece to really anchor them down. I usually have small pieces all torn off and resting on my cuttlebug ready for holding dies in place. So I worked out which way I wanted the quotable dies to face, alternating and fairly equally spaced.
If you have the Genius plates you know this is usually the top plate, I just flip over the bottom plate (which has the magnets in it), place on top of this configuration, flip it again and used a thin shim to put this through the cuttlebug. Cut perfectly each time.

I would flip over again and remove the top plate and just used my tweezers to help move the pieces out as I didnt want to be lifting the dies. Worked perfectly every time.


After I had finished die cutting I then sat down and decided on my colour mixes. I wanted to use up all the pieces so I have a few pre-made pieces now. 
I didnt do the colours in any particular order as I liked all the colours and didnt want to end up pulling my hair out trying to sort it out.
To begin with I placed each cut together in a pile so all the cloud layers were together then the next etc as it made it easier to work out what was what then. I did think towards the end I was going to have doubles of colours but because I had cut an odd number of colours it meant that there were some instances where one colour would be missing so I just had to do a bit of changing around to get them all correct.

I turned them upside down to join them up. and just used double sided tape (I was a bit heavy handed here) to hold them in place. Because of the quotable die 'V' I did find I needed a couple of pieces to ensure the join was tight.


All the joins are nice and tight and I did find there were slight variations in join ups as the card stock moved a bit. I probably should have taped the card itself in place once placed under the dies, but it didnt matter. I did a quick very small trim off each side to straighten them all up.

The end result being these neat quotable die cuts that you could put a word in each or a sentence in each. I did this one with just the one stamped sentiment.
 I did do another card with a collection of sentiments in each piece but I used my usual black ink and forgot it takes longer to dry on this type of cardstock, picked the card up to attach to my card front and commenced to smear the lot - one to be kept for example book.

I used the Misti to stamp all my sentiments, as again, this type of cardstock does not stamp well and everything needs to be stamped 2 to 4 times to get it sharp.

I have added this cute  as little puppy.  Coloured with copics, Glossy Accents on collar, tag and nose.


Added  the die cut panel flat to a white card base, could have used another colour if I wanted to add more to the card but I wanted the white there in this instance. Added a little enamel gem to each colour. 
and to all of you wonderful people who come and visit my blog
"You Are Amazing. Just Remember That'

You are very very appreciated.

Enter this with its wee bit of colouring into:


I think I have done this correct for this sketch. Used the sketch as my inspiration in the first place and lucky to just make it in. Having seen the inspiration last week I decided to try this die cutting technique.

Thank you for coming to visit and I hope you come again soon.