Translate

Thursday 16 May 2019

The Flower Challenge #32 Reminder

It's time for a reminder post, for this months challenge at The Flower Challenge Blog and don't forget there is a prize for someone who enters the challenge this month on The Flower Challenge Blog and another here for someone who leaves a comment.

There is a restriction on my blog, the person needs to be from Australia, Tasmania or New Zealand but other than that just say hello and your in with a chance by commenting here or on the post for the start of the month for The Flower Challenge.

They are beautiful stamp sets on both my blog and the Flower Challenge. The one on the Flower Challenge Blog has been donated by Altenew and you know you love Altenew as much as we do.

The prize on my blog was a prize from Altenew when they came to Melbourne and turned out to be a set I already have so I decided to share the love. Check out my other post to see the set I'm talking about.

Now for this post I have another two cards still using that large background stamp (Rose or Succulent depending on how you use it). I decided to use the other two backgrounds to add some more inspiration.


With these two cards I used Zigs again and lots of loose colour put down then added lots of water.

I have heat embossed the design in gold then added yellow and orange each time just loose scribbles, mostly yellow with bits of orange. I then work petal by petal with lots of water on the brush and gently push at the colours. I just love how the colours blend together.


I let each colour dry on its own. No effort and very quick. Looks amazing when its dry and also when you add the water and watch the colour move from a single line on a petal to spread out. I then trimmed the edges and added to a 5" x 4 1/2" card base that I covered with a piece of sparkly glitter cardstock to first. Used a bit of glue to adhere the multimedia cardstock down as well as tape to get a good hold.
IRL the spacing is balanced, my photo makes the card look crooked.
I finished off with a die cut 'just because' in gold mirror card and a vellum background. No gems needed I felt.


This was the first card I did when I was colouring the four cards and the colours are in reverse of the other rose card. Loved them when I saw this done on Jennifer McGuires blog. I just scribbled loosely with my Zigs then added lots of water and watched it move.

I also added some shimmer for a bit of sparkle.


I nearly threw this one away as it was my attempt to improvise as I was babysitting and didn't have my heat gun. I borrowed Mel's hairdryer and put it on lowest speed and BOOM I have watercolour flicks and splatters flying everywhere. Lesson on this one learnt. But I decided I still liked it even with the purple flicks here and then so used it. Highlighted with Purple glitter card stock and finished off with die cut 'Awesome' and background vellum.

I had a bit of cleaning up to do and apparently I missed a bit (or a lot of the flying flecks) from my little experiment but hey, I babysit for free so whats a bit of paint here or there lol.

So there you have it the stamp used for 4 cards, each totally different to the next in colouring. I hope you enjoyed them. Don't forget to comment and then go check out the beautiful cards the rest of the Design Team have made. They are all amazing and have given me lots of ideas for other cards, just need to find that ever elusive 'time'

Thanks so much for coming to visit

Aileen


Wednesday 15 May 2019

Birthday, Miss You & Hugs


I have so many images coloured that I decided I needed to get some cards made just so I feel as though I have accomplished something. I've been so busy moving craft stuff around, reorganising, labelling etc then colouring but not finishing cards off. I felt like I was avoiding this so it was time to get some actual cards done.

New stamp set, so very sweet with the little girls with the dogs and sympathy sentiments.
Stamped then coloured with Copics, nice clean design.

I then decided to add glossy accents to the hearts and you can see that here then decided to add
a couple of gem hearts (to cover those darn black smudges that creep onto the card when your not looking).


Finished it off with a Miss You sentiment rather than a sympathy for this card. Layered die cut, love that little panel behind that highlights the die cut word.

This is a stamp set and die I bought so long ago I would be embarrassed to say when especially as this is the first time used. I actually stamped the frame on the card as well that you see here in the die cut. 

But then I remembered I had the die so used that  as well, cut three times, first in wood look, then decided I liked the mirror card more. First version got glue on the top, tried to remove with the wrong rubber and it removed the mirror finish. So another added. Looks wonderful and finished off with some pale little sequins. 


This was a work of wonder as I added more and more as it grew. First I coloured my mermaid, love this new stamp. She is just so sweet. Coloured with copics and a bit of glitter pen. I decided to go with green hair I dont know why but happy enough for now.  after colouring her and the shells and seaweed I decided it needed to be dimensional so did another layer and added with dimension tape. Then I thought just a bit of Copic light colour around her so added some masking tape and removed the layered pieces and covered them.

Can you see that bit of sparkle I caught with the close up. And continuing her tail colour up her body a bit. (I saw where someone else did that and loved the look). 


I then decided then to go with blending and a stencil rather than copic colouring so used a mix of Tim Holtz Distress Inks and Oxides as I didnt have all the oxides. They work beautifully together. I put a light layer of colour first, then added the stencil and did the same colours in the same areas then removed the stencil and added colour again on top here and there to balance out. Removed the mask and had a bit of fixing to do round the mermaid and it worked out ok. Added those layers again, some clear gems and finally squeezed in a birthday sentiment die cut. 

She actually comes with some great sentiments but I had crowded things out a bit and then stuck on my gems before thinking of the sentiment (as you do!!!) I love how she turned out as Im not a big scene person and pretty much prefer to just colour and keep things pretty CAS. 

Anyway thats three cards done and only about 200 to go to use up some of my colouring.


Thank you so much for coming to visit and see you again soon for the reminder post for The Flower Challenge Blog. Also don't forget to comment on my previous post for a chance to win that wonderful stamp set I am giving away.

Aileen


Personal Note
This is a drawing my youngest Aaron had done for me for Mothers Day. My first without mum.
I had no idea he was doing this and of course when he gave it to me I cried my heart out. Mum never got to hold Koby as he was born just as she went into final decline with her Alzheimer's. So he gave the artist a picture or two of mum and the latest of Koby and the fella drew them in together. He caught the light and beauty of mums eyes to perfection and I see so much of us all in her. Such an amazing gift. 


Bruch with three of the grandchildren on Mothers Day.
Mason, Koby and Sophie.

Here I am with Koby and mums picture.
A wonderful start to the day with three of my children. Who could ask for more?


Sunday 5 May 2019

The Flower Challenge #32 Embossing (Dry or Heat)

Not only have they chosen my favourite type of stamping (heat embossing) but also it's one of my favourite stamp companies. I love using Altenew and this year I got to meet Tasnim at the Melbourne stamping workshop. I also got to meet Therese and many others that I had only ever talked to on line. It was a real buzz to meet all these wonderful people.

Tasnim I have followed since before she started Altenew as I love her style. I have many stamps ( and sadly I have some that haven't seen ink yet and I am working on fixing that.

The challenge this month is


and it is Sponsored by:

Over on The Flower Challenge there is also a stamp set that has been donated by Altenew 
all you need to do is enter a card with dry and/or heat embossing (please note it does not have to be an Altenew stamp used to enter but it you have any it would be great to see)

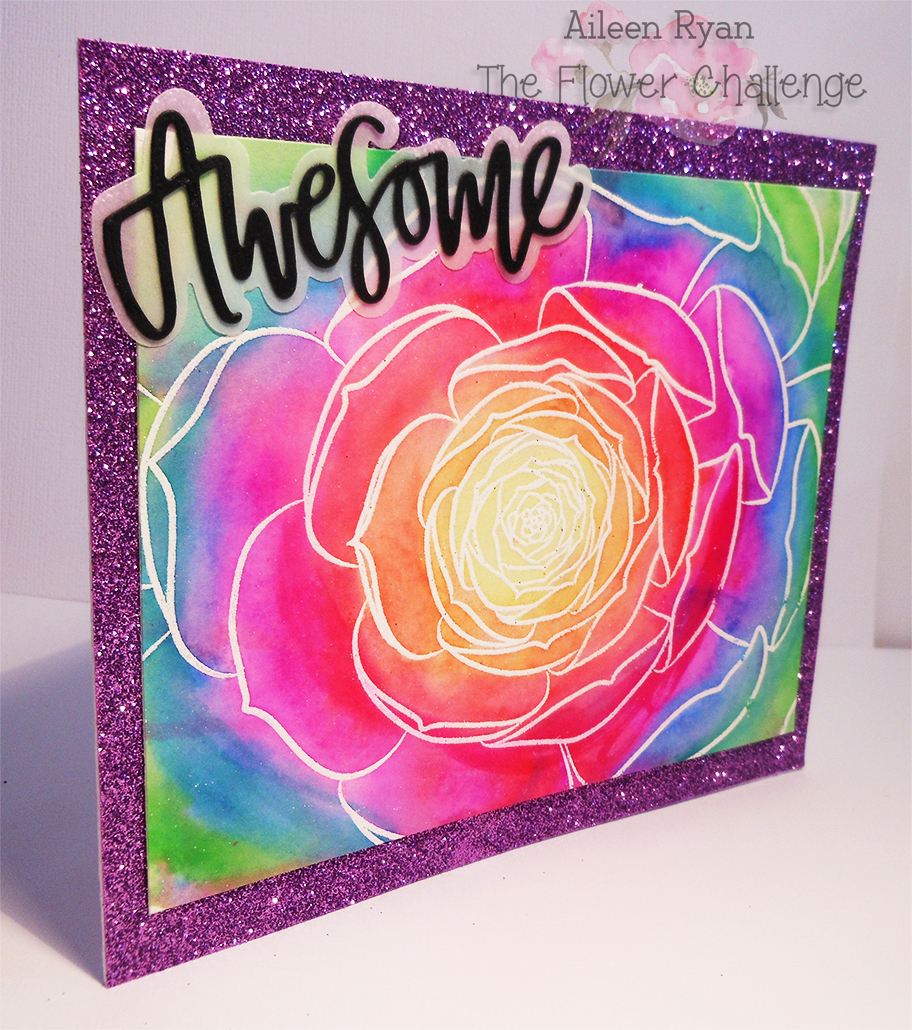
I went through my massive collection and the cards I made today (two of the six  I coloured) I have used a large Rose background stamp that I hadn't realised I had not used. Love it, LOVE IT embossed on watercolour paper, vellum and alcohol ink card stock. Todays are the watercolour versions.
All roses for me though others have used as a Succulent Stamp which is also suggested.


I have done both heat and dry for my first card.

I heat embossing in silver on multimedia paper. This was probably the easiest and quickest card as I used my Zigs the dark blue and purple then just scribbled loosely in each petal with the blue and bits of purple. Then I loaded my paint brush up with lots of water and just dropped it in each petal on top of the Zig watercolour and pushed with the tip of my brush to make the paints move until I was happy with them. If you look closely up the top of the flower I started out moving the colours with my Nuvo Glitter brush but it just wasn't working for me, I didnt like the look and realised I needed to save that for Vellum. I managed to fix the petals slightly when they had dried and was happy enough to leave as they were.

I cut the image using a die cut that gives this old paper edge look, sorry I don't keep them labelled.
I cut another layer in black fun foam to lift the layer a bit. I have taken this close up to show the embossed background paper that is a wonderful green colour just perfect with the blue's and purple's of the rose.


Finished it off with this pretty little gems that came for free (like a bag of approx 300) with my new Pick Up tool I purchased on Amazon. Love when you get those little extra's. Also added a 'Celebrate' die cut layer up three times, last layer silver mirror card.

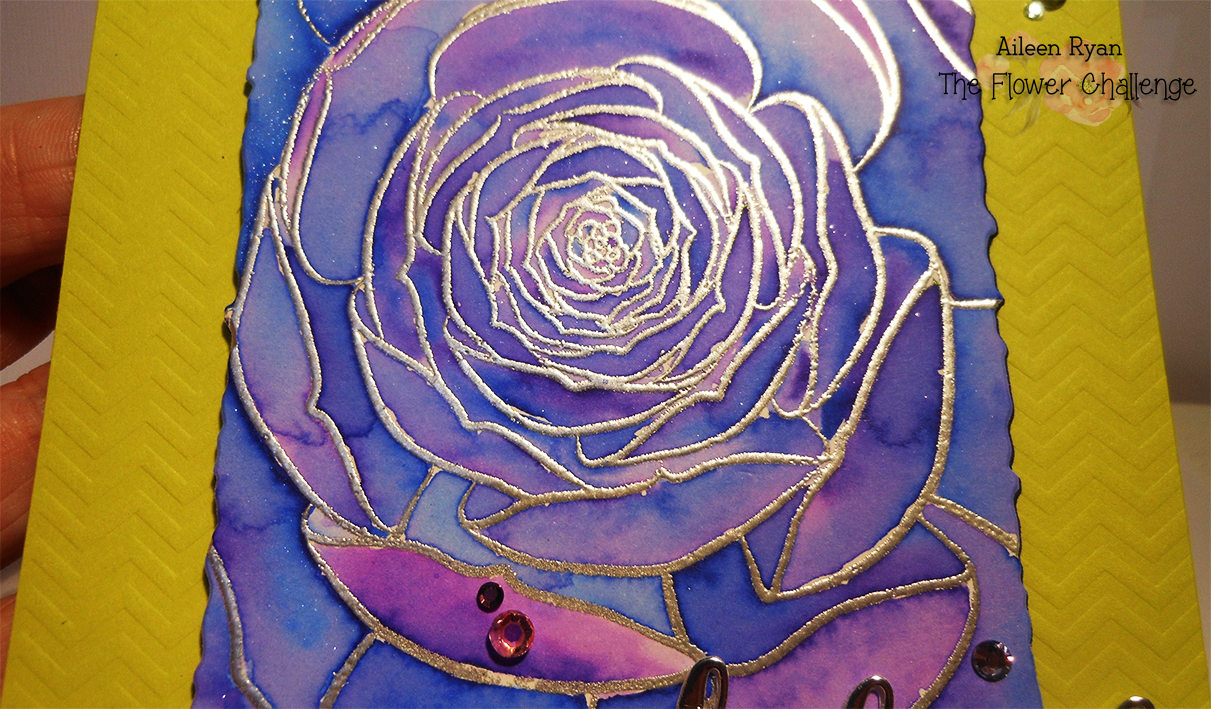
Now this next one was inspired by one of Jennifer McGuire's videos and I love it. I did two in this style but I was babysitting my grandson at his house and forgot my heat-gun. So I borrow a hair dryer,
my goodness what a laugh, I had paint shooting everywhere and had to quickly turn it off. So one didn't turn out so crash hot and this one is better but I had to go with natural drying so its not as good as it could have been.

I white heat embossed on multimedia cardstock then added rings of colour with my Zigs. Nothing perfect in the colouring just rough circles each colour running into the next. Then spray with lots of water, its amazing to watch the colours soften and mix. I had to work fast to get rid of those total mixes which ended up looking like mud colour. Some of my colours mixed a bit much with the next one but next time I will go with the Heat-gun.

I only had plain water but it still looks beautiful. I trimmed the piece down and was going to use the Fine Frame finest layer to outline the image but I had misjudged my cutting and to save the day (after an hour and a half of different ideas) I decided to use a couple of the thicker fine frames and just lay them at angles on the card front.


I love how the improvisation worked. I can see some areas on the frame I will need to get ride of smudges which I didnt notice till I took the photos but I love how it ended up. Its another Birthday card as I have requests for many many Birthday Cards. I just added a small die cut 'Happy Birthday' layered up three times, the last layer in bronze glitter card.

So I'm very happy with how they turned out and I hope they give you a little inspiration. I painted 4 watercolour cards in less than an hour, I love the Big Background flowers as they are perfect for messy and relaxing paining and when my granddaughter got home from school she wanted one. I said pick one out and I will make it for you, she did a lot of thinking then came and said 'Nanny can I just have them all cause its too hard to pick one?' Love my admiration squad.

Now as a special surprise I have a stamp set here for a lucky person who leaves a comment on my blog. I am afraid I am limiting the person to Australia/Tasmania or New Zealand as postage is ok for these areas. I'm sorry to everyone else but it would cost me more to send the set than the cost of this stamp set.

But dont forget we also have a stamp set over on The Flower Challenge Blog and that has been donated by Altenew and they will post to anyone worldwide. Not for leaving a comment over there, it will be for the winner of this months Challenge.

For my blog, its for comments left. 


I have added some of the pictures that come with the stamp set showing examples of what you can achieve and I think they are simply stunning.

I won this stamp set amongst a number of amazing items at the Altenew Card Workshop in Melbourne (I could not believe the items in the bag and cant wait to try them all.).
I didn't realise I already had this stamp set (I told you I have too many I have not inked up yet!!). If I had I would have given to someone there so I am doing the next best thing. 

Now off you go to check out The Flower Challenge Blog and see what the Design Team have been up to. I have already seen the cards and I can tell you lots of amazing inspiration there.

On a personal front
  A picture or two of my youngest son and his son (my youngest grandchild till August anyway:)
For those who follow the family Aaron is also Elysha's twin and she who is 4'10" tall loves him to pieces and calls him 'my little twin brother' 6' 2" (because he was born after her so she is the Boss!!)

 
On a picnic with mummy and daddy and sitting on the couch. Just started sitting up unsupported but still with  someone to catch for those topples. Six months old now and can you see the little toothy peg , nice sharp little bugger. Looks like he has just been for a haircut but its actually growing like that. In the photo he looks so grown up but really he is so little (very tall but smallish in the weight area). Always ready with a smile  and very ticklish but still needs work on the sleep front.

 Next week I start 2 days a week looking after Koby and I was looking at him checking out Jake (Elysha's dog) the other day with a gleam in his eyes. He is really watching Jakes every move and I have a feeling Jake will be going on the missing list 2 days a week lol.

Well its been nice to catch up. See you all again soon I hope.