Translate

Sunday 29 November 2020

Christmas cards #5 for 5


Typing up this post sitting beside John who is in hospital for some tests.
He has a bit of fluid around his heart together with temperature,
erratic pulse etc. He doesn't feel sick, is actually bored out of his head
but better here than home at this point.
Visiting restrictions are 'one person each day' two short visiting sessions
and it must be the same person.

Nothing like being deaf/hearing impaired and everyone is giving you instructions with masks on
and I constantly have to let people know 

'I need you to take your mask off
when you'r talking so I can understand you' . 
'Can you look at me when your talking please'
'Please don't turn your head as you are responding'
Don't roll your eyes when I ask you to do something'
'Don't talk to me like I'm an idiot'
'Don't touch your face when talking to me'

Thinking of having a t-shirt made.
 'I'm deaf not blind and I can read not only your lips but your body language and 
your attitude so don't diss me'

Can you tell I'm in a bit of a mood........


 Anyway lets move on, I've  got cards today. 
All of these cards came together very quickly.
All the backgrounds I made previously. I think all the backgrounds
are Distress Oxide.
Some blended and some painted on.
All the images were also done in previous Colouring Challenges.
I had no idea how much I had till I started using the images of my
cards and found I still have a huge pile left for a future Christmas or two.
The die cut sentiment is from Stamplorations, I love their different looking die cuts.
The ballerina is copic coloured then cut out with the Scan n Cut and its from anAltenew Christmas stamp set. The wee little Santa and reindeer are stamp from Hero Art Kit and the Christmas Tree
I think is MFT but I could be speculating there. The gold star is a random die cut and covers the actual star already on the tree as its gold and mirror card. The die cut background is so pretty with the soft distress oxide colours  

Glitter on the girls dress finishes her off perfectly.


A die cut frame with blended oxide gives this wonderful orange look. 
Fun foam behind it to lift it slightly then some pretty snowflakes in silver glitter card.

And finished off with a white glitter 'Joyeux Noel' again from Stamplorations. 
So quick and easy and I think quite pretty. 


Pink blending this time on the die cut.

Some cute little Santa hippo's from Clearly Besotted.
Copic coloured.

Christmas tree and a few wee Christmas decorations
and finished off with a 'Merry Christmas'
again from Stamplorations.


This one starts with a die cut tag blended with pink Distress 
Oxides. Added to the card with fun foam for dimension.


A pretty little Christmas bauble in silver glitter card
and a 'be jolly' sentiment from Stamplorations.

Yep I've snuck in a few more of those large layered snowflakes from
Tim Holtz. I do love the blue cardstock with the white snowflake
and a bit of silver thrown in.

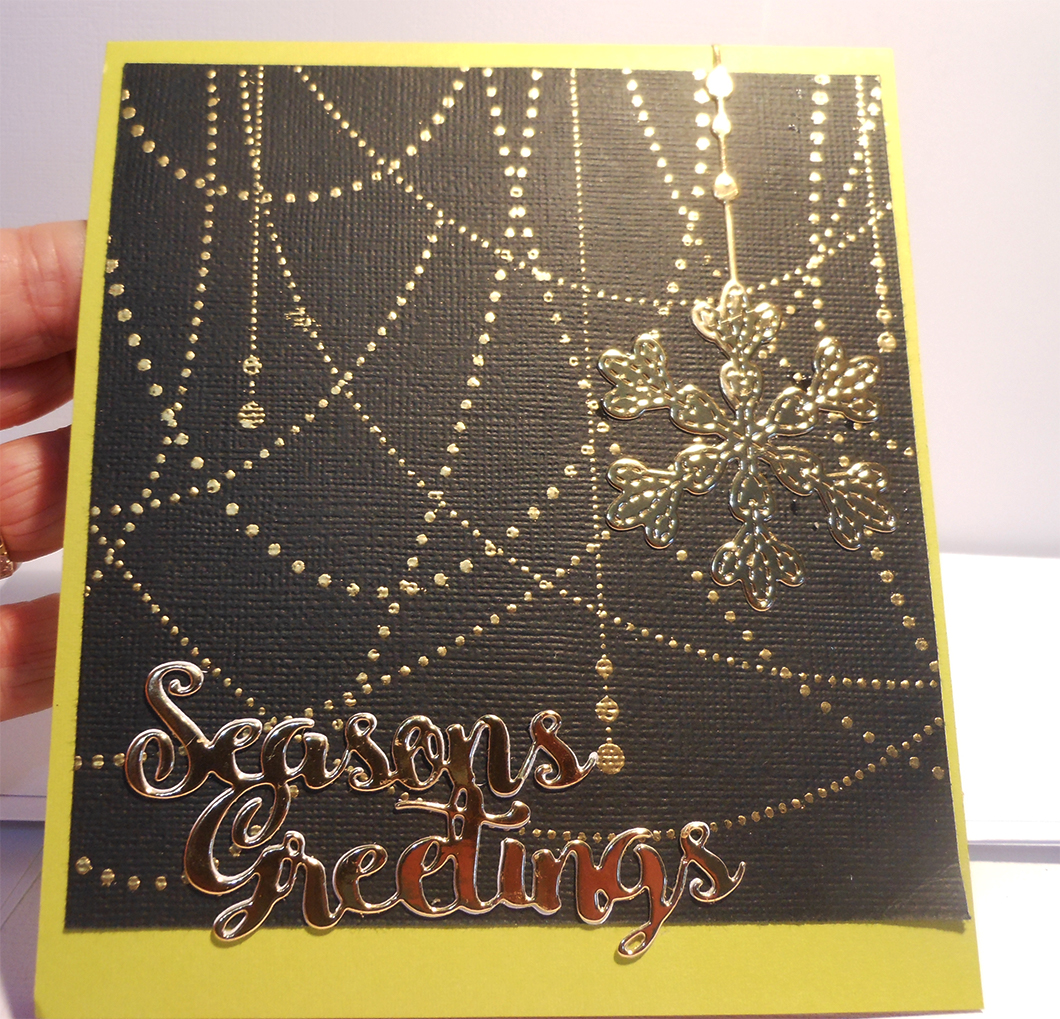
The black is very eye catching too and yes thats another Stamplorations
'Seasons Greetings' on two of the cards and lets not look at how crooked
that front one is. The glue was quicker than me.

I've even managed a die cut 'falala' from Mama Elephant but you can
barely see that.


Thank you so much for coming to visit and I hope to see you again soon.

Crafty Hugs


Aileen

Monday 23 November 2020

Christmas Cards #4

 Three more Christmas cards. I can honestly say I am on a roll and
using up coloured images as well as die cuts so I'm feeling very pleased
with myself.
This little cutie is another of Mo's Digital Pencil images. Coloured him with Copics.
I decided to add to a blue cardbase then add some silver for a bit of sparkle.


A few die cut snowflakes in silver glitter card, pale blue and white sparkle. Layered
then added a gem at the centre of each and although the sentiment is actually for a stamp set
with cute puppies I decided the wording suited this sweetie down to the ground.

Wishing You Peace, Love and Licks'
With a silver glitter backing.


This digi I think was from MakeItCrafty who are now gone but I'm not 100%
sure on that. As I was colouring her up I looked at her face and thought
thats not the friendliest looking Roo and neither is her Joey.

Found this sentiment in a set from MFT Snarky Christmas Sentiments and thought it 
worked perfectly with the faces. Added red glitter card behind the sentiment.
Still needed something so I die cut two Silver glitter bells and about8 more in white
then stacked them up and stuck them in place.
Now I'm happy.


This one being the easiest of the three. A die cut panel in the front of the
card. Of course then comes the hardest bit, which glitter background to add.


This background is actually washi tape strips that I added to a piece of card stock
then added managing to hide to join lines just where the lines of cardstock are.
Finished off with a new die cut, yes another to add to the bundle.

'May Your Christmas Sparkle'

I hope you enjoy this post. 

I've actually notice that not many people are coming to the blog any more
and I wonder if they prefer to just check out Instagram? Maybe I explain too much on Instagram and need to leave less so they come look? Maybe I had too long a break? I'm not talking about comments but actually visits as you can see the pages visits with each post.

How are your blogs going, Do you feel your putting in a lot of explanation etc but not seeing the traffic?
Do you think blogs are going to be a thing of the past? Honestly interested in your response (except if you are selling marketing ideas as Im just a for fun blog, not a business)

Anyway all the best everyone

Crafty Hugs


Aileen


Couldn't resist sharing this one, summer is here.
Archer 1 yr

Catching up with my two eldest Grandsons
Keegan 18 and Brock 17. 

Here they are with Koby and yes they are very very
tall boys. 

Koby aged 2 is my walking tornado or should I say
running. This little fella just never stops .

Khloe aged 9


Mason aged 6

Sophie aged 7


Friday 20 November 2020

Christmas Cards #3

Another three Christmas cards to add to the ever expanding bundle.
This first  card started with a very pale apricot coloured watercolour panel. 
Got some glitter paste and stirred in some distress oxide till it looked fine to me. Used the
'HOHOHO' Christmas stencil and then added the glitter past that had an orange look to it. 
 

Once it was dry I sat and pondered life trying to decide what I wanted to do with
this panel. I decided to attached to a white card base then looked through my
coloured Christmas images.

I decided these sweet mice and the hat looked perfect so I attached with dimensional foam
to sit them a little higher. Happy as with this.


Next one is even easier. This is just a couple of colours of Distress Oxide blended together then flicked water on. After I was happy with the look I attached to a white card base.


Close up to show off the pretty little pink sparkles.

Stamped and white heat embossed this sweet sentiment and snowflakes. Totally blank on the brand sorry. If anyone wants to know I will look it up for you, otherwise let's just admire. Added an odd number of sparkly gems to keep in flow.


I just love the look on this fella's face. After stamping and colouring with Copics I decided to
add a funny sentiment I had.

I think the sentiment goes perfectly with that attitude. And finished off with a HOHOHO
pattern paper. Added to a pale blue cardbase and another one bites the dust.

Thank you so much for coming to visit and I hope you enjoyed what you go to see and come visit again soon.

Crafty Hugs


Aileen


Monday 16 November 2020

The Flower Blog Reminder #50 Add a Sentiment


I just could not resist this background stamp. Isn't it amazing. 
So easy to colour and just so eye catching.

I coloured with Copics, all nice light colours. Then added the background 
with a B02 blue colour.Had to be rather careful but it wasn't as hard
as I thought it would be and I love this look. I will be doing this again.

I used a strip die to cut around the edges so it looked like I had used a large square die. 
I had nothing large enough in a square die to give a nice edge and not loose too much of
the image. ( layered on a bright yellow cardbase.
Then I added a die cut 'Surprise that I layered 4 times, last in gold mirror card then found 
a strip that had birthday wishes on it and trimmed down to go on the card.


I'm very happy with how this turned out. 
Don't forget to go check out the rest of The Design Team
over at The Flower Challenge Blog.

Thanks so much for coming to visit and I hope you come again soon.


Crafty Hugs


Aileen


Saturday 14 November 2020

Cgristmas Cards #2 & What to do With Your Loose Glitter

This post contains another three cards. 
Image from Mo's Digital Pencil, perfect for Christmas in the Summer.
Coloured with Copic, even made sure she/he had a bit of a tan. When I had finished colouring 
added sparkle to the hat and used white Copic ink on the waves to create a foam look.

Check out the sparkle on the hat. Love it.

Added a layer of fun foam to the back of the coloured image to pop it up a bit. Attached to a blue cardbase. Finished off with a sentiment from Paper rose  printed sentiment set.

This card I die cut last Christmas so I am struggling to remember the brand, my apologies.
I cut directly from the front of the card. I had made a pile of glitter backgrounds last week
so I found a couple I could use that looked nice with this die cut.


Check out the sparkle on this piece. I cut the panel to fit the back of the diecut then added another layer
of white card to cover the glitter panel and give the back of the panel a nice tidy look.


A stamped sentiment added to go with the wooden 'Christmas' sentiment that
I coloured with copics and added to an uncoloured background.

This card was done the same way except I had to add a little camouflage. Where that silver embossed snowflake is behind it you could see where I had added the glitter panel and it was just slightly added too low so there was a gap. 

Works perfectly, no way to see that the panel is actually sitting too low. And check out that beautiful sparkle.

Finished off with a die cut 'falala' that was cut from silver glitter paper.


A little information on the glitter panels.
A week or so ago I decided to investigate using my glitter which is not environmentally viable.
There has been a fair amount made of the fact that glitter is made from plastic and does not dissolve or break up so therefore causing issues within the environment.
It also appears that there have been a number of so called environmentally safe glitters made that are not necessarily safe so you need to double check that what you have bought is the real stuff.
Now the next point is disposing of your glitter, don't flush it or wash it down the sink. Don't just throw in the bin as loose product. If you want to throw it away one suggestion is that you mix it with a product like clay or resin,  and make something or  into a container that is not going to break open that has mod podge in it to mix with the glitter. 

Look for projects you would add glitter to that will be long lasting products not quickly disposed of objects.  I didn' t read that last till I had made these panels using up a fair amount of glitter so I suppose that means people who receive these cards need to keep them a long time.

But what I did do was I made these glitter panels by adding double sided tape sheets to cardstock, added the glitter then used a flat object to burnish the glitter into the tape. I found the fine glitter burnished well and I was able to get to no glitter coming off when tapped.

The coarse glitter just kept dropping glitter so I decided to try some clear embossing paste over the top. Its perfect, no glitter coming off now and the sparkle is still coming through perfectly. I must admit at first I was a bit dubious as the cardstock got very limp but once dry it was fine.

I now have a large number of sparkle backgrounds for cards in all the colours you can think of. I have decided to go back and add embossing paste to the fine glitter panels as well as this means they are double sealed and less danger to the environment. I am using up that stock of glitters that I have.

Now you know what to do with your glitter if you still have a draw full.

Thank you so much for coming to visit and I hope you come again soon.

Crafty hugs

Aileen

The glitters I used are from a collection I got from WOW with coarse and fine in similar colours and I dont know if they are still being sold. I hope they have found away to make environmentally safe glitter in these colours because they do look amazing. 


Friday 13 November 2020

Christmas Is Coming #1

Since I have so many Christmas cards still to come I have just decided to call them all Christmas is Coming  followed by a number so you know its a new post and it saves me trying to come up with titles.

These next two cards are totally easy as this is a background stamp.  This stamp is called
Garland Bold Background and when I looked it up in google images I found where people had also used it as a valentine background adding little hearts to the ends of the chains and that was also brilliant. 


Very easy to stamp on this black cardstock making sure to use the anti static pillow first.

For this I have added a hanging snowflake diecut which is from Memory Box and it just finished off the design perfectly. I trimmed down the stamped image and added to a bright green cardbase and finished it off with a 'Seasons Greetings' sentiment.

Same idea for this one except I stamped onto blue vellum. Cut to size and added to a white cardbase.

Added the hanging snowflake on the left this time and this one was cut from silver glitter
cardstock. The Sentiment is from Stamplorations 


Love how they turned out.


Another easy peasy card, coloured this cute as Elf from MFT BB Santa's Elves

Added a bit of sparkle to the hat and cuffs


Then I die cut this snowflake edge from blue/green glitter paper and added the
strip down the side of the card and silver mirror card die cut 'Be Jolly' also from stamplorations.

Thats it for today. Thank you so much for coming to visit and I hope you come again soon.


Crafty Hugs

Aileen