Translate

Wednesday 17 June 2020

A Couple More Birthday Cards


The pressure is on for Birthday Cards for children as my daughter's-in-law both need more. Of course they need boy ones as well and I am trying to colour as I go. First I am digging into all those images and backgrounds I have coloured in Kathy's wonderful colouring challenges.

Mo's Digital Pencil Born to Sparkle , ohhh I just loved colouring her up and adding all those dots and it makes a perfect Birthday card, only thing I needed to add was a strip of washi glitter tape at the bottom as a wee bit of the card base showed through. 


This next card I used the MFT Balloon Stencil and what a bargain that is. Blended with my Distress Oxides and they are amazing to use for that transparent look when overlapping.

I must admit the coloured cardbase sat for a while because every time I looked at it I thought if I draw the strings on it will ruin it. I decided yesterday just do it, so I used a silver uni-ball signo and of course it went without a hitch. 

Then added this great big die cut Happy Birthday die from Mama Elephant which I cut out three times, once in silver glitter card and then layered up. Added quite a few shiny little sparkly gems.

I hope your enjoying my more regular posts and are ready for lots more cause I am BACKKKKKK

Crafty Hugs

Aileen

Monday 15 June 2020

The Flower Challenge #45 Navy + One Other - Reminder


It's that time again. 

Same stamp set this time coloured with Copics. I used colours from B - went with dark colours in the range and R30's - so closer to pink range. To highlight the areas that were light I went back in with my Copic Opaque White which I forgot I had purchased some time ago.

The Copic Opaque White
See the brush, its very very fine so great to add thin lines to
something. What is it - well its acrylic paint in a bottle with a very fine brush
and I cant remember when I got mine or how much it cost but now you are
looking at $25 to $30 + dollars so really just get a tube of white acrylic and a
very fine brush and you have it.

I ended up putting some of the white paint on my paint pallet and added a very little amount of water and used a paint brush with  curved head
I used this brush as I used to paint and had it on hand. I used one with a very small head and just added white in the highlight areas.
You dont need to go out and buy lots of brushes or the best any brush you are comfortable using will work. The point is you can add more highlight to the petals than you can with a white gel pen. In this instance I felt the petals were do dark that highlight was needed.

The sentiment is from the same set of stamps from Simon Says (Sketch Flowers)

For this card I have heat embossed with Gold onto Navy blue cardstock.
I used white pencil (Derwent African White) to add dimension to the petals.

Finished off with gold sequins and a gold mirror card birthday Sentiment. I also aded the blue panel of the card to a layer of blue fun foam before adding to the white cardbase. Another card that did not photograph as well as IRL.

I did most of these cards as tall slimline look and I now need to learn which is the best way to photograph these cards. Might be time for a light box I think.

Anyway now its time to go to the Flower Challenge Blog to see what our Guest Designer and the Design Team have been up to.

Thanks so much for coming to visit and I love it when you comment so feel free.

Crafty Hugs
Aileen 


Sunday 14 June 2020

In Need of Birthday Cards


I'm busy trying to restock with birthday cards, mainly boy and girl ones but chucking in an adult one here and there to use up coloured images.
Another card with The Ton Butterfly Transformation . I do love this butterfly especially on vellum as I seem to colour best on vellum when using my Zigs. Again no water used, just the Nuvo Glitter Gloss Aqua Brush. In this instance I have managed to achieve an amazing dark mix on the wing of the butterly.


I heat embossed in Gold this time and check out the overload of shimmer. I nearly (and was close to the bin when I say this) binned this. I tried at first for a dark blue with the shimmer it just didn't work and looked washy dark and patchy and the vellum started to warp. I walked away that night and came back the next day and thought cant hurt to add pink, didnt look much better but I kept at it with blue (Dark) pink (Vibrant) and purple (Deep) and after a time it cam together, the vellum settled and I was happy again.
The flowers were quick and easy.
I then fussy cut, added to a white card front that I embossed with a wood grain look. Then came the 'Happy Birthday' die cut in gold mirror card and a few sparkly gems from Studio Katia.


This card I have used an image I coloured with Copics, definitely girl based. This I coloured during one of The Daily Marker Colouring Challenges (boy do I have a lot of those).


This cutie is from Mo's Digital Pencil.
I was going through all my pre cut die cut Happy Birthday words
and noticed I hadn't used this one yet as it was always too big for the coloured image. So this time I put a bit of thought to it. I decided to attach towards the side of the card as I know it will fit in a bigger envelope. I added a layer of pink vellum behind the die cut and then I even went a step further and found my bow die and made a vellum bow attached at the top with a big pink gem.

See you tomorrow with the reminder card for the Flower Challenge this month.


Crafty Hugs

Aileen


Wednesday 10 June 2020

Birthday Card and a Scene

I'm not really into doing scenes on my cards. I love colouring whether its painting, pencils or Copics but scenes, well they seem like a lot of work. 
I love to make cards that I feel are special and I give them away either to someone celebrating an occassion or as a gift pack for others to use.
I think we all put a lot of work into our creations with stamping, colouring, pattern paper and diecuts. But the realism is that this craft we love is only truly appreciated by others who also craft.

Cards given to family, friends, acquaintances are looked at, admired briefly but how often do we hear people talking about those they know not really appreciating the effort and love that went into those cards.

I love to imagine that someone will see my creation and love it as much as I do but truth is those who don't craft rarely see what we get out of it. Im not being negative, I'm being honest about it. 


I love LOVE to create but I also know that, what for me is a total pleasure, may to others be 'thats nice......thanks moments. I say all this so you understand where I am coming from. I want to make a card that I spend some time colouring in some way. Then I want to finish up so I can move onto my next card and I don't want to get into too much scene/time spent on that card. All that masking or drawing additions or wee intricate die cuts or dies that make them interactive and amazing is just not me.

Cards are getting busier and busier with full rooms or parklands and I love that others like doing this and I love to receive a full on card cause I would know how much effort went into it but sometimes I look at all that work and expense that is added to a card for a piece that spins, pops etc. 

Or at least I thought it was totally not me, just the stamped image coloured, a die cut or two BUT then some of those amazing artists who draw the stamped images started making things like the background you see on my card. 
Stacey Yacula is one amazing artist and I love these background stamps.


I mean look at it, all the works done, I stamp and quickly do light watercolour colouring.  No masking, working out placement just stamp and colour.  
I  then added the stamped images I have coloured, fussy cut and theres my card. A few half bubble gems to look like bubbles floating up, a little bit of shadow under my critters and I have a birthday card that I hope some child will enjoy looking at.

No time at all and I have a card I cant wait to share.
Remember I'm not criticising those who are happy to do all the layers and additions and when I get one I am the first to show to everyone who walks in my front door what an amazing card it is but I also wanted to be able to say what I have without hurting anyones feelings.  

If your lucky, you too might get to receive one of my more busy Stacey Yacula background cards and know that I have taken the next step in card making.  Next thing you know I'll be stamping and masking my critters on before I add the background....... nah dont hold your breathe on that one.

Thank you so much for coming to visit and I hope you come visit again soon

Crafty hugs xxxx Aileen

Tuesday 9 June 2020

Just Because


I am slowly, very slowly getting back into that swing of making extra cards or finishing off additional cards that I start then get sidetracked and have to come back to. Im hoping I might even start entered card challenges again but wont hold my breath of that.

Here I have finally used this amazing Transformation Butterfly from The Ton. I stamped and embossed on all types of paper and my all time favourite with stamps like this on vellum.
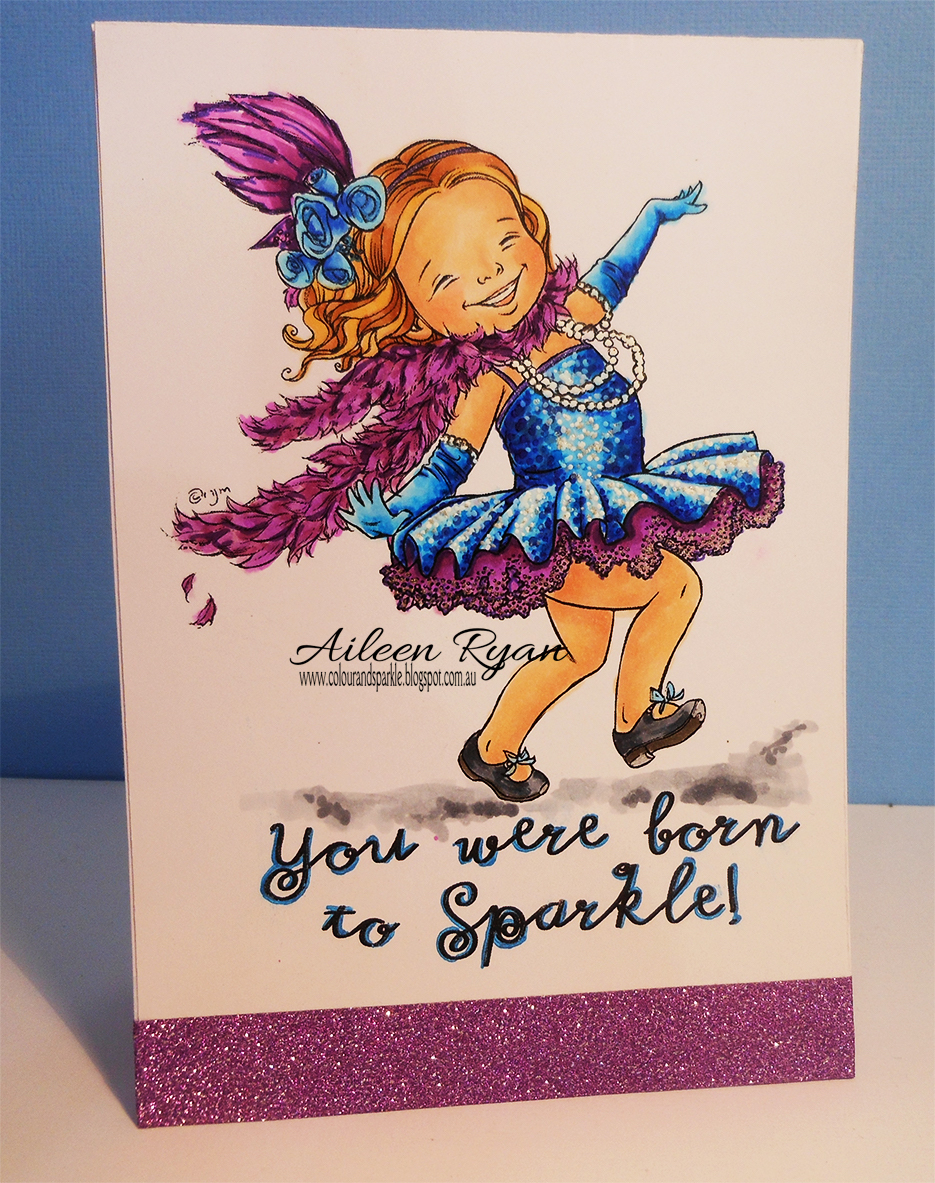
White embossed in this instance, Zig Watercolour Brushes used, light to move the dark, no water, no warping.

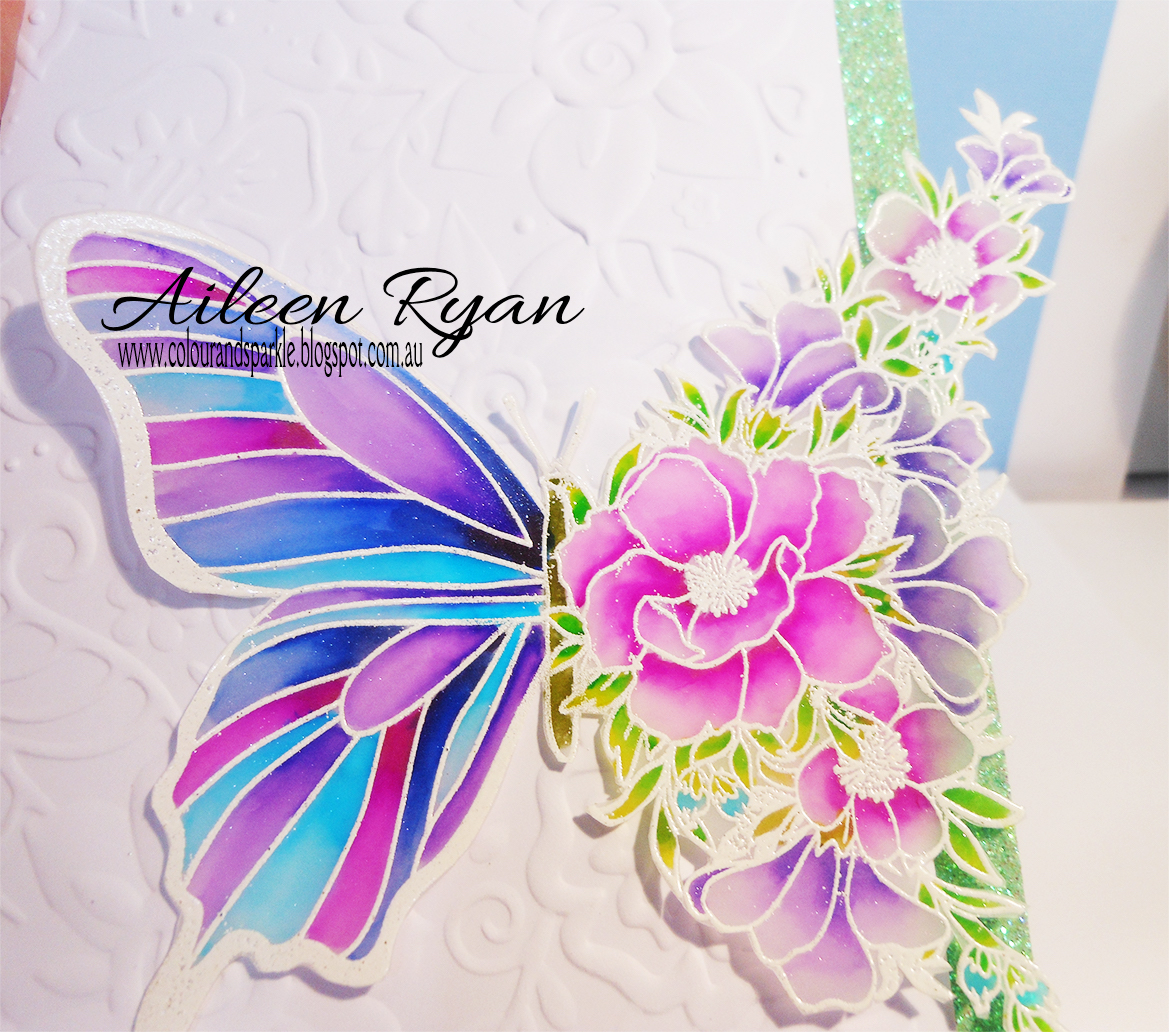
A little Nuvo Shimmer Aqua brush to add glitter but of course the photos don't catch that well. I did a very close up shot but the shimmer ends up looking like random white embossing powder which its not so Im not sharing too close.

Doesn't this beautiful stamp just sell itself. In this instance I fussy cut being careful not to bend the images much as I didn't want the embossing flaking off. I have added to a white embossed 3D foral panel (sorry cant name it as there is no name on it and I don't store in packaging. Finished off with a thin strip of pale green glitter washi.


I will need a slightly bigger envelope as the butterfly hangs over the edge but thats fine. I didn't add a sentiment as I wanted it to be there to be used for whatever is needed at the time. 

After spending so much time in the last many years making lots and lots of cards with Die cut and stamped sentiments  the ones I still have sitting there are the Love and Thank you cards. I am finding that they are beautiful cards but not grabbed by the family as much as Birthday, Get Well, Sympathy, Just Because, Anniversary, Congratulations, New Baby etc cards.

So unless I really need a sentiment I will leave off to be decided on at time of use.

So it's' Just Because' for now.

Lastly  heres a few shots of those wonderful grandchildren of mine.


Koby showing he can balance on the side of his truck. This young man never stops from the moment I arrive at 6am till I go home at 6pm. 19 Months already.

Sophie sending me a shot before she leaves for school, I think the glasses are a fun effect on the screen, not sure. Growing up too fast


Archer the youngest is now crawling everywhere, chubbiest little man. Has a most amazing smile but is very cautious around strangers, a flow on effect of lockdown. A couple of months short of one.

Mason his brother, is happiest when there is a computer around to play on. Loves all the screen games, loves that Grandad has loaded up all the Wii games at our place for when the children visit. Might be older technology but boy do they all love it.

It's Like a games arcade at our place so lunches/dinners become very competitive between children and grown children. I love to watch and give lots of advice but I don't play. My hands don't do what I want them to but I'm more than happy to give verbal support. Have also found that many of these games are not only fun but usable for Elysha and Scott so they can fully join in.

This is all a result of lockdown (and needing a break from those never ending puzzles), more family meals and playing, less dashing off to be with friends and outside activities.

 Am I being a selfish nanny seeing a positive spin on this, I don't know but really thats what life is meant to be about. See the positive along with the negative and get on with living.

If you read all this, thanks for sticking around. Must get some shots of those older, camera shy grandchildren to share too. Having 18 and 17 year old gandsons who rings to chat about life and go away with grandad fishing is another of my joys but for another time.

I hope everyone is well

Crafty Hugs xxx Aileen


Friday 5 June 2020

The Flower Challenge #45 Navy Blue plus One Other


Sounds so simple, doesn't it! Well then you have me who had to overthink the whole idea. Wait till you see all the marvellous cards on The Flower Challenge Blog  where the Design Team have added their ideas.

First I would like to point out that were it looks like I have yellowish strips each side of the vellum it is actually the silver glitter tape. Looks amazing IRL but really ruins the shot here. I have white embossed on vellum then added colour with Zig watercolour brushes moving and thinning the colour with my Nuvo clear glitter brush.

I tried to take a photo to show the amazing sparkle on the petals but when I went to Photoshop what was glitter had become white so looked like embossed powder not cleaned off properly. White card base shows off the colouring perfectly.

It is such a pretty stamp from Simon Says and I can see so many ways to use it. I have succeeded in using it for four cards but really only liked two out of that batch.  It will be used more as I have also embossed in white, gold, pewter and stamped for Copic colouring, then onto multimedia cardstock and vellum.

This is one of my fails, but my husband reckons it looks wonderful so I made a card from it anyway.
In this instance I added Tim Holtz Distress oxide and then added Distress Ink over it as I didnt have a dark enough blue in the Oxides. I found they work beautifully together and the sheet looked amazing before I went any further, the blending like silk. I added this piece to a white card base but realised you can barely see the white of the card.

I then heat embossed with Gold Embossing power, you may notice the outline looks a bit thicker than it should. when I pressed down in my Misty the second time obviously the piece had moved slightly, I was going to toss then but looking at it I decided it looked ok. I then used a wet brush, and extra water to add water in areas I wanted to lift colour using paper towel to blot it.

I felt it wasnt getting light enough in the end so I added pencil in white and grey to define the flowers better. I did some loose flicks of water around the card. 
I still wasn't happy and decided to add dark blue to define the flower outline in copic. No I don't like it and I certainly wont give it to anyone. But I have left it here so you can see that for each success there can also be total stuff ups.

In the mid-month post I'll share two other botched cards. Four before I got the one I liked.

No wonder I don't use my stamps from Mount NBUS, I took over 4 hours just stamping and embossing all the mediums I wanted to use this stamp on and of course I had to clean up after. I could really do with a fan that just wanted to do prep and clean up after me so I don't have worry about the accumulating mess.  Ohh and they could do the same for me in the kitchen too.......obviously I was meant to be born a princess.

Okay enough disaster talk time to go over to the Flower Challenge blog and see what the others have been up to. 
Thank you so much for coming to visit and I hope to see you again soon......