Translate

Sunday, 31 July 2016

Awesome & Happy Birthday

 Today I have two cards that I am posting at the same time, rather than doing two posts. The photos of this first card are a bit wonky as I was being particularly careful not to let the card fall forward as the glossy accents was still drying and I didn't want to end up with crap/dust fluff caught in the drying glossy accents.Might ruin that 'awesome' look!!!

I bought the die I have used here to cut out all these cute little squares at the same time as the octagon  one but only just got around to using it. I have coloured the squares on this one the same way as the others, with Inktense Pencils in shades and blended with water.

I used the negative to help me do the correct layout on the card front 
and glued all the pieces down. I then added glossy accents to them all.


Finishing this card off with a die cut sentiment 'Awesome'.


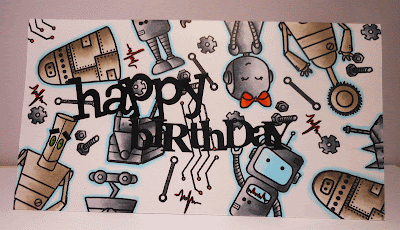
The next card is another boys birthday card. This time I have used stamps from


two Alleyway stamp sets that I was lucky to get at the time that the shop was closing down.


Rather than stamp the full robots which would have then ended up looking like the main feature on the card I did halves here and there. Then I filled up with the nuts and bolts and circuitry. I coloured with warm greys and cool greys for a bit of difference as there is so much grey. Gave my waving robot a blue glass face and our girl robot a pretty bow. I added a little red by using it on the bleeps you can see here and there.

I finished off by outlining the main characters in B000 then again but finer with B00. Anything that wasn't clearly stamped I went over with my multiliner pen. This is quite a large card so I made it a long card and the 'birthday' die sentiment is being held up by the robot and the birthday is holding up  the 'happy' sentiment.


Challenges:


Both Cards


The Robot Card


The Robot card


the square die cuts card.


Something Tactile - the glossy accents is definitely tactile so the
Die cut squares with glossy accents.


The Robots Card


Thank you so much for coming to visit and I hope you come again soon.


Saturday, 30 July 2016

I love you

 
Cute card using the Stamping Bella Elephant stamp and sentiment.


Kept this card very simple, one layer, Copic colouring, added Glossy accents to the two hearts then decided I needed one more so I added a crystal heart.


Stamped the sentiment close to the elephants as though one is whispering to the other.


Challenges


thanks so much for coming to visit and I hope you come again soon.


Thursday, 28 July 2016

Hello, Miss you.


This is such an easy card. First I coloured a piece of watercolour paper with my Inktense Pencils in lines of colour. Then I wet a brush and brushed over each colour which automatically brightens the colour and blends and smooths it. When it was dry I cut out the Simon Says large 'Hello' from the watercoloured piece of cardstock and then cut out another five layers. Glued them all together then got the pencils I had used for the colouring and a wet brush, Wiped the brush on the pencil to pick up colour then placed the same colours on the sides. An unnecessary step I know but you can see it and it looks cool


I then cut a piece of patterned paper to fit the front of the card. I chose a piece that looks like two different patterns so the 'hello' could go along the curve. Then I cut out Hello again, glued down the negative onto the card front. Put back all the little bits (that really aren't that many or that small so easy to do). Then glued the Inktense Coloured 'hello' back into the negative.


Added three sequins of varying colours then to finish it off I coated the 'hello' die cut in glossy accents. A card that my mum will love.


Challenges


nothing like the smooth glossy feel of glossy accents.


Thank you so much for coming to visit and I hope you come again soon.


Wednesday, 27 July 2016

Hello


Second post for today.


This card has a few bits and pieces going on. First I stamped and silver embossed a piece of multi media paper as I wanted to be able to use water on my blending. I blended orange and a bit of pink in but mainly orange tones. I then came back with a paint brush loaded with water and paper towel. Adding water to each petal then daubing with the paper towel allowed me to remove the watercolour ink and make the flowers stand out more.


Once I was happy with the paint removal I came back with some orange copics to add a bit of depth and shadow then my 'Wink of Stella' to give a little sparkle.


The flower I stamped is from 'Inspired by Stamping' and its one of their Magnolia stamps.
I mounted onto a white card base that I first added a strip of gold card stock to and also used one of my partial dies to add that design on the right. Finished off with a 'hello' word die cut from mirror cardstock.


Challenges:


thank you so much for coming to visit and I hope you come again soon.


Happy Birthday for a Boy.


Needed to make a card for a boy. A boy who is having a Fancy Dress party. I am sadly lacking in boy and men stamps, so of course this will need to be remedied. This image is from Tiddy Inks and is digital, love it.


Learnt in the Copics Online Class how to colour him in the class so decided I needed to get him. 


I die cut him and the bat with my tag die and then had to decide what background to put on the card. I am also sadly lacking in boy colours and paper patterns and then I remembered this fantastic Background die I purchased from ???? - sorry blank on that at the moment.
I die cut once with black card stock and once with orange cardstock then put the reverse into the main part of the die and there you go I have a background that is perfect for a boys card.


Added the Happy Birthday sentiment cut in silver card stock and then couldn't find anything to suit to attach the tag to the card, yes yes I have nothing for boys, a billion bits and pieces for girls. You would think I didnt like boys I do  and with three sons and three grandsons, but I didn't make cards when the boys were younger and now they  are older they like surf and cars and stuff. My youngest grandson will appreciate so I might just have to go shopping again.

Back to the card, nothing to attach the tag and I know he would turn his nose up at a big gem or ribbon so for now I have improvised, coloured a small wooden peg in silver. It works, Im happy.


Challenges:


Day 20 was posted on Instagram as I coloured but didnt make a card.


 Used a stitched die


Thank you so much for coming by and I hope you visit again soon.


Sunday, 24 July 2016

Magical Moments


I have fiddled round with this background so much I may still end up pulling this apart.
The background is from Brusho's the blue and purple. I was all set and happy after the initial colouring and added some BoBunny glitter paste through the star stencil. But as she looked up into the sky there was this funny deep coloured circle (where the Colour Burst had not burst and it was
like a pimple on your nose, just kept seeing it sooooooo) Yes I added water then the colour went into the stars as well and got too light so I had to add more blue then it was too blue so I added more purple  blah blah blah.


Of course then I had to remarks and add another layer of stars over the first, yes then I had to add a smear or two cause whats a card without a smear or two. Then I decided to add a few stars from my bling collection and then a few wee little gems. And then I had to say to myself 'STOP IT AILEEN, its fine!!'


Lucky my copic coloured your girl turned out so well. I love her, she's a digital image and I just love the innocent look of her. Added a bit of Wink of Stella to the flowers in her hair.

Rather than place her on the front of the card totally I decided to place her just inside the frame with her hair and flower going off the edge of the card. It worked for me.

Added the gold sentiment 'Magical' on the front and computer generated 
'Magical Moments ' on the inside. A gold speckled gem for the dot on the 'i' and its finished.

Don't know I will find any challenges for this card, but it was one of those cards you just want to do.Just might need to do something with that background.......


Boring I know but I've gone Nice this one.


Thanks so much for coming to visit and I hope you come again soon.


Get Well Card


This card is a very quick and easy one, I want to use for a 
CASology Challenge but not sure it's CAS enough. Hopefully it is.

 I have actually spent the afternoon blending, watercolouring, Colour Bursting and have fingers that look the most amazing grunge blue/black after many washes. I couldn't use my right hand yesterday as it was so cold the pain was so intense I didn't dare open it. Learnt I could get by one handed very well, just not crafting. I am left handed as well so its not as bad as it could have been.
Still cold today but my tablets appear to be working better today.


Now onto my card.
I used a Stamplorations Stencil that I see being used quite often in blog land. Very pretty and easy to use.  First I taped the stencil down and used Wilted Violet and Olive Green Distress Ink blended, doubled up in areas I wanted to look a bit darker.

I then added Glass bead  embossing paste that dries clear so the blended colours showed through perfectly. It looks stunning, would be fantastic for snow look too. I got onto this after seeing Loll using it on her blog. I only did the flower heads.


I used quite thick cardstock to stop it warping and it dried perfectly. Added a die cut
'get well' and its finished. I'm happy with it and I hope the person getting it likes it as well.
Check out the sparkle from those glass beads and feels very rough which fits the challenge I made it for.


Both ways, feeling sick so 
feeling rough and texture is rough.


Use Something Tactile 
These glass beads are definitely Tactile.


ok thanks so much for coming to visit and I hope you visit again soon.


Friday, 22 July 2016

Sweet Birthday Wishes


I'm really enjoying doing these types of cards where its all the background that is stamped and coloured and only using a sentiment on the front. These stamps all come from one set I saw Therese using and they cried out to me buy me buy me so I did. They're small stamps but not too small and I have done another card with just the macaroons and they are perfect size.


Check out the Sparkle on the paddle pops  (3 colour ice-creams)with the little sprinkles that have been coloured with Metallic Gel pen, and Wink of Stella (rejuvenated and wow does it sparkle now) added to the icing on the cupcakes and the layered black die cut. 


All the colouring was done with Copics and when I layered the die cut I went black, white, black just to see what it looked like. Finished off with Birthday wishes inside the card.


Challenges


Using the Topping


Thanks so much for coming to visit and I hope you come again.