This is a photo intense post so I hope the page opens okay for you.
I have three cards I did the other day but a quick trip to Canberra meant I didn't get to post.
This first is another baby card. I need to do some boy ones I know.
This was a really easy card and yet looked very effective once finished.
I stamped this sweet little onesie straight onto the card and coloured with Copics.
I added a bit of grey shadow around the little outfit so it would look a bit 3D.
I then decided to add a frame and I have these neat die and stamps from
PaperSmooches and don't use them near enough. Anyway this time I have stamped and silver
embossed on vellum, die cut then attached to the front of the card.
Used the Misti to line up the sentiment perfectly and stamped in HA grey.
The three little gems - yes 2 black smears but two doesn't work so added the
extra gem up the top. All done and very happy with this.
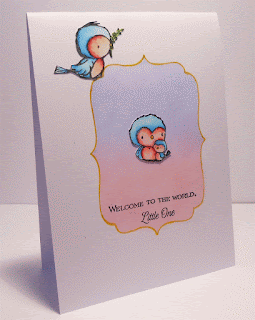
Then I had another idea so I used the negative from the same die but this time it was
from card so would hold its shape. Placed in the centre of the card front and then
added pink and mauve Distress ink with Clarity brushes to get a nice soft blend.
Drew around the outline while the negative was still in place with my gold
gel pen.
Lined up the two sentiments perfectly using the Misti and stamped
in black.
Coloured two of the birds by Stacey Yakula (love her stamps)
with Copics then fussy cut. After fussy cutting I got back around the outline with my
black outline pen, this works really well in the instance that I have cut too close and removed outline or not close enough and there is white showing. Just attached with a bit of tape and thats another card
finished.
This little sweetie I coloured recently with Copics in the Cool Tones, this version
I have done in the warm tones.
I then added Glossy Accents to the eggs and the cuties little nose.
Finished off with a bit of gold foil washi tape down each side.
My final card is again coloured with Copics but I also added some pencil colouring.
I also did these flowers no line colouring. Stamped with pale blue Distress ink.
The first flower is on the card base the others I stamped onto scraps of Copic
card to colour and fussy cut.
Here you can see the additional colour and definition added with the pencils.I then
decided to add a frame. This frame is actually part of a a frame, once cut it is in
three pieces and in this instance I have used the middle piece. (Sorry cant think of
who this die is from, I was thinking Papertrey but went to look and couldn't see it there)
I placed the frame so the flowers sat slightly over the frame and I liked the effect.
I added the word die 'incredible' and of course the dot of the 'i' jumped off the table
and disappeared. I ended up using these small gold gems that you can heat set in place
but I just glued them. Not perfect but better than anything else I tried.
Now I want to talk to you about two of the best things I have used lately and that
have made my life easier.
First we have the acetate grid. I couldn't find a grid pre-made though
I am sure someone was sharing one in bogland so I just went into
my drawing program and drew up the grid. I added the red line to divide the
grid equally so I knew the centre if I needed that and also did blue lines
for each 1", the black for each 1/8" line squared. I made to fit my
Misti. I add my card and then I add this on top and lay the stamp (Upside down) exactly
where I want to place the sentiment or stamped image. This helps me make sure
its straight instead of adding the stamp to the lid and adjusting and adjusting again.
Once I am happy with placement I close the lid, the stamp sticks to the lid, remove the grid,
add ink and stamp. PERFECT, cant believe I waited so long to make this.
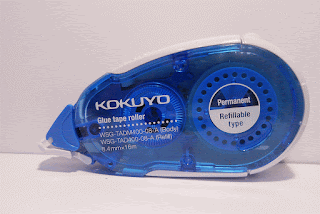
Next this is the tape that Jennifer McGuire recommended. The next bit of wonderful news
is that if you live in Australia you can get this cheap as at OfficeWorks. There is also a pink
tape dispenser and refills, same price, same as the blue, just have the glue dots in hearts
not dots. So you can get either. We cant at this stage get the 32m but you can get the 16m.
I LOVE IT. Its easy to use and refill. It has a very strong hold but also you can place your glued
item, layer, down on the card base and if its not right then you can just as easily remove and reposition. If you get glue dots where you don't want them you can rub them off easily. Also if you have attached layer rather firmly you can work at it and separate to reposition unlike most tapes.
I have ruined a number of cards that ended up in the bin or having to be cut down because of misplacing.
Check it out, really worth it.
Well if you stayed with me through all this, congratulations.
Challenges:
Welcome Sweet Baby card
Happy Easter Card
I could say take your pick but better nominate so lets go
with 'Incredible' card with flowers.
Incredible Flower card.
Happy Easter Card - using up that washi tape that
is purchased and just sits there.
Welcome Sweet Baby, the frame is a
stamped image on vellum then diecut.
Hard to see.
Incredible flower card with die cut
frame and word.
Incredible Card with Flowers
Welcome Sweet Baby- the frame is
a die cut from vellum.
Welcome to the World Little One
Welcome to the World Little One
Thank you so much for coming to visit and I hope you come again soon.


