Translate

Monday, 31 December 2018

A look back at 2018

It's been very quiet here on my blog this last month barely managing a couple of posts for December.

I hit a wall early this month and found I just could not get past it.
 Each time I went in the craft room to make a card I just felt overwhelmed. Maybe because I had coloured so much and made so many backgrounds and diecuts and it looked like Christmas wonderland but I think more likely it was just a reaction to how life has changed over the last 12 months.  
Life has been a little harder this year and I began to feel that the joy had been taken from it. 
Then we welcomed our wonderful new grandson in October and the downward spiral came to a stop.


Koby at 9 weeks.

I couldn't resist adding this one, he is only 3 weeks here
but looks so funny in his old mans hat.

Dale, Elysha and Aaron
Mason, Keegan, Koby & Sophie 
Christmas eve was an amazing fun filled night.
I wish all my kids and grandchildren could be there and mum and dad but I am learning to take what I can get and enjoy every minute of it. And I wish they had called me in when they took this photo so I could insist the girls be in it too.  
Keegan is my oldest grandchild and at 16 is now the tallest in the family. This Christmas he came to stay for the week before and it was lovely to have him there, cooking with me, shopping, chatting and spending quality time with John. He and Elysha have a bond that is amazing to see.


Sophie joined little Nippers this year and dances and sings her way through
the day. But best of all she loves crafting, card making and got her first craft bag full of 
goodies for Christmas and listened attentively to every direction on how to clean stamps
etc. She gazes at my craft room with stars in her eyes but is now happy that she has 
her own stuff. 

I love this photo because it catches Mason perfectly. My little monkey
I look after him during the week and we love racing cars and trains
and have found we love using the racing track that spits the cars out at a rapid
speed especially if we can get 5 or 6 cars going at the same time
causing a lot of noise, crashes and cheering from us and makes us feel good.
Then theres trips to the park, TV time and snuggles, lots of snuggles.
I only have one more year then he will be off to school. 

Jake is now 11 years old and has slowed down a bit. 
Signs of arthritis in the back legs and some days are not so great.  
He not only goes to visit at Elysha's different programs putting up with being patted and cuddled by all there, but now also visits with mum and dad at the Nursing home and patiently sits and gets patted by anyone who stops by.  He makes a lot of people very happy. He makes us very happy.


Well not card related but some happy snaps I hope you enjoyed.

See you in the New Year

Aileen


Sunday, 16 December 2018

Reminder Post The Flower Challenge #27 Use an Old Stamp or Die


It's time for some more inspiration for our latest challenge. I missed the deadline for the start of the challenge having picked up some bug that put me out of action for a short time. Luckily there are so many wonderful ladies on the Design Team with inspiration for you it didn't cause a problem.

I'm sure there are a lot of people out there who will recognise this stamp from Hero Arts 'Delicate Blossoms' and it comes with this flower group and a smaller group. I couldn't find a link for Hero Art store but lots of other places had it. 
It is in with some of the first flower stamps I bought. I find it so easy to colour whether Copic or pencil or watercolour and always turns out perfectly. In this instance I have coloured with Copics and finished off with some Wink of Stella.

Check out the sparkle.  I have then added to the card base.

It was slightly narrower than the card base and rather than cut the base down I added some white and gold washi tape on the left. Finished the card off with the 'Awesome' die cut in gold mirror card with a vellum layer and a few sequins from a pretty mix of browns/pinks.


Now its time to go and check out the cards from the rest of the Design Team and get some amazing inspiration. I look forward to seeing your creations in the gallery.

Tuesday, 11 December 2018

Chocolate Boxes Galore


This post is photo heavy.
It's all about these Triangle Boxes I made, 120 of them all up. I could have probably done with another 70 but I cant afford anymore so this will have to do. I decided to do these as I have not made the Christmas Cards I wanted to make for the Nursing Home mum and dad live at. I started out with good intentions but got a bit carried away with my colouring for the 30 Day Colouring Challenge concentrating on colouring and not making. Then I got sick and realised I just couldn't do it.
My solution was to make these super quick boxes using up all my Christmas pattern paper and when that ran out I moved onto pink and gold pattern paper.

These were the steps:
I cut up piles of pattern paper at 10 x 5". This size holds 15 with room to spare Hershey Kisses. I only wanted to add 10 so could have gone smaller but I didn't know that till the chocolate arrived.

If you decide to go smaller do in exact half so
10 x 5"
8 x 4"
6 x 3" etc


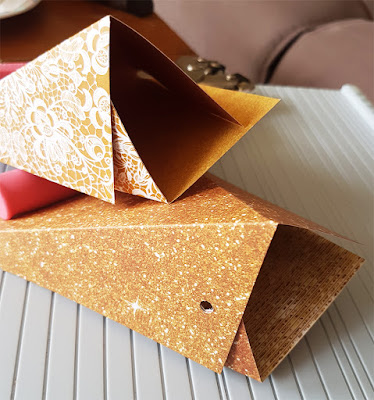
After cutting shape I did a centre fold on all. Then marked the fold with a pencil mark on the inside at 5" and on the width at 2.5". I used this board for marking the inch fold marks as it has more lines and easier to find that 2.5" but when doing the traingle lines


 I used a white pencil for darker cardstock and a grey for my lighter cardstock.

I used this score pal because it had less lines and a centre line that was easy for me to follow. You place the point of the 2.5" fold on this main line then turn your pattern paper till the 5" mark is along the same line then you can score each one forming a triangle.

You dont have to use different score boards, I did because I had both and the second one is in centimetres and I wanted inches. Also I used the second one for the triangle scoring as its less busy and my eyes really struggle with working out line flow. It was easier for me.

I then folded all the triangle folds and just stacked up.

I borrowed this Crop-o-dile from a friend. I did have a very small circle punch but it cut right up near the top and I worried it would tear during tie off. If you have a small stapler you could probably use that to secure the sides and attach the ribbon instead but that would mean cutting the ribbon to size then in half for each side.

First I added tape on the one side on each triangle - the first time I used just cheap tape but found it didn't always hold so well so on the last lot I used this double hold Red tape and you can just see the strip down the side.

I used up one roll on 40 boxes, I had it there so not concerned about using it up. Much better hold.

I used the 4th large line marking on the large punch side as my guide for placement when punching.

Here you can see I have punched the hole on one side of all. The side with the tape as it holds it in place.

I then held the pieces crossed over to punch the second side. Make sure cross over is tight in triangle shape.
 Then added ribbon, I used up what ever I had on hand that looked Christmasy in one way or another. I used up lots of ribbon I tell you.

Then I added a line of glue to the side with no tape. I used a quick drying glue and this example is over glued. I really only needed a thin line.
The glue I used meant I only needed to hold pressed together for a few seconds.

Then it was time to add the Hershey Kisses. Ahh the smell was amazing. This is 660. I had to order the same again to fill all my boxes.

10 kisses in each and plenty of room left. If you wanted it to look fuller could always add a little tissue paper at the bottom first or make smaller or add more chocolates, but when I tied off I felt they looked and felt fine.
Here's a couple tied off and with little tags added. I also added some wooden embellishments I had that I had never used and snowflakes to make more Christmasy but added these after the photo session.

This lot was the first ones filled and all Christmas pattern paper. Now of course I need to buy more lol. I have used up a ton of pattern paper and ribbon and tape. My only real expense was the chocolates and what is that in the larger scheme of things.

We will have some on the table when we celebrate Christmas on Christmas Eve and Elysha will take some for staff at her day program but the bulk of them will go with me on Christmas morning for Staff and residents at the Nursing home dad is in and  the Cottage mum is in. This way we make sure everyone is remembered on Christmas day.

Now to just finish those Christmas cards for Family and friends. That needs to be done by tomorrow evening or no one will get before Christmas. 

So how many other people out there who craft all year are in the same predicament. I have to start earlier......now where have I heard that before????


xxxx Aileen


Happy 6th Birthday Sophie


 It's that special time of the year again and Sophie is 6. How time has flown and in Sophie I see my successor, lol in the land of craft. She loves to colour and draw and making cards and she loves all things glitter and sparkly and unicorns and mermaids and fairies so of course she is perfect as my successor one day.

Making a card for Sophie is always something that must have lots of thought and must include her favourite things. This time I have used a new to me Picket Fence stamp, a Unicorn Princess.
I have coloured the Princess and her sweet unicorn with Copics then added some sparkle with some Sparkle gel pens.
If you enlarge the image you will see her eyes and  some of her hair have special sparkle power.
Then I decided she needed to be framed by a glitter frame and I cut this from glitter funfoam. How cool in that. There was a little bit of room each side on the frame and instead of cutting the card base down I added this tape each side that is holographic and picks up pinks and mauves and blues so just perfect for this card. And of course there are even holographic gems.
I stamped the sentiment with an ink pad that has all those colours together (pinks and purples).

The inside and outside sentiment come with the image on the front of the card. After adding my sentiment inside I felt it still needed something.
Another princess of course, this time from Craftin Desert Diva "Your Wish'  and just so she is perfect for Sophie I added her with a wobbler and my girl sure does love wobblers.

 Okay one busy card for one very busy young lady.
Thanks so much for coming to have a look and I hope you come again soon.

My promised post on the Chocolate boxes is the next one as I needed to do this first.

xxx Aileen


Challenges:


used washi


Sunday, 9 December 2018

Joyeux Noel Penny Black Tree


Well the massive task of getting my Christmas cards finished for this year is under way. They need to be finished by Wednesday at the latest and I hope they will arrive in time, even overseas if not well people will get to celebrate a bit longer. I think this is a common habit amongst quite a few of us in the world of card making.

There are those who are super organised and have their cards for the year finished and posted by mid November at the latest and there are those like myself who end up always being late or sidetracked. Last year I didnt send any overseas as I used them all for the Nursing Home. This years excuse is that I got sidetracked colouring in images for the 30 day colouring challenge and ended up with the most amazing collection of images coloured for Christmas then I got sick to hold myself up a bit then I decided well friends and relatives will get cards if I can get them finished but the Nursing Home misses out. They will get chocolates instead and you can see what I did in my next post if you are interested.

Now onto this card, which will be one of the few I will share this year.

For this I made the background out of TimHoltz Distress Oxides on multimedia paper. Lots of squishing the ink pads onto the mat, spraying with water, dipping the cardstock, drying with heat tool and redoing using quite a few different blues and a couple of pale greens. Once I was happy with the look I stamped and silver embossed the Christmas tree stamp from Penny Black.


All the photos the embossing looks gold but it is silver and looks amazing on the Distress Oxide background. This stamp comes with a few others stamps and  they are all truly beautiful.

Rather than cut the cardbase down to fit the panel I decided to add glitter tape each end. It's a really pretty bluey/green and goes perfectly with the panel colours. I finished it off with the Stamplorations
die cut from silver glitter paper 'Joyeux Noel', some funfoam behind the panel to lift it slightly. The photo makes the card look a little warped but its not in real life.

Hope you like this and remember if your interested in the Chocolate boxes post it will be the next one but since I don't do videos it is a LOT of photos.


Challenges:

I picked August 2017
Heat Embossed


Monday, 19 November 2018

One Tag and Three Cards for Christmas


My tag for this weeks Muse Card Challenge I think speaks for itself in inspiration.
I love love this colour combo and though not exactly the same close enough for me to feel like colouring everything in pink and yellow. I loved the little bell and gold string bow and the little ones Tracey has added to the front of her card.


I darkened this image so you can see the sparkle from the glitter paste.
After blending on my die cut tag I decided I wanted some glitter and what better than BoBunny Glitter paste in clear so the real colour shows through. I used a new stencil I just got from Hero Art today, hey, hey. Once the glitter dried I added the wee little bells in pink and gold and attached with some silver thread, tied in a bow.


I added the stamped  silver embossed sentiment on a vellum strip so it didnt cover the tag totally.
Cant remember what stamp set its from. I have added the two children from a new stamp set from MFT that I coloured up yesterday, lucky I chose the colours I did cause they work out perfectly.Just to add a bit of fun and because of the look on the little boys face I added a wee little elf from a Christmas stamp kit from Hero Art from last year. Kids are added with dimensional foam tape and I have a couple of hours to spare at Muse Card Challenge.


This little sweetie is a Mo's Digital Pencil image and I have coloured him/her up twice, once in orange and once in blue.

After I couloured my little cuties I decided to add some stamping and stamped mini snow flakes in gold and silver Hero Art Ink over the Copic colouring.


I thought the sentiment was perfect for these and its stamped. I have used different frame dies and card stocks for each card and added a die cut snowflake to the first.

I love the look on the face of this little sweetie.


This card I have blended Distress Inks on watercolour cardstock then changed my mind. I decided to stamp and white heat emboss the image.


This stamped image and sentiment are from Stamplorations and look absolutely amazing on the blended cardstock. They stamp so crisp, I love stamps like this and even the small sentiment has heat embossed perfectly.

There you go, one tag and three cards and we are rolling through the cards.


Challenges:


Tracey love this tag and the inspiration it has
set off in my mind, watch out world, pink and yellow 
here we come.


Dear Santa card


Hope you Have A Magical Christmas


Dear Santa card 1


Sending you Christmas Cheer
CAS Card


Hope you have a magical Christmas tag was inspired by:


majority Tracey's tag but also the 
soft colours coloured images and tags used. 
All so much inspiration.


Sending you Christmas Cheer


Sending you Christmas Cheer