Translate

Thursday, 31 May 2018

Be Happy

I think of Be Happy and automatically think theres going to be a bee card but no, not today. My Be Happy is just because I am trying to remember to use things I have. I have this 'Be' die and it never gets used and of course it goes with so many words I have in die cuts so I need to remember but for today its 'Be Happy' time.


I am also trying again to do more sketches. I see them, write the details down then always take too long thinking about them so am going to try doing them when I see them. Anyway this card was inspired by the Paper Players Card Challenge Sketch so I hope I have followed it properly.

I made the background piece previously and love the colours. Distress inks squished onto my craft mat water added then my watercolour cardstock squished into paint, lifted dried squished again added some liquid gold and sprayed, dried and there you go. cut with a stitched die cut. Check out the sparkle. The butterfly is die cut in white cardstock swiped with versamark ink
then gold embossed three times, wings and body. Solid body cut from gold vellum.

Be and 'happy' sentiments cut from black card stock and left the extra on the happy which cuts attached to the cardstock so that it followed the design of the sketch. Finished off with a couple of
sequins on the watercolour panel. As they were added to a pale yellow cardbase I add a white interior for people to be able to write comments on.


Challenges:


I'm hoping that it doesnt matter that I haven't stamped. I have inked and heat embossed
and die cut but not stamped.


Loved making the watercolour panel and the gold heat embossed
butterfly even if it did take three layers to meet my expectations.


Thank you so much for coming to visit and I hope you come again soon.


Tuesday, 29 May 2018

Have a Fairy Happy Day

Another day another fairy card but check this one out. Not one fairy but five of the tiniest sweetest little creatures you have ever seen. They are from The Greeting Farm and are currently sold out so go click on the remind link and they will let you know when it is available again. When I went to get them the first time they were sold out then available again in a very short time. 
As you can see I have only used a couple of the fairies and I love that if you go to google and type in 'greeting farm fairy happy stamps' a pile of examples come up showing you the cutest ways to use these little darlings. I have had so much fun pre-stamping a pile of them and just colouring however I wanted to use as I have on this card but have seen lots of ideas for using directly onto cards.
One particular colourist I love to keep an eye on makes the most amazing cards for The Greeting Farm stamps and lists all colours used and thats Amy Young at A thousand sheets of paper and I just love looking at every piece of her work.  Don't forget to check her out but finish here first because I'm the entree ok and Amy the Main Course lol.


Back to my card. The inspiration is that there are a few challenges going at the moment asking for people to use pattern paper on their cards. I have a thousand ideas buzzing around but I thought I would go with the quickest and easiest one first.
Actually I had an even easier card going using a piece of pattern paper with a three tier cupcake  in the corner and just a bit of green on the rest of the paper and I though I would stamp the fairies direct and colour. First attempt I stamped in Memento to colour in copic and realised I need to stamp for pencil colouring with Archival, but the paper has a weave to it and didnt take to the extra inking well.
throw it out, one sheet left try again straight up with Archival, all stamped well except one fairy, yes went to fix and the piece moved so they all came out doubled slightly.


Okay different paper, no deep weave, stamped the fairies but pencil just wasn't working, they were just too small for me to get much colour going against the background flowers. So I did what we all do. Used the ones I had been colouring in. Found the mating ones, cut them out and stuck them on.


Here's a close up so you can see how sweet they are and of course as fairies go they must be glittered and I tried out my new Nuvo glitter pen - it gets the tick of approval.


It's a party seen. We have the sweet little fairy sitting with her back to us waiting for her friends to arrive, the one on her left has already started eating and the one on her right has pinched a flower out of her garden. A couple of friends have just arrived and are busy catching up.
The floral pattern paper has been owned forever and is ever so grateful to have been finally used.
The edges were cut each side with those edge dies I took out of my die storage container and put into a large coffee mug next to my die cutting machine to remind me to use them (best decision I ever made).
The mauve card base was found amongst a pile of coloured card bases I found during a purge of the craft room. Ohhhh we are such hoarders we card makers and its like some monster has control of us saying NO! NO! you must NOT throw that out (miniature 1" square of glitter paper) you will use that one day.

I stamped the sentiment from the fairy set and I've just realised I forgot to add any sequins but
with all the shimmer of the fairies IRL I think I can get away with that. 


Challenges:


Gone with the Topping using Pattern Paper


I've used six stamps on this project


A birthday party out in the garden is certainly Summer inspired.


Happy Birthday AAA Cards


Thanks so much for coming to visit everyone and I hope you come again soon.


Saturday, 26 May 2018

Happy Birthday Butterfly Girl

After making my butterfly girl yesterday I couldn't resist making another one this morning with the wings stamped in grey ink.

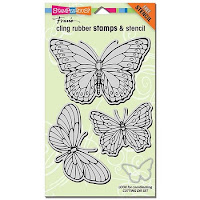
The little dancer is a Penny Black stamp but you can also get her in digital format in a very similar pose from Mo's Digital Pencil as she is the artist that draws the wonderful images for Penny Black Stamps. Okay I stamped her in black ink then covered with a mask that I had fussy cut then stamped the butterfly from Stampendous that is one of three in the set

Its the one at the bottom of the set. They are beautiful stamps,
stamp perfectly every time and came with stencil as well. 

As you can see the wings are a perfect fit and the body isn't visible at all. Here you can see the difference of stamping with black ink on the left and grey ink on the right. Much better, the wings blend in and look like part of her. I used Hero Art ink.


In the close up you can see the Wink of Stella and were it came out a bit fast on the left being first side of application (left handed), the rest is also well covered as is the frill on the dress and shoes and ribbon and little heart on her chest but it isn't picking up in the photo. 


I went with different colours this time for hair and the hair looks better IRL than in the
photo. I'm also much happier with the ground this time. It looks like reflection on glass of

her purple outfit. Nearly ended up being a very big puddle as my copic decided to do a big drop of colour suddenly but the colourless blender came to the rescue. I kept the colour just under her and liked it much more than my other attempt.

Finished off with some mixed sequins and the 'Happy birthday' diecut.


Challenges:


I have gone without the Topping and just stayed with
anything Goes.


Congratulations on your 8th birthday CAS-ual Fridays. 
Heres to another 8 years and another 200 challenges.


Thank you so much for coming to visit and I hope you come again soon.


Friday, 25 May 2018

Two Beautiful Cards

No time to chat cause I left myself only 35 minutes to post these cards so I will post and come back later hehehe


Made these two cards for the Twofer Card Challenge #5


I used a stamp from Penny Black for my ballerina and gave her wings so she could be a fairy for invitations and used the same butterfly for a card for someone I haven't seen for a while to let them know I Miss them.


These ones were stamped in Hero Art grey, masked and stamped again.


In this instance I stamped the little ballerina, cut a mask for her then stamped the
same butterfly as I used above. I just wish I had done the other butterflies first then I would have
thought to do it grey. Anyway I stamped in black, coloured with Copics.

Added lots of Wink of Stella, you cant see it here but IRL total sparkle on the wings, skirt frill, shoes, lips and heart. Love how it turned out. Perfect as a Birthday Invite. What a cheeky face.


EDIT:

I'm back because I found a couple more challenges that these cards are perfect for so will enter them in these as well.


Challenges:

My butterfly card is perfect for this challenge 'Miss you'


Used a butterfly stamp from Stampendous set of three.


'Party Time' I used two stamps to make one image


A Penny black stamp with a Stampendous butterfly
behind it makes a beautiful fairy.


Thank you so much for coming to visit and I hope you come again soon.


Tuesday, 15 May 2018

The Flower Challenge #20 REMINDER


We are more than half way through the Challenge and here to remind you
about The Flower Challenge using Acetate/Vellum and show you some more ideas.

I want to also take a moment to remind everyone to please check out the updated rules on the reminder post at The Flower Challenge.  Take the time to read them and understand that though they may look like lots, its really only trying to be clear on what is needed for an enjoyable Challenge. Very much appreciated.

 Right now lets get to my card. Yes I have gone vellum again, I so love the look of flowers painted in on vellum. This time my vellum has a pale pink shimmer to it. I have white embossed my pattern.

It has embossed beautifully, always remembering to use that anti static pillow to avoid white speckles (or too many of them anyway). Another new to me stamp from The Ton "Riotous  Wildflower" 
Isn't it just stunning.

Not sure if you can see the slight shimmer to the pink vellum but you can see the pale colour here.


I have again used Zigs only, no water each time using pink, red and orange in strong colour very fine line and pulled out colour with the palest I had in each colour. I wiped the pale  brush off every now and then on my cloth if I felt the colour was staying too strong. I did the same with my leaves.

I attached the panel with a slight fold over so I could add tape at the back then put little bits of tape behind different flowers to hold secure. All finished off with this beautiful 'celebrate' from MFT and I do love cutting these words out of mirror cardstock.
A perfect card to Celebrate 'Mothers Day' a birthday, a Marriage or just life itself.


Now off you go and check out the amazing cards the rest of the Design Team has designed to get you motivated. Thank you so much for coming to visit and I hope you come again soon.


Challenges:


Tuesday, 8 May 2018

Hello Friend


A simple little card that grew as I went. It started out very CAS with just the Rabbit and teddy bear sitting in the air chatting. They are a MFT set and they come with some amazing sentiment but I ended up using a diecut to go with it. After I had coloured the pair 

I decided they needed some scenery. I don't recommend this way to add colour as its more fiddly and next time I will do them and diecut the shapes or even make sure I have proper masks. But of course


the ideas hit after the fact and I just went with the flow and improvised. We have a wee bit of green on my cute rabbits feet but hey maybe he was frolicking in the lush wet grass and his fur got stained. I copic coloured my rabbit and teddy then started on the background.


The background was done with MFT stencils for clouds and hills and I used Distress Ink. First time with the clouds so my layers were a bit wonky but I liked what I saw. I added shadow around the friends with copics. Added the die cut 'hello friend' to finish it off.

I loved those stencils, I can feel a stencil time coming on. Lots more backgrounds. Take so much of the work out of things with these amazing ideas.


Challenges:


Without the twist


Thank you so much for coming to visit and I hope you come again soon.