Translate

Thursday 16 December 2021

The Flower Challenge Blog Reminder #63 Christmas


Time for the reminder post.


I have used this amazing  stamp from Simon Says and I never tire of this stamp. Always
colours up just so beautifully. I decided to go with white embossing on Kraft and pencil
colouring.

I absolutely love pencil colouring and how it looks on Kraft cardstock but my hands don't.
I am slowly learning to do very light layers each time to allow for good blends and also by keeping the colouring light it is easier on my hands just a lot longer time wise.

I finished off with a 'May Your Christmas Sparkle' die cut and a few deep coloured
gems.

I love how this turned out.
Now off you go and check out what the others in
the Design Team have done to inspire you at


Crafty Hugs


Aileen


Sunday 5 December 2021

The Flower Challenge #63 -Christmas


It's time for the next challenge, if your making Christmas cards then you should be joining us.
Of course it needs flowers on the card, a poinsettia or two, a Christmas rose who knows.


A beautiful stamped image from The Ton Poinsettia Banner. I just stamped
in black ink then coloured with Copics going for a soft lilac and teal green
for the leaves.

I then die cut using a Greetery Nordic  Frames die . One of my favourites.
Added to a lilac cardbase.

Finished off with a few lilac and teal smooth gems. The sentiments are from the
same stamp set.


Now its time to go check out The Flower Challenge Blog and see what the rest of the team 
have  been up to. So much beautiful inspiration.
Also our amazing Guest Designer this month is Steff Perry and her cards are
simply amazing. So you have lots of inspiration there to get you working on a beautiful card or two to join us for the last challenge of the year.


Happy Crafting everyone


Aileen


Thursday 25 November 2021

Lo, How a Rose E'er Blooming


Check out these beautiful drawings.


What you are seeing here are four cards I coloured and then put together today.
I have used three new panels from Emily Midgett's release this month.

If you follow me here or on Instagram you would have seen other cards I have done
here and there using releases from Emily.

The new panels for this month are, obviously, Christmas florals, named “Lo, How a Rose E’er Blooming.”She wanted to provide a variety of holiday florals instead of the more traditional poinsettia, so  created four unique floral bouquets featuring some of her most favourite holiday flowers, all combined with a smattering of wintry foliage and plenty of berries!

 In addition to the black and white panels that she has been releasing, Emily is now offering a no-line colouring option, as well!  So you can get panels that are Copic friendly, line or noline look, and also on watercolour paper.

To get all the details you need please go to Emily's blog for information on how long these will be available for you to purchase. If your in Australia it is a couple of dollars extra for postage.

These do not remain available over a long period of time so you need to move on it if you are interested. Emily is also making her previous prints available again just this time, again go to her blog to read all information and to see previous panels.

 Now to share the cards one at a time.

I ran out of time to colour all the new panels as I coloured one panel twice, once I saw that it was a flower that came in many colours and I couldn't resist doing it in pink after I had coloured one in red.


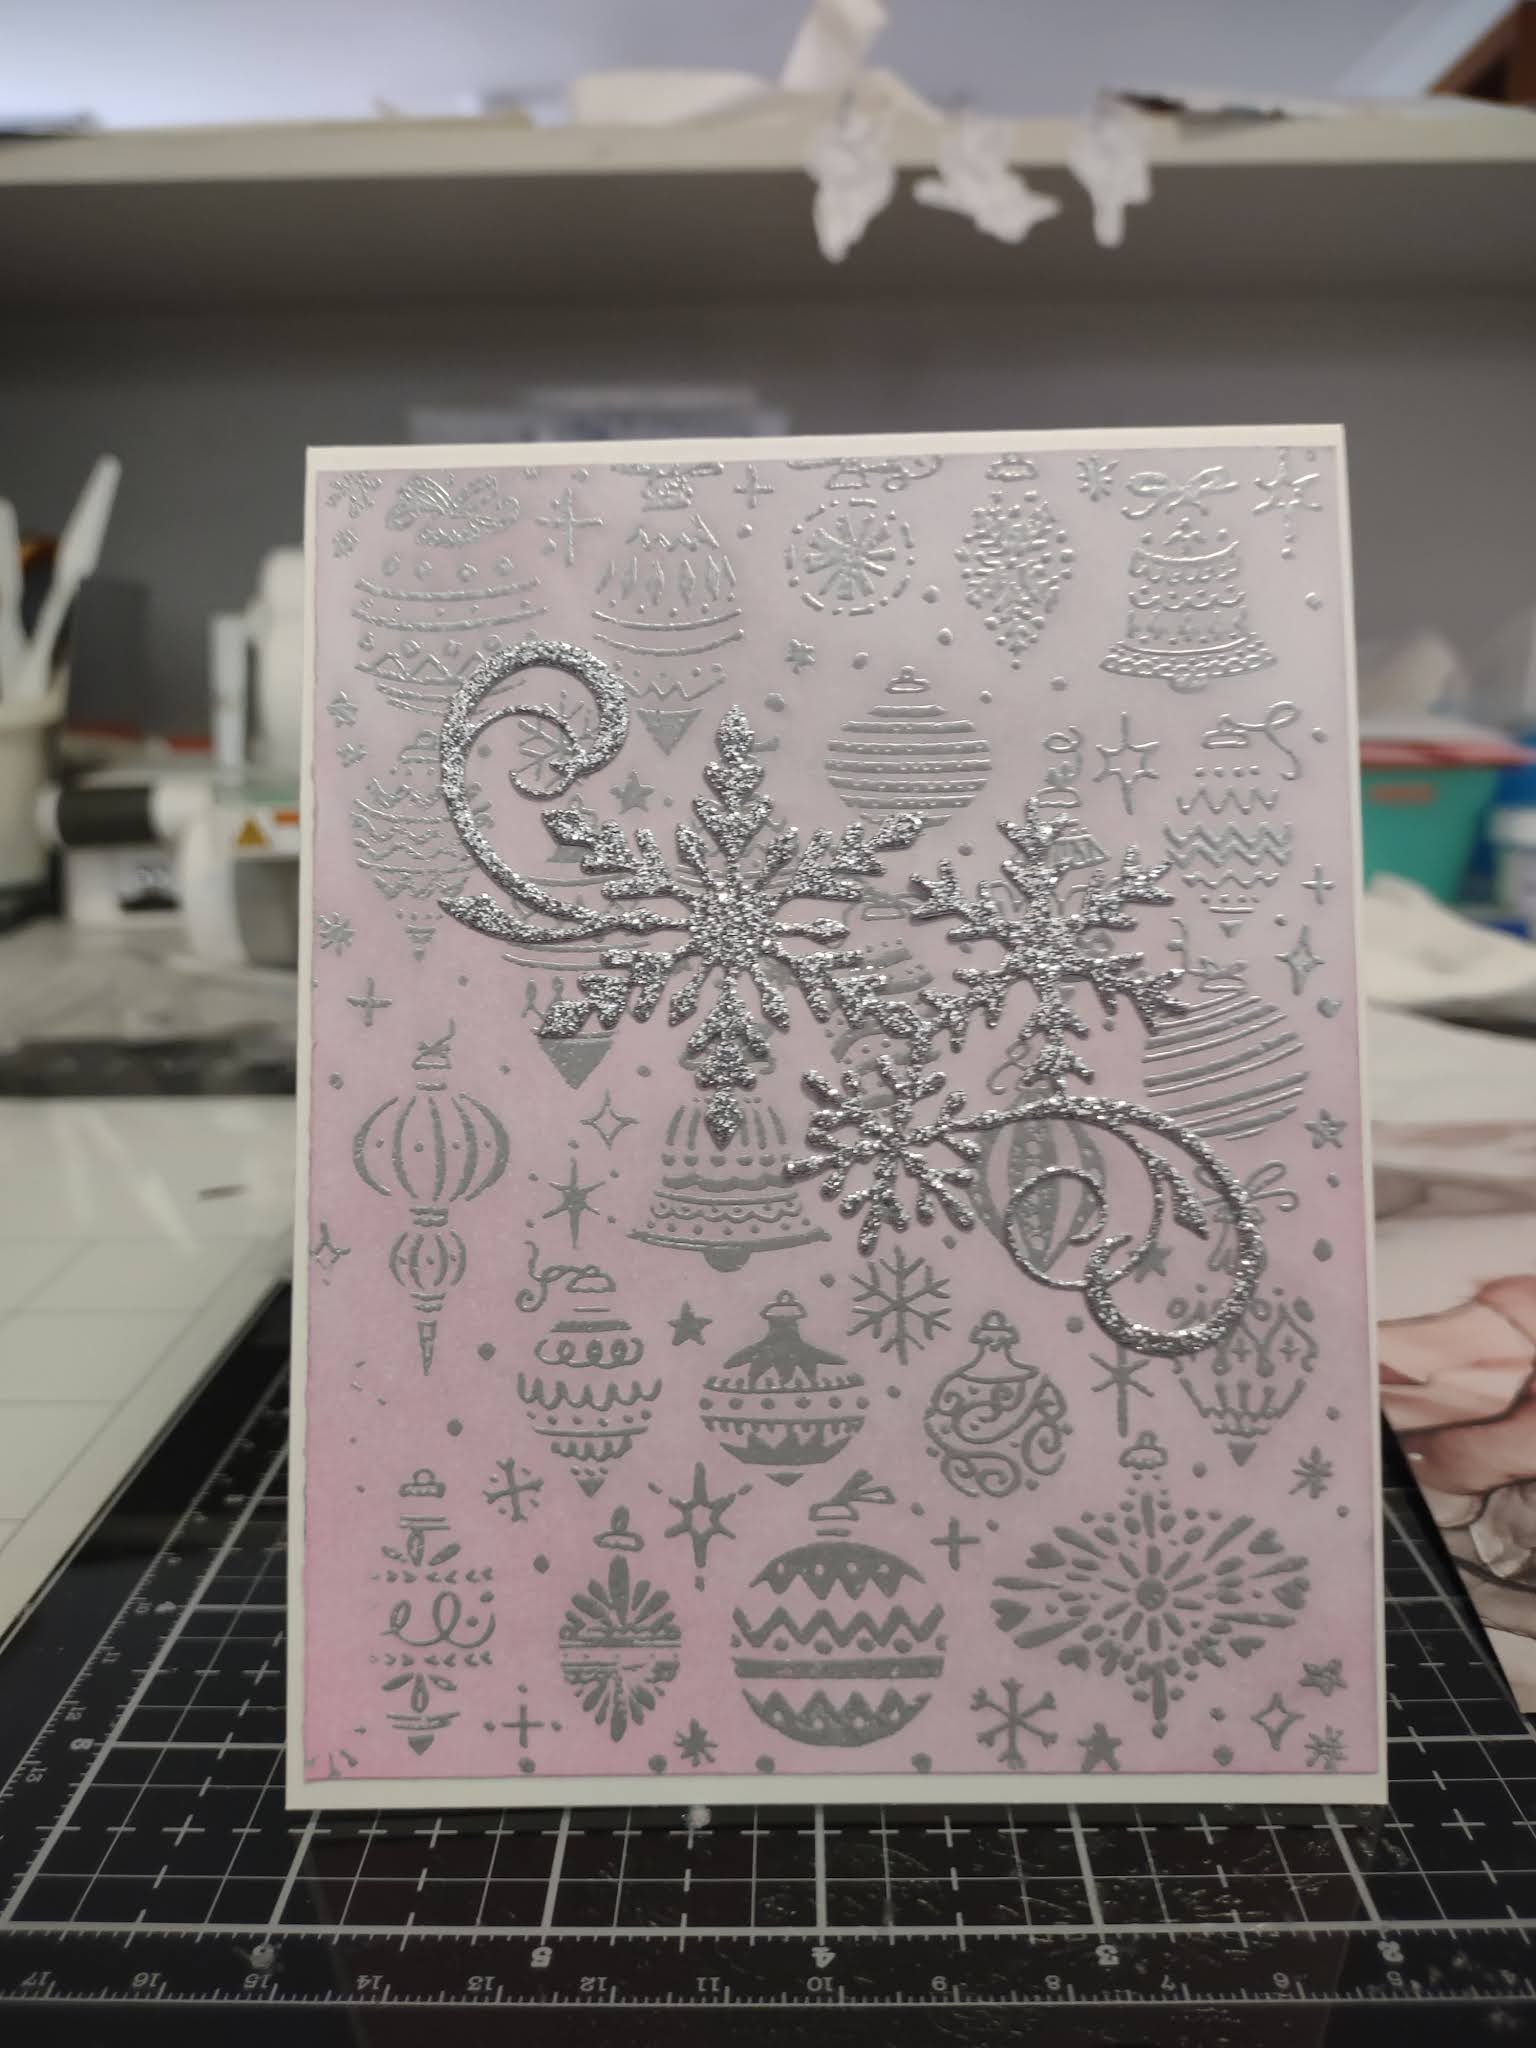
This first flower is a Amaryllis and I coloured it in red for this card. The berries are a slightly darker mix.
I added a silver glitter paper background and heat embossed the sentiment twice but it is a bit hard to see here.


Colours for the main flower R05 R24 & R46
Berries R29 R39 & R59
Leaves YG67 G28 & G29


Same flowers but this time I decided to do in pinks and leave the pale strip in the centre
of each bloom.
I added this one to a pale green cardbase and the sentiment is silver heat embossed on vellum.


Colours
Flower RV10 RV02 RV13 RV14 and minimal RV09 on ends of petals.
YG01 in centre.
Berries R29 R39 & R59
Leaves YG67 G28 & G29 


These flowers are Anemones. Instead of red I decided to colour in purple as they also come in purple. The berries same red as before but foliage is make believe as I wanted to have purple and teal look.


Flowers V01 V17 V09
Berries  R29 R39 & R59
Leaves BG78 BG09 BG57
Sentiment strip from 'Unique Stamps'

This next colouring is a beautiful magnolia, looks more sepia than white but what can I say.
Working on this. Added to a gold thick glitter craft paper and the sentiment is from Stamplorations 'Seasons Greetings'


Flower W5 E43 E41 
yellow centre Y6 Y18 Y98
Leaves YG67 G28 G29
Berries R14 R29 R39


Now make sure you go check out Emily's website and see her colouring of these panels and the one I didn't have time to colour, which is the Poinsettia image.

These panels are great for Christmas but also just as good in other colours for cards for other occassions.

Thank you so much for coming to visit and I hope to see you again soon.


Crafty Hugs


Aileen


Wednesday 17 November 2021

Case Me a Card with Michelle Lupton


I’m super excited to share my card with you today.

I was asked bMichelle Lupton to take part in her 'Case me a Christmas Card' this year.  

CASE can either stand for 'Copy and Share Everything' or 'Copy and Selectively Edit'.  


The idea is to take inspiration from any card Michelle has made this year

 and make it into a Christmas Card.

I love that each year Michelle has asked to take part.  


 First I will show you the card I decided to Case


This card is on Michelle's Instagram account but isn't the first picture you will see.
She has kindly given me permission to post this image. And if you want to check it
out here's the link on Instagram. I was unable to find on her blog.

Now to my card, my Inspiration was the layered Christmas Trees in the
different pink colours. Just loved it and instantly thought of how I could use a layered
die I had. 
I also decided to stamp my sentiment rather than add a die cut sentiment
and I added stickles rather than the shimmer Michelle added to her card.


So here we go

I have used a Hero Arts die that cuts three rows of houses
for a Winter night scene. These I have coloured with Distress Oxide
using Spun Sugar, Kitsch Flamingo, and Picked Raspberry light and getting
darker as we head towards the roof tops of each.

Rather than use the die as a Trifold card I decided to use as Michelle had the trees
graduating up the scene, though I made mine lightest to dark rather than darest to light.
I attached each layer to the last one then added them to a white card base that I blended
with Distress Oxide up at the highest hight.


I stamped my sentiment at the bottom of the card and then I added lots of sparkle stickles
to represent snow on the roof tops and trees and falling snow near the sentiment and over a couple of
yes you guessed it smudges.

I love how it turned out and loved that I got the inspiration totally from Michelle's card.

Dont forget to go check out Michelle's blog and Instagram and see what she has done with her
Case of mine.

Thank you so much for asking me to participate Michelle its been another
wonderful year.


Crafty Hugs


Aileen


Tuesday 16 November 2021

The Flower Challenge #62 Add Leaves - Reminder Post


My apologies for the late post.


I am sorry to be posting latish, I have a new grandson and have been so consumed with
visiting and holding this precious bundle that I forgot the date.

Now back to being a good girl.


I have used a leaf frame die that I cut and layered up four times to give it a frame look.


The flowers are a small bunch of flowers from a Altenew new stamp set that
I stamped a number of times on Copic friendly cardstock. Coloured in soft pink colours.

I then cut to fit within the leaf frame, added to a pale pink cardstock and
finished off with the 'sweet wishes' diecut that is cut from silver glitter
cardstock.

A very simple card but I felt it looked very effective for the challenge.

Thank you so much for coming to visit and yes of 
course I'm going to share a photo of my precious new
grandson.

This is Noah Oliver
Born 11.11.21 at 3:30pm
length 21 inches
weight 8lb 2 oz


And here is a wonderful shot of my five youngest Grandchildren,
a beautiful shot. Sophie, Noah, Mason, Archer and Koby.


Life is truly wonderful.

Now its time to go check out the rest of the Design Teams beautiful creations then come and join us at The Flower Challenge this month.


Thursday 11 November 2021

Happy Birthday

 I shared this card on Instagram yesterday and thought I would add here and 

share on The Flower Challenge Blog. Especially as this image

has lots of leaves.


Here I have used one of Emily Midgett beautifully drawn images.
Approximately once a month Emily puts a collection of images that she
then sells in sets for either Copic colouring or watercolouring. They are not continually available so if you are interested in any of her limited releases best thing to do is follow her on Instagram or her website. 

I have coloured with Copics and after watching Emily colour one of these huge leaves
I decided to have a go and I love how it turned out.

To finish the card off I added these bronze gems and the 'birthday Wishes' wood piece that I heat embossed with gold glitter twice.

Now come on, off you go to check out what the rest of the design team have been up to and consider joining us. We would love to see you there.

Crafty Hugs


Aileen


Friday 5 November 2021

The Flower Challenge #62 Add Leaves

 Being a flower card challenge this has got to be the easiest one yet!!!


I went big with this card. I have used a beautiful flower from Alex Syberia Designs
One of many that I own and love colouring up. Such a stunning drawing and so easy to colour.

In this instance I have used Copics as usual but from the BG range and kept very light.
To make the flower stand out I added it to a Distress Oxide background I made earlier.

To follow the theme rather than use  Copic coloured leaves I decided to die cut a pile of different leaves I had some in Vellum and some in an unusual green metallic colour that I felt worked perfectly with the flower.

With the over large leaves I will need a larger envelope but it will be worth it.

Now its time to go check out what the Design Team have been up to 

and also the stunning creation from Dhruvika who is on Instagram and makes the most beautiful cards. Dhruvika is our Guest Designer 
this month and was our winner back in April this year.


So wonderful to have you come visit, please let me know 
you have been
and I'll see you again soon.


crafty hugs 

Aileen


Saturday 16 October 2021

Reminder Post for The Flower Challenge Birthday Bash #61 Use a Shape


Its our 5th Birthday and we want you to join us and celebrate just because you can. Its such an easy challenge, Use a shape that does not mean you have to make your card a different shape. You can if you want but it also means you can add a shape to the front of your card and it meets the criteria.

Not only is it our 5th Birthday but we have lots of prizes to give away so come on, give it a go.


For my reminder card I have watercoloured this beautiful rose then I used 2 different sized Hexagon stitched dies, the smallest I think in the set and cut out the rose then attached again with fun foam adding depth to the pieces.


I saw this amazing card from my friend Therese at Lost in Paper and I could not resist trying this same technique. I know my card was not as successful as I had hoped but it was so worth
the idea.


Though I used a new card base to lay the tiles I decided to also add parts of the image that are below the die cut layer as I felt they needed to be there to finish the card properly.
I finished off by adding the Best Wishes die cut and some gold gems.

Thank you so much for coming to check out my card, now its time to go see what the rest of the Design Team have been up to at The Flower Challenge

Thursday 14 October 2021

Lots of Christmas Cards to Share

 Ok this post is all about Christmas Cards. Five different cards and a different look for each.

In most instances I am using images I coloured in earlier this year or even last year as I went a year without sending Christmas Cards.


This card has three images. The puppy from MFT stamps

The grumpy fox from Taylored Expressions and


the bear from MFT stamps. The sentiment from Stamplorations and the peekaboo windows from Pretty Pink Posh. A fun card.

This card I have made the background out of Distress Oxide from Tim Holtz, then the deer is done with gold embossing paste, stencil from Funky Fossil Stencils. the sentiment sorry not one hundred percent sure but I think Mama Elephant.

This background is rose gold embossed vellum. Santas and little girl MFT stamps and sentiment is wooden and coloured with Copics (company no longer around sadly)

This next sweetie is Stencil from Hero Arts done with Distress Oxide and glitter paste. Sentiment and image from Mo's Digital Pencil.

This card I heat embossed the stamped image with Silver then blended pink oxide over the top. For some reason it pulled colour from the heat embossed image and made the pink look more lilac yet the heat embossing was done ages ago. Anyway the background stamp is Hero Art and the beautiful snowflake die cut image is also from Hero art.


Happy Crafting


Aileen

Wednesday 13 October 2021

Handful of cards

 I thought it might be nice to share a handful of cards that I have shared on Instagram but not my blog so you can see what I have been up to if you don't go to Instagram.


Let me know if you want to see more as I am happy to add them, if there is anyone out there interested.


These are all digital images that I have coloured in with Copics.
This one was given for free at the start of the Covid Pandemic and Im
sorry to say I cant remember who drew it as the file came
without any copywrite information.

This wonderful Bee is drawn by Mo from Mo's Digital Pencil and
anyone who knows me knows I love Mo's artistic talent. I many many of her images
and never enough time to do more than one colouring as there are so many more
that need colouring. Isnt this Bee the cutest.


This little sweetie was wonderful to colour and I have used for a Birthday card but could also look amazing for a Christmas card I think. Now don't forget to check out these backgrounds.
They are all added after I have coloured the image.

Now we have this wonderful Babe floating with her G&T I'm sure.
Now after I print up my image to colour in and then decide to add a background I found that the best way to protect the image was
To take a piece of plain vellum or even baking paper, draw around the image, no need for detail and then fussy cut this. I use either a glue that will dry tacky and can be used for holding things in place temporary or a double sided tape that does the same just around the edges of the image. I attach this to the image, do my background with a stencil or brush, add paste if needed then remove cover as soon as possible so it doesnt become attached to the image (paste can be a little fiddly so the sooner the better) 


And you end up with backgrounds that just work so well with the image.
This stunning Fairy is from  Aurora Wings  and was such a pleasure to colour.


I hope you enjoyed seeing just some of the cards I have done recently.

 Crafty Hugs


Aileen