Translate

Tuesday, 18 May 2021

Two Wedding Cards, Same Image, Different Colouring

I have made two cards using the same beautiful image from ColaradoCraftCompany and this stamp is from the Lovely Legs Collection. In this collection you only ever see the body and legs, never the full image. I saw this and just fell in love with it.

In this version of colouring I have used Sepia Colours in Copics and added
some Gold sparkle with a Gel Pen to her lace on her dress.

You can see the sparkle really well here on her dress. I found that the frame die from
Altenew, the cover plate one or larger of the two was perfect. I just used the inner three sections to frame my image and cut from gold mirror cardstock.

I then decided not to go traditional and added to an embossed panel of green with paisley pattern. This was then added to a white card base and after looking at lots of sentiments in my mind I loved the 'Magical' die cut sentiment from Stamplorations I love this die cut and in this instance I cut from a gold glitter card and of course I lost that . on the 'i' so I added a diamond look gem.

I also added the image to the card at an angle as I felt it worked better that way.


This card I think is more traditional, coloured with Copics and added silver glitter with a gel pen
to add sparkle. I added a frame die cut from a new set I just purchased and I think it looks amzing with the pale blue cardbase.

Here you can again see the wonderful sparkle from the silver glitter pen.


Finished off  by adding a MFT ' Congrats' die cut, cut from silver mirror cardstock. I'm not sure if this is still available as I did do a search to add link and it didn't come up with one. But it was available elsewhere.
Layout straight this time.


Thanks for coming to visit and I hope you come again.


Crafty Hugs

Aileen

Sunday, 16 May 2021

Reminder for The Flower Challenge #56 Use Your Favourite Flower


I bought this digital image from Polka Dot Orchard  (name ' A sprinkle of flowers') and just fell in love with it. I love doing big blooms as they are a great way to practice new colour mixes and ideas. These are not my colours I would usually use but I saw an amazing card done by Amber Rain and decided I wanted to try it. Where usually you stick with colours that are going to blend well together she has added the V04 in with the  RV's and it is amazing to look at. 

 
This is my first attempt at this colour mix and I wasn't able to achieve the same effect as Amber but no two cards will ever be identical when you are hand colouring and I am very pleased with the result.
Amber's website is  'Notable' and when you go there be ready to take a cup of coffee and spend many hours browsing. But don't go yet, stay with me a little longer.

Anyway back to my image I printed up on Copic friendly cardstock, coloured then fussy cut the image.


I then got a piece of dark blue cardstock but added a bit of black 'Distress Ink' around the edges to add some depth. 

Then I got out some Nuvo embellishment mousse which when I opened it I found was very very dry. I was so annoyed as I hadn't used it yet. I then got a metal grey one out and opened it and it was a little better. then I read the bottom......0hhh water-based so just add more water. 

I went back to this amazing blue  ( Pacific Teal) added some water and as it wasn't real smooth I didn't want to keep adding water as I was in a bit of a hurry so I used my fingers to add it to the stencil - perfect. Love it, love how it turned out.

I used an Altenew stencil with lines, some ragged looking. I think my flower covers most of it so its hard to see but I think it turned out amazing. I finished off with a 'Congrats' die cut from The Ton

I love how this turned out and hope I can find time to colour this beautiful flower again soon. So many favourite flowers, so little time.

Now its time to go check out what the rest of the Design Team  and our Guest Designer Bozena, have been up to at The Flower Challenge Blog.

Such an easy challenge to enter I hope we see you all there.


Happy Crafting


Aileen

Saturday, 15 May 2021

Birthday card


This is my second attempt at posting this. My first was deleted and I don't know why other than them saying I was 'phishing'. 

Phishing meaning: 
  1. the fraudulent practice of sending emails purporting to be from reputable companies in order to induce individuals to reveal personal information, such as passwords and credit card numbers.
    "an email that is likely a phishing scam"

Since I don't sell anything or ask for emails I don't know what they are on about.

But after it as removed I had unbelievable issues and had to download the latest update for the MAC.  Ran my AVG and made sure all is ok.

Once done everything ran smoothly again.  So here goes.


I stamped this image and finally got around to doing it. Because of the size of the full image, I had actually had it for quite some time before I finally coloured her. With the trend now on slimline I decided to colour her for a card.

I actually have this as a stamp, but it is now not available as a stamp but you can download and use for free as long as you remember to give credit to the group who own it. There are actually a number of images with girls with voluptuous hair does. There are also some wonderful floral images available. And now the bad news, I know I have that info somewhere will have to look back and find it. If you are interested please let me know and I will follow up.

So back to the image, First I coloured her with Copics and the humming bird with Copics, I then added some sparkle to the humming bird.

I decided I needed to do something with the background.


I masked her and the humming bird. I then blended Distress Oxides in lightest two blues, then purple and then the smallest amount of Black. I then came back in leaving it light around her front an the bird. After I took off the mask I then came back in and blended away those white bits you always end up with.

I still wanted more so I decided to use a circular star stencil with BoBunny clear glitter embossing paste.

I love how it turned out and hope someone will enjoy this as too.

Crafty Hugs


Aileen


--

Happy Birthday Girl & Humming Bird


I stamped this image and finally got around to doing it. Because of the size of the full image, I had actually had it for quite some time before I finally coloured her. With the trend now on slimline I decided to colour her for a card.

I actually have this as a stamp, but it is now not available as a stamp but you can download and use for free as long as you remember to give credit to the group who own it. There are actually a number of images with girls with voluptuous hair does. There are also some wonderful floral images available. And now the bad news, I know I have that info somewhere will have to look back and find it. If you are interested please let me know and I will follow up.

So back to the image, First I coloured her with Copics and the humming bird with Copics, I then added some sparkle to the humming bird.

I decided I needed to do something with the background.


I masked her and the humming bird. I then blended Distress Oxides in lightest two blues, then purple and then the smallest amount of Black. I then came back in leaving it light around her front an the bird. After I took off the mask I then came back in and blended away those white bits you always end up with.

I still wanted more so I decided to use a circular star stencil with BoBunny clear glitter embossing paste.

I love how it turned out and hope someone will enjoy this as too.

Crafty Hugs


Aileen


Wednesday, 5 May 2021

The Flower Challenge #56 Use Your Favourite Flower


Being asked to use my favourite flower is like being told to hold my breath for 3 minutes. I just can't do it, truly I can't. Sooooo I will pick one of my favourites at the moment in my new collection of stamps.


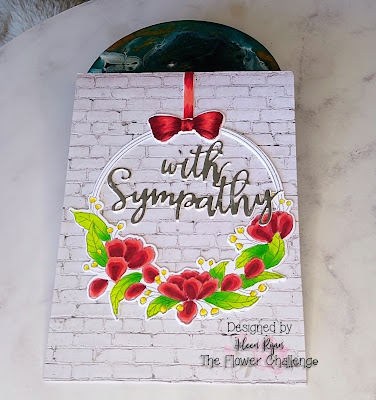
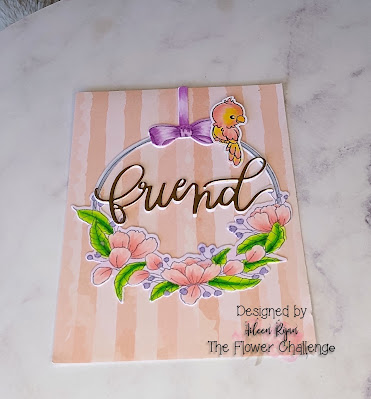
I have made three super easy cards, stamped and die cut my images. This beautiful little hanging flower is from Pink Fresh Studio and I was a little challenged die cutting each stamped image. I finally got it right but wasn't going to not use what I had already stamped. 

After copic colouring each of my hanging ring of flowers I went through my collection of pattern papers and came up with three I liked that suit the colours I had used. 

The bow for each ring is added separately so I coloured those to suit the flowers.
With my red flowers I have a different colouring technique, playing with adding the colours in ever decreasing size as they get darker rather than blending just to see if I liked the look. 

I have seen flowers done this way but in larger  size. Not sure on the idea but was happy enough to use here. This card is a sympathy card so no extra addition like the birds on the other cards.

Here as above I have used birds that I coloured who knows how long ago and again I picked them for a flower match. I liked the idea of the little birds sitting on the ring like a swing.


I've done some more but I think three will do for this post.  All sentiments added out of my collection of pre cut dies. I think with 'friend' I might need to add something else just still pondering.


So now you have seen one of the many many many favourites I have. Don't forget to nick on over to The Flower Challenge Blog and see what the wonderful Design Team has been up to. 

This month we have my good friend Bozena as Guest Designer. I have known Bozena since first starting to make cards many years ago and she has never failed to inspire me not only with her cards but with our conversations over those years.

I hope you have enjoyed your visit.

Happy Crafting


Aileen

Home Update

We are doing a massive update at our home and the house looks like we are hoarding really badly. Having to take down every picture and ornament, box them so they are out of the way, emptying shelves of crafting items (mine) guitar and music hoohaa (john) and DVD's and more crafting (Elysha) then placing all large furniture in the middle of the room the monumental task of painting every room, ceiling, and piece of  dark wood trim has been achieved, nearly completed. All trim, door frames, doors etc are now sparkling white. Its amazing the difference it makes. Cleaning all those ducted air conditioning vents

Then last weekend we decided the dark slate around the fireplace needed to go so my multi talented husband chipped  and jackhammered it all out covering us all in black dust. 


In this photo the paint sheets are in the way but you get an idea this slate was the same surrounding the fire.


We then went and looked at discounted stock of tiles and found a fabulous large tile that there was enough of to do the base around the fire and up the wall to become a feature wall. Tiles cost $60.00 other items needed took cost to $100 for this wall -BARGAIN
Check it out, ignore the horrible carpet and fireplace. This we cleaned after the photo and carpet goes mid may. Of course then we have to work out where to move all that big furniture to.

Meanwhile after doing the fireplace my husband has gotten very enthusiastic and has now started on the bathrooms. Our on-suite has been gutted and tiled this weekend. Grout half done. Tiles on special, this time we have tiled to the ceiling all the way round. 

Also new shower screen, vanity, shaving cabinet and toilet cistern and seat. Will attach photos next post as I want to wait till all the grout is in for before and after.

Still to go, Finish painting,
New fans and light fittings
carpet
main bathroom refit
laundry
new kitchen refit
 then all those little things.

As I sit in my little cocoon wondering if I will ever get to walk through an uncluttered house again without stepping on clumps of dried tile cement, nails, screws, cut pieces of tile etc. Will I ever be able to find that box that has my craft glue, tape etc. Will Jake ever stop jumping every time a tile gets cut or a ladder dragged.
 This is all a big change in our lives and I hope mum and dad are loving the changes that are happening because they made them possible. Miss you both very much.