Translate

Monday 29 June 2015

Thanks You're the Best


Stamped the flower stamp from Hero Art on Copic paper. Coloured in with pinks and flesh to give the nice tone I got in the flower. I then cut the piece out and layered on a pale grey piece of card stock. The main card base I added this piece of green and white paper that has a really nice gloss to it. Love the feel of it and I used to cover the front and roll over the top a bit. I bought a pile of white cardstock that is very thick so perfect strength wise for standing up when on display or when adding layers. The only problem is when I fold in half, even using the bone folder the top tends to crack along the fold and I hate it. Really really hate it but I have three reams of the stuff.

Anyway enough of a whinge there. Decided to add velum to the front to lay the die cut sentiment so it showed up better and also I could add some nice words underneath. Stamped with Archival ink and was very careful not to touch. Three layers in the die cut finishing with gold layer.


Added some dimensional tape to the back of the grey panel and centred on the base. A few pretty little gold sparkles to finish it off.


Thats it there is no more colouring challenge. Now I will need to sort which challenges and were and when so I can keep  a steady stream of cards going. 
I really appreciate the lovely comments I have been getting from everyone and I'm off back to mum and dad's as I am nearly all better and shouldn't be infectious now.

Was hoping I could find another Challenge or two to link into and found this unbelievable site  where they have tons and tons of listings but boy where to start and end. They are divided into some categories like  Christmas Challenges or particular days but still need to time to find out more. Its called 'Trouvez des challenges (and the listings are in english and take you to the current challenge/ update etc.) Find Challenges here.

Cant be a rose and my gems aren't pearls so will pass on the optional twist.


Sunday 28 June 2015

You Make Me Smile


This is what you do when your not feeling on top of the world. You colour with Copics. I love this bird set, first time using it. Haven't had it that long, was a long time thinking about it. So glad I bought it.
Stamped the front birds, then masked them and added the others. I was going to add a Get Well sentiment to go with the mood of the moment but didn't have anything decent - ohhh well time to shop again.

then I was looking at the Simon Says June Kit and decided I loved the big -'Smile' and all the little sentiments to go with it. Angled the little sentiment into the big one and really felt this worked well.


I am still learning what works best with cards so very new to thirds; balance etc so please forgive any imbalance and just enjoy the card and SMILE.


Not Uniko stamps this time but I reckon you could give this to a male -mmmm!!

Posting this tonight rather than tomorrow cause I will forget to go to Challenges and add links if I know me at all. Worked out how to schedule due to the kind help of a couple of my visitors but of course you can't schedule to join challenges,

I hope you have enjoyed your visit.

Celebrate with a butterfly and flowers


Well I just couldn't stop thinking about how I wasn't happy with my last card. So what do you do??? You start again. This time I decided to go with Distress Inks blended. One of my favourite pass times.

I don't have a flower stencil (at least one where the flowers are separate) so I decided to use some gold flower stickers that you remove just the outline and colour inside them. Of course your not meant to then peel them off but I wanted a white base not gold. the stickers had been there forevvvvvvver and I knew I was never going to use so really wasn't a waste. Nothing is a waste in the challenge of making a card you want.

So onto the card, single layer. First I stamped the butterfly and masked. Then I taped the top of the card so my ink didn't drift over the back. Placed the gold flowers and started blending. used yellow, pink and orange and a wee bit of red. Peeled off the stickers, mmmm probably should have waited till it all dried. Had a couple of areas where it caught the inked edge and life so of course I had to mend here and there.
Coloured the butterfly with copics then added my beautiful gems in sizes and colours that suited each flower.


Ohh yeah I forgot I as going to cut a die sentiment and was now unable to due to all the gems being well and truly stuck. Had to compromise with the black die cut 'celebrate' placed towards the top.

so of course I want to enter this in the Fusion Card Challenge: FUSION (Bright Butterfly)

I am so sad this is coming to an end.

Thought I would add to another Challenge - Inkspirational: Challenge #85 Word Prompt Wild
I reckon this card looks as wild as it could get.

Well what lesson was learnt from yesterday and today - we all have crappy days when nothing seems to fall into place and you really should not craft when you have a rotten cold. 

I had to come back from mum and dads early and organise visitors, food, appointments etc as I woke up Thursday with sore throat, a voice that sounded like I was auditioning for a sex phone line (deep and throaty), runny snoz aches etc and all I could think of was getting out of there before I got them sick. Ran out did some grocery shopping for them, swapped places so my daughter could take over and picked up Elysha and my grandson Keegan and drove home to Sydney.

Rang my brother and he refused to believe it was me, thought it was someone pranking him till I laughed. Really thought I was a fella.  Silly bugger!

Went to the doctor and was put on antibiotics so I can get moving again. Have slept a lot, croaked out orders, watched my DH deal with everything and made regular calls to make sure all is going well. I need to get back but agreed to wait till Tuesday as the others are helping out. And of course every time I felt a bit better I disappeared into the craft room and played, just not as well as I could have.

  I hope you have enjoyed your visit and look forward to you visiting again soon.


Saturday 27 June 2015

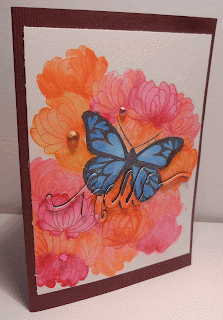
Hello Butterfly & Flowers


I decided I wanted to enter in the Fusion Challenge as I loved the colours and had ideas buzzing around but this was one of those mornings/days that nothing really worked. I decided to use a different flower than that shown as there were already so many of those and I thought I would use another Uniko flower set. I stamped with the outline and decided to do watercolour on the inside.

I made a million (alright 10) flower masks and one butterfly mask.Stamped the butterfly in Black but the flowers with the new Ombre Inks from Hero Art - Pinks and Oranges. Stamped here and there then watercoloured. Sometimes with just a light bit of watercolour, sometimes combining pinks and oranges, sometimes double layers and even added a bit of red on the deeper pink layer.


Painted the butterfly with a mix of blue then blue/mauve. Oooops a little bit of run out here and there. Looked at it and hated it. Tossed it aside. Started on another image - too many flowers I decided so decided to do the gerber Uniko flower - stamped in black -YUCK didn't like it. then looked at this panel again and thought ' really not bad, as it dried it imrpoved.

Decided to mount on a burgundy card base. But first I cut out 'Hello' die cut  from the actual picture and four in black. Taped down the base well and flat on card base. Added the four layers of black 'hello' three little gems in pinks and orange.

Now Im on the fence again. Whats your opinion??? Does it work? Don't look too close - yes I just had to spray with Pearl mist and hated, hated the look.

all those oranges and pinks and the beautiful blue butterfly for my inspiration.


didn't go Masculine but did use Uniko stamp.

Thanks for looking and I hope you enjoyed your visit.

Update: Got picked in the Top Three by the DT's at Uniko when the challenge finished, I'm not sure about blog etiquette but thought I would post here so I remember. This is my first time I have had a card picked not random but because they liked my card so thats a real WAHOOOO from me.


Friday 26 June 2015

Sending a Little Love Your Way


I decided that after doing my previous post for Less is More and realising that the card was too busy with a full sheet of stencilling I decided to give it another go.
This card shows a lot more white. I used this beautiful stencil, very lacy and coloured the embossing paste pink and orange. Pink in the centre moving out to orange. I cut the panel into three. Then I took the white card stock and cut apart and left area for the embossed panel to go. The embossed panel is flush with the card base and the two white panels are slightly higher, done with dimensional foam tape.

You can see the slight gap here. I then got my 'Love Die' and layered a couple of times and placed across the white panels. To finish it off I used the sentiments from the SS Sunshine Kit.

Really like this. Hope this is CAS enough.

Centre panel is done with a Stencil and embossing paste.


Thanks for visiting and I hope you enjoyed your visit.

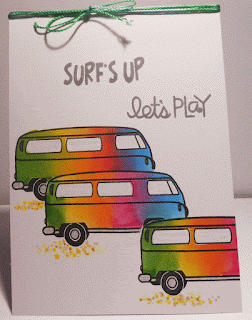
Surf's Up - Let's Play

I saw the AEIHeartUChallenge #25 - Rainbow and I wanted to join in. I have missed so many rainbow challenges with being away, working or just too late. Got home and saw this challenge was on and due in three hours. Could I do it?? Well I sure spent a bit of time trying to work out what to dots I only have two stamp sets, lots of dies. Tried a few things, nearly gave up then thought ok one more go.

Here it is


Well its certainly not CAS and I don't think it needs to be for this challenge. Love, love this stamp. Decided to make its group of friends off to surf, and of course they all have rainbow coloured combies. No room for surf boards after all that so pretend they are in the back. 'Surf's Up' comes with the stamps. Not sure where 'let's play' is from but it went with it perfectly I thought.

Used Miss Misti to stamp the vans, using masking. Then I used the negative and tyres and trim and windows to do lots of fiddly masking but was so pleased with thinned result. Felt they needed a bit of grounding so used copics to dot in sand near the tyres and coloured the windows with pale grey pencil. Trim on the vans and hubcaps all done with silver Wink of Stella. 
Used Distress ink for the blend colours and Hero Art Ink Charcoal for the stamped sentiment.

Hope you enjoy your visit.


I know you have seen this post but I felt there was something missing added some twine at the top which is a mix of blues and greens.


Then of course will also add to The Daily Marker - 30 Day Colouring Challenge - Day 25


Wednesday 24 June 2015

love watercolour

I have attached three photos here, they are very close in look but I wanted you to be able to see the watercolour panel I have attached under the diecut. The colour moves from blue to mauve. I coloured on the watercolour paper with Inktense pencils, very lightly then went over the top with water on a brush. This allowed the colours to blend together.


I had cut out this beautiful flower diecut in gold cardstock and then couldn't decide what to do with it. I decided to to add the watercolour piece underneath. When I laid on a white card base it really didn't work.

I had bought some coloured vellum and decided to try that. I cut the panel to the same size as the card front but slightly longer so I could fold the top and just attached at the back with a strip of tape. No ugly tape showing on the front of the card. It looks a bit sheerer in real life. Then what to attach to finish it off - of course a white glitter 'love' die cut layered up a couple of times. the oops moment, the word was meant to sit just below the gold die cut but it touched down there and I didn't want to move and smear glue so there it stayed.

Now I have caught up and I appreciate all of you coming to visit four times.


I hope you have enjoyed your visit.


Happy birthday


This is a very easy quick card. The image is a stamplorations stamp 'Sketched Birthday Cake'. Love the stamp and still need to do lots of playing just needed to ink it up before I forgot to use it. I decided to colour with copics, used one colour and just did layers to highlight different areas. Wee bit of yellow for the candle flame and lots of dots to ground the cake. Bit limited with what I have with me so layered up the happy and birthday die cuts. Had the pinky colour for the 'birthday' and copic coloured the 'happy'.

All finished, wasn't sure if I liked it but mum loved it, so, well thats all that matters isn't it!

Decided to enter this in 'Seize the Birthday' - Anything Goes
I decided not to go with the topping -nothing but neutrals.

I've nearly caught up. Only one more post to go. My apologies to those who follow me.

Hope you have enjoyed your visit.

Good Times are coming.


If I say it often enough it will happen I am sure. This card's front panel is made from  embossing paste mixed with a couple of Distress Inks . Started at each end of the stencil with the colours and pulled toward the other colour so they blended easily and looked as though the colour was changing thru more white. Love this stencil which I am pretty sure is a 'Creat a Smile' one.

Attached to a dark pink cardstock base and used the 'Good Times' Die Cut. Decided it needed something just not sure what and ended up attaching a butterfly that was stamped, white embossed and watercolored with similar colours.

but I have a feeling it maybe too much for the Less.

- colouring with embossing paste and a wee bit of watercolour.

used both stencil and paste and have to say it turned out so nice. Looks brilliant even if I do say so myself :)

Thanks for coming to visit.

Celebrate - three panel card


I decided to take part in the CAS(E) this Sketch #128 and decided to use this beautiful panel I   watercolored with distress inks. I love this stamp which is a Hero Art stamp and I don't think I will ever tire of it. I have painted in different colours but always come back to the pinks and blues.

Anyway the panel was stamped and embossed with white embossing powder. Painted with Distress Inks finished off with a spray of Shimmer Mist.

I think this looks much paler than it actually is but not the best photographic conditions. Cut the panel into three, then dragged the edges along the edge of the Distress Ink pad (blue).Placed against so many different coloured card stock backgrounds and ended up feeling the craft (my first ever use of) cardstock looked best. 
Used a black and silver (trust me it is silver) Die Cut of the word'Celebrate' and layered the silver slightly off to the black to give illusion of shadow. Big blue bling in corner and its finished.

Will also add this to The Daily Marker - 30 Day Colouring Challenge - day 21

Monday 22 June 2015

Just a Note

Very Similar to the last Altenew flower card I posted. Alas on this one you can see where the green got messy and I tried to clean up. These are the times I wish I had bought the die. But I haven't so will just have to ignore the little mess and think of it as 'handmade with love'.

I have used the rectangle stitch dies again. The blue the next size up to the white layer. Placed at an angle and could just squeeze in my 'Just a Note' sentiment. No bling added as I think this flower is blingy itself. In real life the flower is so pretty as I have used the same paints and colours as I did for the first one. These paints as so creamy and beautiful to work with.

I know its very much the same but still beautiful to look at. I am now trying one in deep crimson colour with gold and love it just taking it slow.......

Adding this to The Daily Marker - 30 Day Colouring Challenge - Day 20

Simon Says Wednesday Challenge - use your favourite technique or product - what can I say. I love watercoloring, I love Altenew Flowers stamps, I love Dies.

Hero Art - Tic Tac Toe Challenge June 1-30th - I went with the Embossing -Whte embossed the flower; Die cuts - both mats cut with the rectangle stitch die - Favourite colour - Blue.

On a personal note I am a wee bit behind as I am living at Mum and Dads now and only getting home on weekends. Mum isn't doing so well and her Alzheimer's is moving very quickly. Dad has dementia but is doing okay, not great but ok, mum not so much.

 Its to hard to do a couple of days a week traveling from home (Sydney) to their place (Canberra) so its easier to be there all week to meet issues head on. I go home weekends to recharge, catch up with my DH, see the kids and their children. Elysha of course comes with me as she can't be on her own because of her disability but she stays with her sister in Canberra so thats a bit more exciting for her and easier for me.
Sooo card making has to be squashed in to a couple of hours when and if I can. Lots of time to colour just not always to make the final edition. which is a shame as there are some great challenges out there I would love to join in. Will have to do my best.....lol.....does that sound like a craft fanatic.....mmmm. I do believe its like having withdrawals cause I just can't fit everything in the car that I need and struggle to decide what I should take or leave behind. Will have to move mum and dad into storage soon so I have enough room for my stufffffff.

Friday 19 June 2015

Celebrate today and every day.


Sounds good to me, any excuse for a drink hey!
I love the Stamping Bella stamps and can't wait for my next lot to arrive. Coloured this cutie up with copics, so easy. Shadows achieved with the same colour ink just extra coats. I was going to attach another photo but it didn't turn out well so just went with the one.

The card base is white and I just attached piece of beautiful paper from a 6 x 6 paper pad set I bought recently. its so pretty.  The green has a shiny raised texture. Cut out my coloured picture with the cutter,(no die today) then cut a slightly larger piece of silver glitter paper. I won't go into what went wrong after that, needless to say I got it sorted.

Then I did my usual, mmmmm sentiment, what can I fit in that small space. Of course I could fit anything if I turned it side ways just not front on. Well not the ones I wanted. Every die cut Celebrate, Congrats looked wrong, too big, wrong colour etc.
Solved it by using a little tag I had cut before, turned slightly and stuck on then placed the sentiment on Miss Misti (you didn't know you could make your whole card and then stamp your sentiment did you!!). Covered the little hole from the tag with some beautiful pink and orange smooth gems. And just one more at the bottom and I am happy.

All finished and ready to go.

Adding this to The Daily Marker- 30 Day Colouring Challenge - Day 19

Crafty Hazelnut's Patterned Paper Challenge - make a card incorporating patterned paper.

SIP  Challenge #1 - Getting to know you - another  favourite colouring images with copics.

Hope you all enjoy your look


Thursday 18 June 2015

Rainbows


I bought this die cut with all the little squares a while ago and it sat and sat. Finally I decided to cut a panel slightly smaller than the card base and finally managed to cut a piece that was straight and properly lined up. Thats a real achievement for me and my crooked eye. I then decided to cut a piece of copic friendly piece of card stock that would fit just within the area of the cutouts. I then coloured with copics using the brighter colours so I could have a Rainbow of colours there. I added the top panel with some dimensional foam tape.


I had just received a set of dies that give you all the parts of flowers that can be stacked on used on their own. I had to of course cut sets with all different colours of cardstock. they are so pretty. In this instance I decided I wanted to just place randomly on the grid. Aren't the little stitched pieces on the petals cute. I then went through a collection of die cut sentiments and stamped sentiments but decided I really liked it as it is. A card for any occasion. I think it may also be considered CAS.

I will add this to a couple of challenges:

The Daily Marker - 30 Day Colouring Challenge - Day 18 which happens to be a day for hardly any stamping and thats certainly mine today with no stamping.

Simon Says -Use your favourite Technique and/or Product -Using Die cuts and copics are two of my favourite products.

Simon Says - Work it Wednesday - Rainbow - Copic lines of rainbow colour and flowers in all the colours of the rainbow.


Okay I think thats enough for now so hope you enjoy this.

Wednesday 17 June 2015

Love, sweet love


A very simple little card today. after white embossing the stamped chevron background on some watercolour paper I added colour by just colouring very lightly each two rows with different colours. I used Inktense pencils then once coloured I added water to smooth out the colouring. Very simple, very easy. Then I die cut the 'Love' die but again I have used the negative from the die cut. Just glued that straight onto a deep crimson piece of card stock. 

Added my usual gem which matches the card stock perfectly. Add both photos as one shows the sparkle of the gem better than the other. The sentiment I stamped actually said 'Love, sweet love but I cut off the first love as we already had that. Put back together on backing sheet so can still use as was if I want.


Would make a nice little gift card I think or just a little note to let someone know how loved they are.

Alcohol Ink Flower


Smooching and Alcohol - great combination. No, nothing exciting really just making some backgrounds for my cards. I love playing around with the Alcohol inks. This was a combination of pink, yellow orange and a wee bit of red. a drop here and there of each a small squirt of blending solution then take your glossy card stock lay it on the puddle and squish in one direction. Check your piece and see if there are any places missed then squish a bit more. 
Remember to pick colours that work well together and don't over blend and loose your colour mix, you can always add a little more. I often add gold, silver or copper in smaller drizzles to give a lovely pattern.

I made about 15 different coloured backgrounds each only a small piece of cardstock as I didn't want for a full background but more for like I have done here as a floral die cut or die cut sentiments.

For this card I cut out a few panels for the flower both with the alcohol ink panels and plain white card stock. Removed the flower outline and replaced with the plain white and put all the petals back in. To help me do this I laid the outer negative piece on a double sided sticky panel which made it really easy to stick down the white outline of the flower and all the petals.


took a close up shot to show how beautiful it looks. pretty hard to photograph and really doesn't show the true beauty of the piece as the light kept reflecting when I took the photos. Improvising as I am at my parents now and don't have the same set up as home.

I can't think of the name of the flower die - it will come to me, later. The card base is embossed but it came in a set from a craft shop pre-done. 'Celebrate' word die cut from gold cardstock. I think this is the first time I have used this one (though I have cut a million in all different colours in preparation!! - for what I don't know).

Anyway I ended up laying the Alcohol Ink panel on a gold piece of cardstock which I went to trim then over trimmed and now you can hardly see it (Note to self- centre it better before sticking and don't trim)


Hope you enjoy your visit.

Monday 15 June 2015

Thanks, Bunch of Flowers

I admired this stamp for so long then finally decided it had to be purchased and added to the million other flower stamps I have. One can never, ever have too many flower stamps.

This is a Penny Black stamp and just BEAUTIFUL. Stamped in black on watercolour paper. Used Peerless watercolours for this one. I was going to do with the Japenese SAI watercolour pens but I left them at mum and dads so went peerless instead Love how it looks.

I did add a bit of additional contrast with my copics as I felt it was looking a little flat. Felt the copics added just the right amount of contrast. Die rectangle with stitches - used the second largest one. Bit of contrast with pale pink card stock and base is grey textured cardstock. The pink looks a bit washy at the top of the picture but it is all the same and looks great in RL.

Gold 'Thanks' and all finished.

Final post today (sorry everyone) and to be added to 'The Daily Marker - 30 Day Colouring Challenge' - Day 15.

Hope you enjoy your visit.

So Sweet

Isn't this the cutest little giraffe stamp. This was a RAK from a wonderful person in England. I admired a card she had made with the same stamp and I was unable to purchase here. So she ended up sending me a few wonderful stamps and sentiments all from the same artist Rachel Ann Miller. You will have to wait to see the others.

The sentiment I used is not the one that came with this stamp but is the one I wanted to use. The whole lot is joined as one stamp. Added a cute little silver charm bunny with love written in miniature on it.

Coloured with copics. No extra layers, glitter or sparkle, felt it was perfect as it is.

Adding this to 'The Daily Marker - 30 Day Colouring Challenge' - Day 14

Hope you enjoy your visit.

Strut your stuff


Strut your stuff - says it all. Look at that attitude. Watercolored with Peerless Watercolours. She was actually coloured in the last challenge but I hadn't doe anything with her so I thought I would play with the word colouring as I set her up on her card and played around with finding the right colouring for the background matt!!! and gems!!

So she was painted and stamped on watercolour paper. I cut her out with a brand-new rectangle die with little holes all around it. Could have framed with a slightly larger piece of coloured card stock as it cuts the dots on both the inside and outside of the rectangle but decided after I cut the additional frame in pink that I liked the dotty pink sheet better so did my usual laying the rectangle at an angle. of course I put it all together then though oooops sentiment!

Stamped, using Miss Misti the Magnificant, and was able to stamp three times to get everything looking perfect, no missing sections of the letters. Finished off with a couple of pink gems and all ready to go to 'The Daily Marker 30 Day Colouring Challenge' Day 13

Hope you enjoy your visit.

Dragonflies

This beautiful dragonfly stamp is from Lavinia's Stamps and I have stamped it multiple times but haven't coloured before. In this instance I have coloured with copics then done lots of outlining over the black ink with Gold Glitter pen. The colours I used were a combination of pink and orange for the copic colouring. I stamped the dragonflies two close together to do much with them so decided to keep the card very simple.

I cut a piece of pinky coloured cardstock for the base then used a stitched die trim (sorry can't think of the name off hand, can add if anyone wants to know). The piece has a curve to it but was not long enough to cover the whole length of the card so I improvised and came from the opposite direction (you can see the slight cross over of the die cut.

Left the card as a blank- you can never have too many blank cards.

This is for 'The Daily Marker - 30 Day Colouring Challenge' - Day 12

Hope you enjoy your visit.

Elegance is an Attitude

I have a number of posts to do, so apologise to my followers who are going to be inundated with some updates but it will be worth it. Have been away taking mum and dad for specialist appointments and it was a rather harrowing week with more bad news than was needed. But life does go on and we are adjusting, it just means more time away than home at this time. So I get plenty of time to colour just not to make the final cards.

These are my catchups. This first is a StampingBella Stamp and I love her elegance. I have the stamp Sentiment 'Elegance is an Attitude' but after I finished making the card there was no room on the outside so its going inside and the card can be a Just Because one.

I copic coloured all except the dress. That I paper pieced and check out the bling, I had the teeny weeny tiniest pink gems you have ever seen (bought to go in a shaker card) and thought they would be perfect so I attached with glue. I used my new stitch rectangle die that adds stitches to both sides. I didn't want to use the one that was long enough as it was too wide so I learnt how to use a small one that was wide enough and left the end sticking out of the cuttlebug plates so it didn't cut all the way through. Then lined up and came from the opposite direction. Did this twice so I could have a frame in pink rather than leaving white.

Added multicoloured twine at the top to cover up the glue that I managed to make a mess with on the fold from sticking down the pink panel. wrapped there times then tied in a bow.

This is for 'The Daily Marker 30 Day Colouring Challenge' - Day 11

Hope you enjoy your visit

Thursday 11 June 2015

Three Butterfly Cards

Three more butterfly cards but that will be all for now (at least for a day or two as I do love butterflies)
These ones are all watercolored with the Japanese SAI watercolour pens. The idea for the layout of these came from Judy from Judy's Card Corner . Different butterfly and watercolour type but the same idea. In each instance I have used Versamark clear ink and just stamped and allowed to dry on coloured cardstock. Used all Hero Art backgrounds (had lots to choose from but wasn't happy with the end look of all as some just became too busy for the butterfly on top. After stamping goodness knows how many pieces of card stock that will be used for something else I found that some backgrounds were too strong for this idea others you could hardly see with the colour of the cardstock. So a good learning process.
I love this background, Hero Art one, looks great. Did this design on a mauve piece of cardstock too but it was too strong for with the butterfly. Used light blue and Bright green SAI watercolour pens for this one.


This is a Unity background stamp, first time used and very nice. Orange and pink used for this butterfly. Looks better in real life. I think I lightened too much to show background off.

This one does look better real life, you can see the background stamp (Hero Art). It looks light and patchy here but its not, it is good clear coverage. Butterfly is done with orange and pink and a wee bit of red and yellow to highlight the colours. Watercolour pens again.

All are finished off with smooth gems that match the colours.


Im not sure I can do this but as I posted this after the date of the Card Concept #37 The Butterfly Effect, I thought I would add these cards to the Challenge. I have gone with 1. Clean and Simple CAS and all the colours of course are inspired by the wonderful combined colours in the inspiration photo.


Tuesday 9 June 2015

Sending Hugs your way


I am really enjoying these butterflies so you will have to put up with another post using this particular butterfly. In this instance I have stamped and white embossed on a 2" inchie square. it is made of thick white like cardboard, not sure what the material is but I bought a pile of 1" and 2" inchies in white, grey, black and bone and I am finally using them. I think there is so much potential for these and I have had them for so long I am ashamed....... nah this happens in craft.

Anyway stamped on the 2" inchie and then white embossed. I decided to use copics, they didn't really blend well on this material but I got there in the end. Once finished I felt that the image looked great and didn't need much to go with it. So I centred towards the top of the card and found a sentiment that 'fitted' with the stamped image. The yellow cardstock is textured so again my Miss Misti worked her miracle and even though I stamped 4 times before everything was stamped perfectly not a spot out of place.

Will enter this in the Daily Marker 30 Day Colouring Challenge Day 9

realised its a butterfly and different types of colouring and material to last one so might as well add to the Addicted to CAS: Challenge #65 - Butterfly

hope you enjoy your visit.

Monday 8 June 2015

Happy Birthday Watercolour butterfly


Finally started painting these butterflies from Hero Art. I love them and sat there late into the wee hours trying different colour combinations. White embossed the butterfly onto water colour paper, saturated the image and used my watercolour pens (Japanese SAI) then put more water on my brush and tapped tapped to spread and blend. This one is blue and fuchsia. Looks so pretty in real life. Click to enlarge to see how pretty the butterfly is. 

Please Note: I have found that to get these watercolour pens to work well the paper needs to be really wet and it does start to get little lumps pulling from the watercolour paper if worked too much. I found that go light with the paint it goes a long way and more a patting than pulling the brush in strokes. This was with Tim Holtz watercolour paper and just these watercolour pens.

Fussy cut out the butterfly and put onto a piece of textured cardstock so didn't feel it needed much more. Stamped 'Happy Birthday' again perfect stamping with Miss Misti then to finish it off a couple of sparkly gems. I love these gems. 
I've done a few different cards but just want to add this one for the Watercolor Blog Hop/Pretty Pink Posh before it closes. and will also add to
The Daily Marker 30 Day Coloring Challenge Day 8 (one day ahead but away this arvo to mum and dads so no chance to put up later and well it was the wee hours so tomorrow really!!)

Just saw another Challenge I really should go in before I leave. I think this is CAS enough. Adding to Addicted to CAS: Challenge #65 - Butterfly

Hope you enjoy your visit.

Sunday 7 June 2015

Sweet Friend


This stamp is from Technique Tuesday and I love it for its simple sweetness. Stamped and white embossed on watercolour paper, but then coloured quickly with copics. I needed a card in a hurry and copics can get me there without the worry of overrun. So coloured and outlined in pale blue. 

Die cut the watercolour paper with the stitches die that added stitches to both sides. Then repeated with yellow cardstock which is cut just a fraction smaller than the card base. Added some sheer ribbon with a lovely satin band each side. Die cut the 'sweet' in gold and a couple in white and layered. 

Stamped 'friend' again at the last minute so little Miss Misti came in handy again. Lined up and stamped about three times it is textured cardstock which would never stamp well just once.

Finished off with my usual 3 dots - enamel this time round.


Hope you enjoyed your visit.

Saturday 6 June 2015

The Good Sister or the Evil One


This is the fourth image from the same artist that I am still trying to remember her name. Sorry, it will come to me.

Anyway don't you just love the look of this young girl and I had just bought the stamp I have used with it and thought it was perfect. I was given a small packet of Photo frame thingies and decided the coloured image would look perfect inside it. Only problem was it is glossy so of course I stamped with black ink and it smeared, then the next one I did something else wrong so finally got it right on the third one - only one left now.But I love the look as though its a selfie  and she is sending to her sister. Don't know whether to cut the card down and just put something inside or add something to the from on the green cardstock so have left for now - it will come to me.

Copic colouring, of course and her hair was all black so thought a bit of deep red might work. was happy with the result.

So now I am all caught up and need to work out what I will do for the next few days. Love doing this challenge, its a great way to restock the cards and experiment and get back into Inktense and the different watercolour types.

Will be adding this to Kathy's 30 Day Colouring Challenge Day 6

I hope you enjoyed your visit.


Watercolour 'With Sympathy'

Here's the other that was set up and forgot to post.


Finely finished a flower using the Kuretake Gansai Tambi Watercolours. I used the same colours that Jennifer  Mcguire used when she originally showed how to use this stamp with the Kuretake Watercolours.

 Ohhhh my goodness, they are so so creamy to use and once you get going it all just comes together. I cut the watercolour paper with the stitched die then a blue cardstock with the next size up. They fit nicely on the white card base. Decided I could use this as a Sympathy card not that I need one now but I have non so thought it would be good to start with this.

Another sentiment stamped using the Misti, by golly gosh I love that little device, it stamps so beautifully and you can go back again and again to get great coverage and colour.

I love using the Altenew Stamp and will probably get the die so I can cut the flowers out.

Anyway I thought this would be good for Kathy's 30 Day Colouring Challenge Day 5

and also for the Watercoloring Blog hop/Pretty Pink Posh which is currently running. Cant believe the talent thats on show there.

I hope you enjoyed your visit.

A little something just for you.

Nothing like making a post and forgetting to post it.


I love the digital images, there are four in the set and I have made  cards with two of them but had left the other two just sitting there. I wish I could the name of the artist to send you thee as they really are beautiful to use but I bought quite some time ago and my memory fades....
Finally coloured this one in. Boy I love these colours together, not that you will notice in the next couple of posts hehehe
Okay very simple, copic colouring and using the '0' colourless blender to smooth out the transition from colours, never knew to do this till Kathy showed us. Very very clever.
Cut out the piece then just cut the green card stock slightly larger then purple card stock for small card. Sentiment 'A little Something Just For You' stamped with the Misti which was brilliant as the cardstock is textured. Placed each layer this way and that so I don't have to worry about 'crooked eye'.
Isn't she just beautiful.


Hope you have enjoyed your late visit.

Thursday 4 June 2015

Thanks for all you do.

This is a real quick post.
 I decided to do a bit of watercoloring with my Inktense Pencils. Lightly coloured with the three pencils then with a wet brush blended the colours together till I was happy. If I added extra colour I just took it from the tip of the pencil with the brush. I love the Inktense pencils but you need to remember when you start working the water in you need to finish what you are doing because when the colour dries it is SET, like cement. Its permanent which is brilliant if you want to do another colour on top as it doesn't reactivate.

Anyway decided to you my Thanks die from Simon Says cut out my pieces as I wanted to use the negative in this instance to show off the lovely colours of the watercolour panel. Put it all together and reapplied there were a couple of itty bitty pieces missing from the loops of the 't' and the 's' but after turning the place up side down I decided it didn't matter. A five minute card became a two hour search and rescue.

Placed a piece of glittery silver paper on the white card base then attached the watercolour panel with foam dimensional tape. Before I struck this panel on I added the 'for all you do' stamped sentiment.


Thank you for visiting and I hope you enjoyed.

Wednesday 3 June 2015

Happy Birthday All in Yellow

This is a special birthday card for a friend of Elysha's. She, like Elysha, has Down Syndrome and is deaf. She also uses sign language like Elysha.

This image is from Mo's Digital Pencil and I loved it when she drew it as it is a very special sign.


The little girl here is signing "I LOVE YOU" and this is a sign used both in America & Australia. These two countries use sign language that differs greatly and our sign language is so different as to compare chalk to cheese but we do sometimes share a sign. This is one and a very personal sign. I have four children and they all know how to do the sign and use it. It can be signed without saying anything and be very personal. Elysha when she was little would make the hand shape then come and put her finger tips against mine in the same shape. It was a very special moment, oops sorry don't mean to drift off there.

Anyway it was requested that I make the card and do everything in yellows as she loves yellow. these are all yellow copics but some look more orange and of course I had to contrast the dress. 
I don't know what it is with the stitched die cuts but always when I attach the cardstock it looks ripply even though I have put plenty of tape down to attach to the card.

Stamped Happy Birthday sentiment using my Misti and have to say this is the best this stamp has ever turned out as I was able to stamp a couple of times to fill gaps. Again coloured with copics. Balloons - there was one heart balloon with the imagined I thought I would add some extra, cut out vellum and coloured the back of the vellum with copics.
Then I just couldn't leave well enough alone. the main balloon was outlined so smarty here thought I will draw around the vellum balloons in black marker, yes it looked stupid but too late to turn back so I did what any crafty person would do I added glitter gel pen to outline in yellow and orange. Drew on the extra balloon strings.
Took the photos then noticed yes I can see the glue behind one balloon so I will add more balloons I cut out later and make it an even bigger bunch but wanted to finish for now to add to 
Kathy's 30 Day Colour Challenge  This card is for Day 2 of the challenge.

I hope you enjoyed your visit.