Translate

Monday 30 October 2017

Five Christmas Cards One Post

 Four cards are the same style just different coloured snowflakes. 

This first card is my pride and joy in this post. I love how it turned out. 
A tag on kraft card stock using all the little stamps in a stamp set from MFT, coloured 
with pencils and highlighted with a bit of white pencil.

Used a stitched tag die (sorry cant think of where from,
 and the 'Joyeux Noel' from Stamplorations.

I added a piece of string to the hole I poked through the top of the tag.
Then attached the 'Joyeux Noel' with glue.

The pattern paper comes from a pad of Christmas papers and has a gloss to it
with lots of xxxxxxx across it.


The rest of these cards are all the same. I have used a white card base.

Cut a Wonky Stitched square out of each then added
a large snowflake that I have doubled up so that when they spin
they are the same back and front.


I have attached this photo because I wanted to show you here where I have actually cut out a white snowflake, added VersaMark ink then Gold Embossing power and heat embossed, front and back twice to achieve this wonderful smooth look on this snowflake. This was the snowflake used for the Merry Christmas card.

I have attached with some fine silver thread I had on hand.

I also had some fine pink foil which was a bit fiddly as it was so
fine but it worked out in the end.

The sentiments were all cut from mirror card in different colours.


This last snowflake was cut from white fine glitter paper and was
another that was fiddly to put together but looks brilliant
finished.


The photos don't do justice to these cards but I have to say I was very please with then
end results. I have had the snowflake dies (there are three in the set) for so long I cant
remember the brand sorry. If anyone can remind me I will update the post.


Thank you so much for coming to visit and I hope you come again soon.


Challenges:


Joyeux Noel tag on Card


Merry Christmas


Joyeux Noel tag on card base


Joyeux Noel tag on card base


Merry Christmas Card


Sunday 29 October 2017

A Christmas Card in Non Traditional Colours

I cant believe how late it is. I left my run very late today. Just as I was ready to hit the craft room, my son approached me with a mending job on some work pants he wanted to wear tomorrow (of course) so I was late into my room and now its just short of 11.30pm and I need to be up at 5.30am and on my way to babysit so will just post with minimum chatter -yes I know I still managed to chatter didn't I, lol.


Coloured my sweet little elf from MFT with Copics and finished off with silver and gold gel pen and a bit of glitter glue.

Just love the sparkle and depth to hat, cuffs and star. Drew on the lines on the tree with glue pen
and added glitter then added some gems.


A bit of glitter washi for the side to finish the card off perfectly and a 'cheers' sentiment
from one of those paper sentiment sets we all get and hold onto just in case....

Love my elf in blue and purple.


Challenges:


Thank you so much for coming to visit and I hope you come again soon.


Sunday 22 October 2017

A Couple of Halloween Cards


I have to admit I'm not really into making Halloween cards as Halloween isn't something that we celebrate big time over here. It's only in the last 10 years or so that people have been getting their kids dressed up and even that is rather hit or miss. I would say probably the kids in their late teen's and early 20's are enjoying dressing up and having parties. And very young children are now being taken around just within their street to neighbours they know dressed up.

Cards are not exchanged as far as I know so even though I made Halloween cards I didnt have any sentiments other than the ones I used last year 'Trick or Treat' Smell my Feet' which didnt work with these cards so I looked at other sentiments I had that could work as well and I really liked how these turned out.


My cards are fairly plain, I have seen some of the most amazing cards with brilliant backgrounds and scenes but I have settled for pretty CAS. These stamps are from a set I bought on line for $5.00- cool hey. They all come as separate parts you stamp and build a body.


So here we have a Zombie with a bit of leakage, a glowing pumpkin
and a bodiless cat saying 'hi'.  Fab sentiment 'Let's get together' for
Halloween or any occasion and finished off with this brilliant Washi tape.


My next card I decided to use three Characters from the set. Just love Frankenstein 
and stamped him and the Zombie and the pumpkin and then The Vampire -ooops
he looks like he is tangled in the pumpkin and that glow is shining right up his bum.
Must be getting pretty hot, probably why he looks the way he does or it could be because
Frankenstein has his fingers stuck right in his face, probably up his nose. too graphic? Sorry!!


All coloured with Copics. This one is finished off with some glitter ribbon on the side
and a few sequins in the Halloween colours and a perfect sentiment
"We're all quite Mad You'll fit right in".

Again perfect for Halloween or just some other occasion.


Challenges:


We're all quite mad here!


Lets get together


I think the second card  picture & sentiment suits
 your challenge perfectly
'We're all quite mad
You'll fit
right in'


Lets Get Together Card


'We're All quite Mad Card


Lets Get Together Card


Thank you so Much for Coming to Visit


Wednesday 18 October 2017

Started On My Christmas Cards


Four Christmas cards each made the same way. First I used a piece of acetate that I cut an oval shape from the centre of with my Scan 'n' Cut. I then placed this where I wanted to do my blending and used the Clarity brushes so I get a nice light blending. I love using these brushes and find them very easy to use. I have one foreach colour and have wrapped a piece of coloured washi tape around the top area of each so I can see clearly what colour they are for.

I do clean then when I am finished with them, not totally but as much as possible on a baby wipe just brushing away excess ink to keep them so they are for light colouring.


I have done light blue for two.


A lavender.


And a pink. For the lavender and pink I cut pink coloured metallic 
cardstock and for the blue silver cardstock.


So easy and pretty with the die cut sentiments from  Stamplorations.


Challenges:


Merry Christmas Lavender colour


Merry Christmas Lavender colour
I think I hit the twist on the head with my die cut too :)


Thank you so much for coming to visit and I hope you come again soon.


Sunday 15 October 2017

Reminder for The Flower Challenge 1st Birthday Celebration


Now don't forget its a really easy one.


It doesn't have to be your one and only most favourite flower stamp,
it just has to be one of your favourite flower stamps.

But also remember its important to share our new blog button that
Vivien put so much work into designing for you to add to your blog post
and direct link so we don't have to go looking for your card. Also don't 
get too zealous when linking to challenges, we have limited it to 6. And you can
only enter two cards this time. These rules apply if you want to be in the draw for 
one of the fantastic prizes that are being offered for those who participate in the challenge.

Now onto my cards. This time I have done two. I did another one using the same Hero Art stamp
but this time I stamped and heat embossed with silver embossing powder.

I did this card as an even easier version without an outer frame. The silver embossing is done on vellum and as you can see it has embossed beautifully. I never have any problem with this embossing and the vellum never warps. 

I have used the Zigs again dark and pale blue but I have been unable to catch the difference in colour here in the photos no matter how I shifted the card around, IRL it looks fantastic.

I die cut the window for the vellum to sit in then added a few sparkly gems and the silver mirror card die cut 'incredible' with a couple of mini diamond gems for the 'i' dots.

My next card I used one of my favourite stamps from Altenew

I stamped the flower onto Linen look cardstock then coloured with copics.
I went over the copic colouring with some Wink of Stella to add a bit of sparkle.


I die cut the flower then added foam tape to the back of the negative.
I attached the negative to the front of the card then added glue to the die cut
flower and leaves and inset them flat onto the card base.


You can see the sparkle in the close up. I also attached some sequins and stars
from a sequins set from Pretty Pink Posh and finished the card off with a die cut
'Happy Birthday' sentiment that I had blended some blue ink into.


Two very easy quick cards using flowers that I love to use.

Now its time to go over to The Flower Blog and see what the rest of the Design Team
and our Guest Designers have been up to.

Heres hoping you decide to join us this month for our exciting 1st Birthday
at The Flower Blog and show us some of your favourite flower stamps.


Saturday 14 October 2017

Happy Birthday card and some Alcohol Ink on Yupo

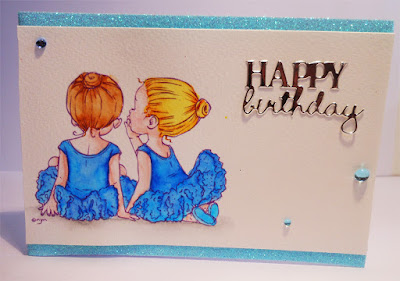
Needed a sweet birthday card so what better than the little ballerina's whispering
to each other. These are the ones that are digital images and I have manipulated
the lines so that in this instance the lines are a light purple (why purple you may ask? well
I don't know purple appealed to me at the time) and I have printed through the laser printer
onto watercolour paper. 


 I watercoloured my little sweeties with Zigs and lots of water so its light on the skin
but trying to get the hair right meant more colour than originally planned. A little bit of grey
around where they are sitting to ground them.

This watercolour paper is not as white as others I have used but brilliant
for printing on and watercolouring so although the card isn't 'white' 'white'
I think it still looks very pretty. I finished it off with a strip of glitter washi
top and bottom and a silver mirror cardstock 'happy birthday' die cut
and my usual odd number of glass gems.

Challenges:


Thank you so much for coming to have a look and I hope you come again soon.  


Now I thought I would share a few pieces I have been playing with using alcohol inks and Yupo.
Ohhhh my goodness I feel like setting up a room that is just for Alcohol inks, Yupo, trays,  
all the bits and pieces. There are so many videos and amazing photos where people are experimenting and Yupo comes in full A3 sizes so you can do full on art and if not happy, clean it off or turn it over and use the other side.


Now I have to decide what to do with these pieces.

I have just put a frame from inside a photo frame around the piece to take the photos here.
This piece was inspired by TaeEun after she had done an amazing card using these colours and she had explained she had used her Copic Markers. I tried with my Copic Markers and the piece didnt turn out so well the first time but with this piece I used both The Black Copic Marker as I didnt have
refill for it but I used the refill inks for the greys.

I used different greys from the Neutrals and the Warms and I used my Colourless Blending Solution that I have in a large bottle. I poured some into a small container and tried a mix of ideas. Some dropping solution onto colours to cause the solution to reactive, some flicking for small dots and some using cotton bud for controlled dots. Love the end result just not sure what to do with it.

This piece was just a lot of dropping Alcohol ink colours and blending solution and moving the yupo to blend and move the colours. All the colours were from my Copic refills and I used so many I lost track of what I used so I cant list. Will have to get better at it. This piece looks better IRL than in photo and is really rich looking but again not sure what I will do with it.

This piece is Copic Ink refills blues and yellows so of course we ended up with greens. I went a bit nuts doing the cotton bud dots and you can barely see the bits where I blew the colours with a straw. Will end up cutting this piece up for backgrounds or die cuts as the colours are wonderful and vibrant.

This piece is a mix of pinks and reds again Copic refills and blending solution but it has warped, too much playing and not knowing when it stop. Hopefully I can use bits for die cuts or parts of backgrounds, its amazing how much torture a piece of Yupo can go through especially as this piece
had also been used on the back, as a dismal failure, thrown in the bin, retrieved because its too expensive to throw away (for me anyway) and played with again.

I now have more background pieces to add to my never ending collection of background pieces, I just need to remember to check them out and use them for challenges.

I hope you enjoyed this little additional piece and please let me know if I forgot to share anything that you would like to know.