Translate

Monday 23 December 2019

Merry Christmas


Merry Christmas Everyone

I think this will be my last blog for this year so I just made a quick card to post.


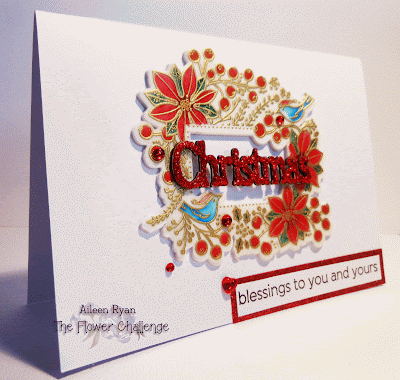
Love this stamp from The Ton called Cozy Poinsettia has this wonderful stamp and a few sentiments to pick from being in the Christas and Holiday flow.

I stamped and heat embossed with gold on vellum then I painted with my Zig brushpens though I dont know if we can call it painting as no water is used in this technique. I lighten the colour using the lightest colour in a colour range pulling the darkest colour that I have just run in one thin line along the edge of the flower. If I want to lighten more and also to add bling I use my Nuvo Shimmer brush pen.

Its really hard to get a decent photo of vellum and the shimmer so you will just have to believe me ok. Thats three cards made for Christmas next year lol.


And with this card I wish you one, and all, a very very Merry Christmas and a Happy New Year. May you all get to see your family/friends and treasure every hug and kiss you share.


Next year, if your lucky the cards will flow, my humour will burst forth and I know, don't be too shocked, but you could even get a card in the mail. 

To all my friends here in Australia and those Overseas I thank you one and all for the lovely cards I have received throughout this year and Christmas. You have all helped me through a very hard year and in extension Elysha too.

Crafty hugs and kisses to you all


Aileen


Friday 20 December 2019

Die Cut Flowers and Distress Oxide Backgrounds

I decided that since I havent made any Christmas cards to send out this year I would concentrate on Thank You cards to send to all the wonderful people who sent me cards for whatever reason this year.

If you follow me on Instagram you know that though I haven't been making cards I was being very industrious, making backgrounds for cards, cutting numerous die cuts and colouring in images. I think I have enough for a couple of hundred cards give or take.

So these cards were easy once the idea popped into my head.


The flowers on each of the cards all came in the same set. I die cut piles of them, then glued layers together (four at a time) as this lifts them and makes them look better. The die cuts are from
Pink Fresh and are called Floral Square Frame Dies


There are six in the set and you can do so much with them. Here I have kept the cards simple.


I used backgrounds with Distress Oxide each time in three colours. I then die cut the lifted section with the Tim Holtz Deckle Thinlits  Die I then found that the outside frame fit a 4.5" x 6" perfectly. So I attached the outer frame.

I then die cut adhesive  fun foam with the same die so I could lift the inner section slightly. I the process of sticking these layers on I managed to damage two card fronts where I pulled off bits of coloured card.


Not this one the other two which I then covered up by adding a little colour then a gem or two
in the strangest places but at least It covered the mistakes up.

Finished each off with a little die cut 'Thank you'. Sorry cant remember where these were from.


Now don't forget The Flower Challenge this month is all about using Die cuts. Still time to join in if you want and don't forget there is a prize for the winner.


So wonderful to be back and card making. I hope to see lots more of you all.

xx Aileen

Monday 16 December 2019

The Flower Challenge #39 Reminder Use a Die


Sorry for the delay in posting. Lucky I couldn't sleep and decided to come on line. Too busy playing with my grandson yesterday to notice the date.

It's time to remind you all that we have passed the half way mark for The Flower Challenge this month. It's such an easy one too and remember this month we again have a prize available for the winner. So a card with flower/floral being being the main ingredient and somewhere on your card a die cut piece, the flowers, background, decorative piece or sentiment.


In this instance I have gold embossed on vellum then coloured direct to the front of the image with my Zig watercolour pens but not used water.  After colouring I diecut then I also cut a layer  in fun foam to lift from the front of the card. 
I couldn't find a die cut sentiment that fit with the centre of the die cut so I used a chipboard 'Christmas' sentiment that I added glitter to, then found a sentiment to go with it and layered that up with red glitter cardstock. Finished it off with some red gems.

My Christmas card stock is very low and late this year and will end up being used next year as my return to the craft room has been so late this year.

Now its time to go to The Flower Challenge Blog and check out all the amazing creations from the Design Team. Thank you so much for visiting and I hope you join us in this last challenge for the year. 

Crafty hugs xx Aileen


Thursday 5 December 2019

The Flower Challenge #39 Use a Die


I'm back to card making  and chose to use this amazing flower
image from The Ton. I coloured with Copics and just love how it turned out.
I then cut a layer of white glitter cardstock that I purchased to make lots and lots of white
glitter diecuts from that I could leave white or colour. Of course then I realised that it was hard as hell to cut with my machine, just too thick for me. So now I am using for backgrounds and still looking for that perfect white glitter card thats not too thick to cut easily.

After adding the white glitter layer to a white card base then I added the white layer with the coloured image. Lots of tape for each layer to hold in place. The came the silver die cut Merry Christmas that I layered up with an additional three layers of white die cut. I still felt it needed something else and came across this die cut corner from a Hero Art Kit, its so delicate and elegant I felt it was a perfect finish for a Christmas card.

Now its time to go see all that amazing inspiration from The Design Team and our Guest Designer Nancy Penir who makes the most amazing cards. Go and see what die cuts they have used and get inspired.  Remember your flowers can be for any theme you just need to include die cuts on your card. 
Also remember there is a prize again this month this time from 


A small update for those of you overseas, fires are still burning right across Australia with over 130 in NSW alone. The closest to us is 7kms away and under control. Winds are so strong and the drought just feeds it. Cant see the sky or sun for smoke haze and the air is very hard to breath.  Please send lots of positive thoughts our way.

xx Aileen


Wednesday 4 December 2019

Happy 7th Birthday Sophie


I'm back I think, well. I've just spent two days making cards so I'm pretty sure I am. 
There are cards for www.theflowerchallenge.blogspot.com.au but you don't get 
to see one till tomorrow and the other on the 15th.

Today's card is all about Sophie, my granddaughter who is 7 today. As well as my
granddaughter she is my crafting buddy and loves everything that is rainbows, flowers,
glitter, sparkle, fairies and unicorns and she is my sweet tooth friend too. When you go out
for lunch or dinner, and its just Nanny and Sophie its dessert first and if you are really hungry 
after then something savoury.

Todays birthday card is all about fairies and rainbows and glitter.
This may look like two cards but it's one with a special inside. The outside was very quick and easy. All the ingredients are Hero Art Kit from last year and I love this kit. The main kit is not available now but a lot of the add ons are so worth a look if your into fairies.
I first Distress Oxide blended some rainbow colours then attached the panel to a white card.
I die cut this fairy scene twice, once in black for shadow and once in gold glitter for the top layer.
I cut the black layer down the middle and trimmed a little from both sides (probably should have trimmed more but its a learning process).
Glued it in place, checking with my gold layer that black would show as I went. Then I spent 10 minutes looking for that little black piece which is her face yes cause the middle cut took off her face and I should have realised it would look funny without it. Found eventually and glued in place.
Then attached the gold layer. Finished it with the 'Happy birthday' die cut which I ran the Nuvo clear glitter brush over.

Inside is the fairy from the Hero Art kit, which I die cut and coloured with Copics.
Glued her in place, Found the sentiment I wanted then found some itty bitty
gold stars from a die cut background and glued them in place.

I love how the blended background looks, wasn't going for a proper
coloured background just bright and happy.

The fairy looks so pretty and there is sparkle on her wings want
and little flowers on her dress it doesn't show up in the photo.

Tonight to go with the card is her first set of Alcohol Markers 48 + another set of 24 with all the skin tones and a book to practice in.  Now she can join me with the colouring sessions and hopefully will get lots of use out of these markers. Found them online and they ended up around 50 cents each. Not refillable but what a great way for her to learn and see if this is her style.

Great to be back and I hope you will all stick around for more posts to follow. Thank you to everyone who continues to follow my blog and Instagram account. You have all been wonderful this past year and your love and kind words has been appreciated.

Crafty love

Aileen