Translate

Wednesday, 26 February 2020

You Are Awesome


I just couldn't resist making another card using another of Rachel Vass Designs. This one is known as
Trio of Peony Roses and was such a pleasure to colour. I printed up on Copic friendly paper as I planned to colour with my Copics but after laying a base colour with the Copics I decided to use my pencils to truly highlight these wonderful flowers.

I love how they turned out and it did take me a bit longer than Copic colouring as I am trying to learn to pencil colour properly and only put down light layers and built the colours up. When it was finished I brushed over the flower itself with my Wink of Stella to add a bit of sparkle.

I then decided to add some soft blending for the background rather than copic or leave white. I had a spare image printed from the same time so decided to fussy cut that and add some glue to the back to make it a mask. The funny thing is it was a particularly hot day with both the air conditioner and the fans going in my craft area so I don't melt. After I cut out the flower I left the area for a few minutes, came back and the fussy cut piece had disappeared. To this day it has not turned up and its not like it disappeared in a messy spot. The table had very little on it and after crawling around and moving things about I had to admit I was defeated.

I still wanted to mask so I used a piece of vellum, traced the image, fussy cut and added Tombow Mono Glue to the back and waiting till it dried. Perfect for masking, I then blended with my Distress Oxides Cracked Pistachio and Tumbled Glass. Stamped 'you are' and added the die cut 'Awesome'.
Its a 5.5" x 5.5" card.

Dont forget to go check out Rachels other images and thank you so much for coming to visit.

Crafty Hugs Aileen


Monday, 24 February 2020

Because Card using a floral image from Rachel Vass


Check out this amazing flower drawn by Rachel and coloured by me. I coloured with copics
and added quite a bit of yellow to my pink mix. I just love how this turned out, not worrying about where shadows and highlights should be just going with the feel.

I then cut the image out by hand as I was trying to decide exactly how to display to its best. I went with of all things a bright background made from yellows and oranges Distress Oxides added in layers and dried between each layer. Although the flower is ultra bright it works with the background.

I felt a little white was needed and thought of adding some embossing paste but decided on this die cut piece that reminds me of a part piece of white fencing or wire, it just worked perfectly. The sentiment well because it could be ' because It's your birthday' Because I love you' ' Because I wanted to say thanks etc.

So dont forget to go check out the rest of Rachel's graphics  on Etsy under Rachel Vass Designs and get ready to see more of these beauties around the place. Congratulations Rachel You have drawn one beauty here.

Crafty Hugs 

Aileen


Saturday, 15 February 2020

The Flower Challenge #41 Leaves Reminder


It"s time for The Flower Challenge reminder post.


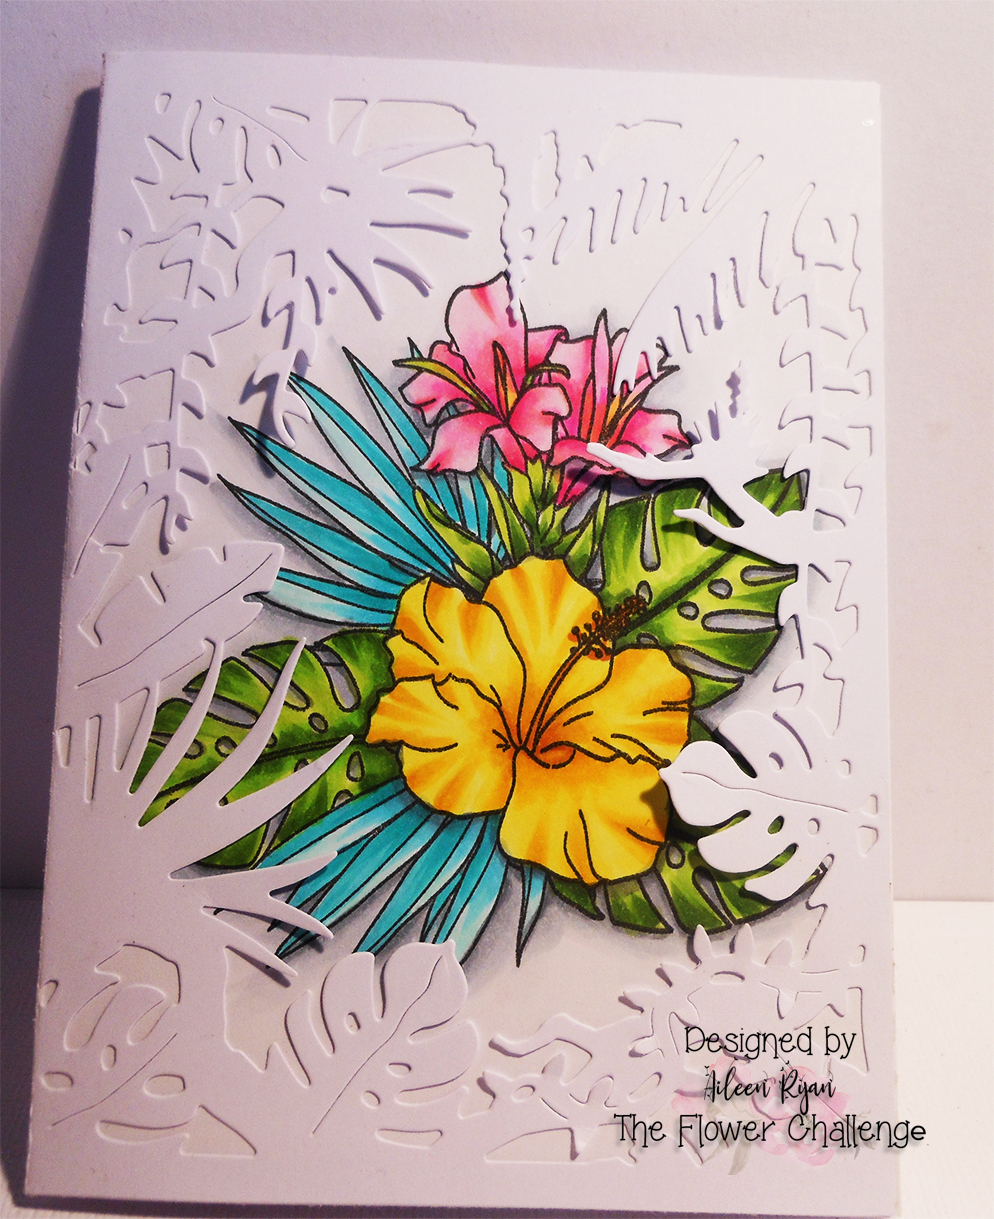
Here you can see the stamped and copic coloured image through the acetate window of the card front.

I made the card front by die cutting  the palm leaves a number of times then gluing to the card front. I trimmed off pieces hanging over edges and used some to fill places. Then I decided to cut a window rather than put the coloured image on the card front. I picked a stitched square die that fit the image perfectly. Of course then the piece was thick and I had to put it through a couple of times, the washi tape holding it in place then adhered so well that when I removed it it removed some card layer.

Hence the bright pink "happy birthday' that I have attached to the card front to cover the damaged leaf.


I added a piece of acetate to the inside of the card which gave the card front a firmer shape when it was closed.

This wonderful image is from Newtons Nook Really enjoyed colouring this.


Thank you so much for coming to visit and now its time to go check out what the girls have been up to at The Flower Challenge

Saturday, 8 February 2020

A couple of cards using digital images to share.


I have a couple of cards to share. This first is using a digital graphic from Rachel Vass Designs .
Rachel is on the Design Team for The Flower Challenge Blog, a great friend and has recently gone into designing her own flower images. I couldn't resist getting some and this is my first card.


What I love above digital images is that you can move them around, resize and generally decide on the card layout before you have to colour in. Love it.

I have used the image and sentiment both from Rachel. Coloured with Copics, cut to size and added to a Olive green layer of cardstock then added to a Kraft card base. A few little sparkly gems and its just perfect in my eyes. My link to Rachels shop is just that a link, I didn't receive any payment for making this card, just pure pleasure.


This next was lots and lots of colouring. Its a digital image from Stamplorations and I went a bit mad there as well stocking up on so many wonderful images. 

Originally I was just going to colour a few things as is the latest trend but I am a colourer at heart and it had to be totally coloured. I love how it turned out. follow the link if you are interested, I don't get anything for supplying the link, just made it easier as I found I wasted a lot of time trying to find the digital stamps in the shop. It is a seperate section as far as I can see.

I printed on a much lighter setting so once finished I went around the frame and colored that black so it stood out more. I added a piece of dark blue fun foam to the back then attached it to my white card base. I didnt need any gems for this piece and finished off with a Penny Back die cut sentiment 'Dream Big'

Two down and many more to come. I hope you enjoy the simple CAS design and the full on design.


Cheers

Aileen

Wednesday, 5 February 2020

The Flower Challenge #41 Add Leaves


Such an easy challenge, since the main theme is flowers where there are flowers, there are leaves. How much easier could we make a challenge.

I decided to go a step further and not only coloured a beautiful floral stamp from W9Plus and is currently out of stock but wont take long to be back.
Coloured with copics.

I then cut  the Jungle Frame Fancy Die which was an add on to A Hero Art monthly kit. I love this one as it works perfectly with the coloured image. 

I added glue around the edges of the Jungle frame and added to the card over the coloured flowers.

Now its time to go on over the The Flower Challenge and check out the amazing inspiration from the Design Team and our Guest Designer this month who happens to be Galina Filippenko. Her card is just stunning and you need to make the time to go check out her amazing creations at her blog. These girls never cease to amaze me with their stunning creation.


Thank you so much for coming to visit and I hope to see you again soon.

Friday, 17 January 2020

The Flower Challenge #40 Shaped Cards, Pop Up Card


I was re-arranging my die cuts in my craft area and came across a pile of die cuts for 
Pop-Up Cards and realised of course they were perfect for this challenge.


So this is the card as you would see it when you take it out of the envelope. Put it together so that everything I added stayed within the box shape.

And these next shots are what you see when you push the box into its square shape.
Look there's even a little fence that considering all the flowers I added probably should have gone to the front as it looked so cool.

I couldn't resist making another card as I had a pile of coloured flowers (these ones from MFT though I couldn't find a link so I don't think they are sold anymore. It's a sad thing when you realised you have coloured up flowers for the first time and they are no longer being made.)


The flowers are all added by attaching to acetate I cut into strips so you cant see them. There are three grass strips going across the card and I attached the flowers to these front and back to balance it all out.

I added a couple of coloured flowers direct to the box on each of the flaps and then finished off with a 'Birthday Wishes' cut from chipboard. Really pleased with this and I know it will be a popular card from previous ones I have made.

I then decided to make a sea scene one but Im still looking for those 'wave dies' I bought and put somewhere to keep safe !!!

There's still time to enter the latest challenge at www.theflowerchallenge.blogspot.com.au 
if you feel like it and we would love to see you there.

hugs Aileen


Thursday, 16 January 2020

The Flower Challenge Reminder #40 Shaped Cards


Time for the reminder.

For this Shaped card I went to my Scan N Cut and only had to do it twice to get everything to work fine. I chose a pattern that was already on the machine made it to the size I wanted then added the same again design again. I then overlapped the design slightly and selected both and I think the word is Melded so they joined up. I cut from a lovely pale blue card stock and just folded it in half.


As you can see the top of the card is straight but thats okay.
The flower I have coloured is one I already owned from Alex Syberia as I hadn't coloured it before and decided now was the perfect time. Just like me physical stamps and dies I have a ton of Digital images that are also crying out to be used.

In this instance I wanted to colour the flower in a style similar to Jaycee (dont forget to check out his amazing cards) and I say similar as I am not in his class but certainly was happy with the end result. I love how the flower turned out, love blues and kept the leaves neutral went with warm greys.
I also cut out a pile of leaves from different dies all in vellum to fill out the background.

I went back to the scanner and picked the same shape slightly smaller and cut it twice seperate to add to the inside of the card. The card design still needs a little work on it as it was ever so slightly out of wack and didn't all fold as a perfect match on the loops but was close enough for now.

No sentiment as I felt it was busy enough. Now it's time to go check out what the rest of the Design team at The Flower Challenge Blog have come up with and also check out what others have been doing. Some amazing inspiration on that page.


Sunday, 5 January 2020

The Flower Challenge #40 Shaped Cards


First I would like to wish you all

'Happy New Year'
Yep thats it, no fancy banner or artwork but said with lots of heart and sending loads of well wishes to everyone. 

A bit of police humour to start the day


 I am hoping that this will be the first of many posts now the card making urge is stronger..


This month is Shaped Cards which of course means any shape rather than the basic rectangle standard card. I made my first card by just using the largest die in a square set of dies which gave a fancy deckled edge.

In this instance I have used the largest die from a Honey Bee set called 'Deckled Edge Squares' I love this set. I have this type of style in rectangle as well in two different brands for different sizes. Obsessive - nah.....

Anyway back to this card I folded my card stock in half then put it through my Sizzex making sure to leave the end of the die outside of the cutting plates. It easily cut through the double layer of card and left it intact as a card.

I coloured this wonder Image from Alex Syberia which is available on Etsy and called Winter Bouquet. I do love that with digital images you can size and place exactly where you want. 
Coloured with Copics and very happy with how it turned out.

I was going to try doing with Gold Foil but have found out that we are using a generic brand ink in our laser printer and though it is perfect for everything else it does not for some reason work well with the Hot Foil technique.  Ahh well cant have everything.


I die cut the floral layer with the die that was two sizes down from the largest. The image and sentiment fit perfectly. After adding my fold to the card layer I then attached the floral image on the bottom half only.

You can see from the first photo that the card lays flat on the table then you move the top layer backward to end with the image standing higher than the card fold.

You might also notice I added a couple of big gems to be a stopper for the layer so it didn't slide closed again but found I actually didn't need them as the card stayed upright fine on its own.

Okay thats my card, simple design and easy as. Now it's time to go check out The Flower Challenge and see the wonderful inspiration from the rest of the team.

Alex Syberia has also joined us this challenge with her own amazing creation.  Don't forget to check out her amazing floral images and remember by entering this month you are in for a chance to end up with two of her amazing images.  Also don't forget to check out her blog that shows all the most amazing inspiration for colouring of her images. Maybe try out her dot colouring inspiration.

Before you go I wanted to share my favourite four cards that I made for The Flower Challenge for 2019


See you all again soon I hope

xx

Aileen


Monday, 23 December 2019

Merry Christmas


Merry Christmas Everyone

I think this will be my last blog for this year so I just made a quick card to post.


Love this stamp from The Ton called Cozy Poinsettia has this wonderful stamp and a few sentiments to pick from being in the Christas and Holiday flow.

I stamped and heat embossed with gold on vellum then I painted with my Zig brushpens though I dont know if we can call it painting as no water is used in this technique. I lighten the colour using the lightest colour in a colour range pulling the darkest colour that I have just run in one thin line along the edge of the flower. If I want to lighten more and also to add bling I use my Nuvo Shimmer brush pen.

Its really hard to get a decent photo of vellum and the shimmer so you will just have to believe me ok. Thats three cards made for Christmas next year lol.


And with this card I wish you one, and all, a very very Merry Christmas and a Happy New Year. May you all get to see your family/friends and treasure every hug and kiss you share.


Next year, if your lucky the cards will flow, my humour will burst forth and I know, don't be too shocked, but you could even get a card in the mail. 

To all my friends here in Australia and those Overseas I thank you one and all for the lovely cards I have received throughout this year and Christmas. You have all helped me through a very hard year and in extension Elysha too.

Crafty hugs and kisses to you all


Aileen


Friday, 20 December 2019

Die Cut Flowers and Distress Oxide Backgrounds

I decided that since I havent made any Christmas cards to send out this year I would concentrate on Thank You cards to send to all the wonderful people who sent me cards for whatever reason this year.

If you follow me on Instagram you know that though I haven't been making cards I was being very industrious, making backgrounds for cards, cutting numerous die cuts and colouring in images. I think I have enough for a couple of hundred cards give or take.

So these cards were easy once the idea popped into my head.


The flowers on each of the cards all came in the same set. I die cut piles of them, then glued layers together (four at a time) as this lifts them and makes them look better. The die cuts are from
Pink Fresh and are called Floral Square Frame Dies


There are six in the set and you can do so much with them. Here I have kept the cards simple.


I used backgrounds with Distress Oxide each time in three colours. I then die cut the lifted section with the Tim Holtz Deckle Thinlits  Die I then found that the outside frame fit a 4.5" x 6" perfectly. So I attached the outer frame.

I then die cut adhesive  fun foam with the same die so I could lift the inner section slightly. I the process of sticking these layers on I managed to damage two card fronts where I pulled off bits of coloured card.


Not this one the other two which I then covered up by adding a little colour then a gem or two
in the strangest places but at least It covered the mistakes up.

Finished each off with a little die cut 'Thank you'. Sorry cant remember where these were from.


Now don't forget The Flower Challenge this month is all about using Die cuts. Still time to join in if you want and don't forget there is a prize for the winner.


So wonderful to be back and card making. I hope to see lots more of you all.

xx Aileen