Translate

Saturday, 3 April 2021

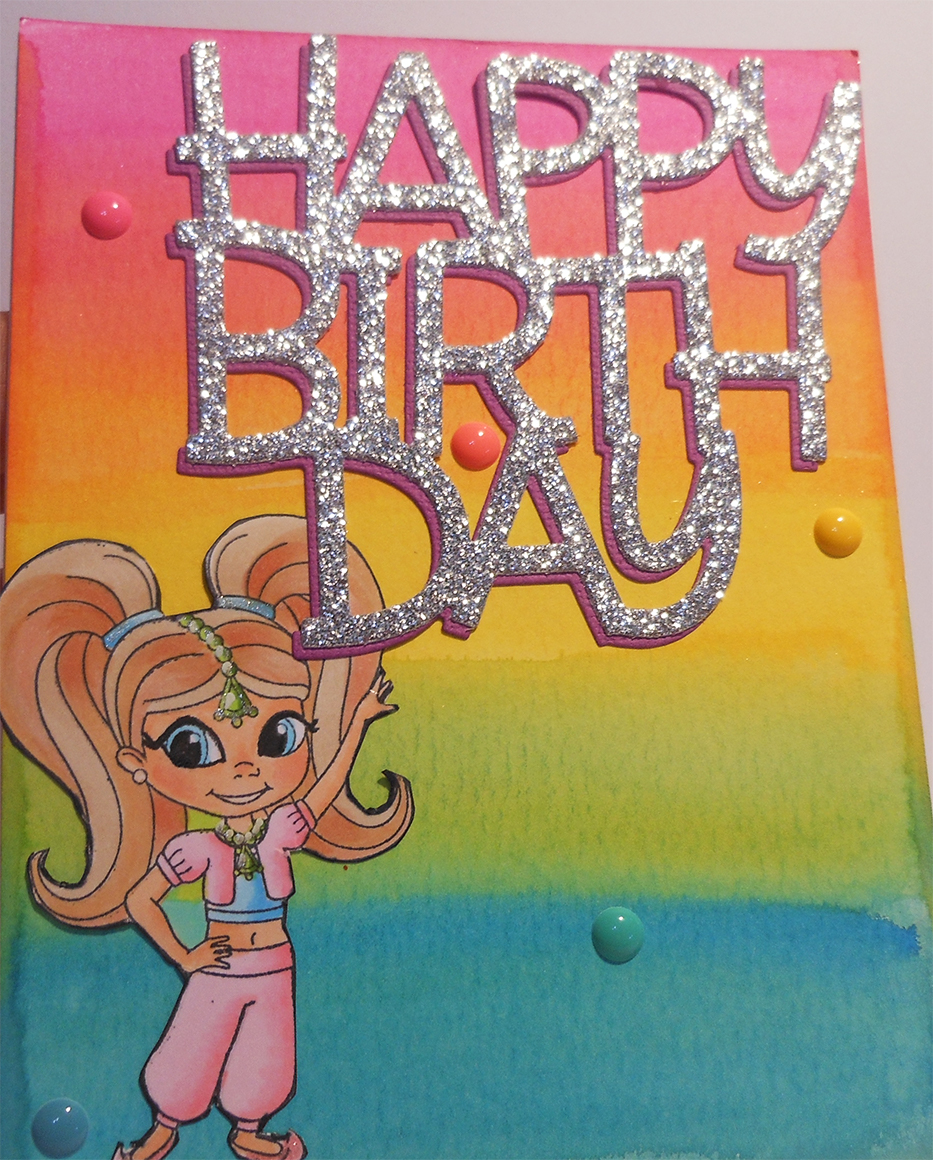
Birthday Card For a Girl


I do love my Distress Oxide Ink and Distress Ink inkpads for giving me vibrant backgrounds. Always done in rainbow colours not laways adding all colours but combining from two ink pads to make a centre colour.


There is a bit of watercolour build up on the edges but not enough to worry about it. I left as it was, it is homemade. I decided to use this wonderful big bold Happy Birthday word die from Mama Elephant and I added a silver glitter layer over a purple cardstock layer just off centre to show both.


My little genie I coloured ages ago and I know I could have improved on the colouring but this is about making quick easy cards and using your stash not obsessing. 
I'm not sure if she is still available these days, could be from one of those companies that have come and gone.

 I finished the card off with some enamel dots that blended in perfectly with the colouring I made the background. The background was a fraction too short for my card and I didn't want to risk trying to trim and ruining the finish so I added a strip of washi tape glitter.

Another birthday card for my granddaughters and grandsons friends.


Thanks so much for visiting and see you again soon

Crafty hugs

Aileen


Wednesday, 31 March 2021

Seriously.........Happy Birthday


I love these critters AALL & Create from Topflight Stamps . I have lots to still colour and more I wished I owned but you all know how that is. 

I made this card before the next one so the scene is very very basic, blue for the sky and green for the grass and a branch hanging down.


Now with my stack of Nutty squirrels there is a sentiment and some pretend swearing
and I added the die cut sentiment 'Seriously' and a 'Gold' leaf that they are reaching for.

Now this card was done with inspiration from 'Amy' who is just amazing at bring these images to life. My card is so close to hers you could be forgiven for thinking its the same card (my learning process is do the same then next time.....) 
The flower is not the same as Amy's as I used a stamp I have had and used for many many years -The Uniko gerbera , the leaf on the right is also from Uniko and I drew in the stem.
The background and fairy on a leaf are all from Sweet November stamps.


I cant wait to use more of these amazing stamps and backgrounds, just need to find a mere moment in time.
I left this close up in the darker range so if you click on it you can see the shimmer on that gerbera. 


Thankyou so much for coming to visit and I hope you all have a wonderful and relaxed Easter Break.


Crafty Hugs


Aileen


Saturday, 20 March 2021

Celebrate Floral & A Happy Birthday


The same image I posted a few days ago but this time its on watercolour paper so I have coloured with my Zigs for the flower. The of course I used my Wink of Stella to thin and move colours so its a bit too sparkly but hey really can anything be tooooo sparkly.

I added white gel marker to the flower centres then decided to be really daring and coloured the background black.

Actually not quite black went with Copic marker C9. Done with a lot of care so I wouldn't end up going into the floral image. Love the end result and will try this more often but I do have to admit I do it with lots of trepidation as a) if I don't like a dark colour once started there is no choice and b) I usually have a lot of oooops moments.

Anyway it turned out ok in the end and just to remind you this drawing was done by Emily Midgett and she is currently doing a new one off release but I don't know if its too late to order if you want any.


This little sweetie is from Mo's Digital Pencil and of course you can colour her with or without the sentiments.


I went pale and soft in the colouring of this little sweetie. Check out that cute as face. I added some sparkle with a clear gel pen that contains glitter.


I decided she needed something else so I cut out a few wee little butterflies from some alcohol ink backgrounds I  have. So simple and ready to go.

Going to enter this sweetie who is new and not coloured before to Darnells Challenge


Thats it for today. My apologies  for the photos its been raining and dull for the last few days. We have had to backwash the pool a number of times and the backyard looks more like a giant pool than grass and pool. 

Jake (Elysha's dog) doesn't like the rain or water and keeps going to the doggy door in the backroom and just sticking his head out and debating, will I or won't I. Its amazing how long he can hold on. Such a human gesture, head tilted then the mad dash, wee's then runs in and runs around like a berserker, I did it I did it, I survived weeeeeeeeeeee


Arent you glad I shared that bit of trivia with you lol 

Crafty hugs

Aileen

Tuesday, 16 March 2021

Reminder for the Flower Challenge Blog #54 Use Shades of Purple


This card I loved colouring. This is another image from Beccy's Place
She draws so many wonderful images and I love the detail in the blooms. 

This floral is another from her Free images. In this instance I enlarged the image to fit really nicely
on a Slimline card. I don't worry if the image is hanging off the page as only whats on the page will be printed.

I'm hoping this image isnt too large on your screen, as it was slimline the image was reduced quite a bit to fit all into the photo.

I have coloured with Copics and found a great combination for the purple flowers. I then decided to do leaves with more detail colouring than I usually do and I really like how they turned out so will build on this with practice.


After colouring I did add a layer of wink of Stella to add some sparkle. Then I used a slimline die to add a nice border around the card. A large pink mirror card  die cut 'Celebrate' from MFT and some sequins and its all finished.

This image is definitely  going to be used again.

All right now its time to leave a comment just so I know you have been,
 then chuff on over to The Flower Challenge Blog and see what the wonderful Design Team have been up to.

Crafty hugs


Aileen


Sunday, 14 March 2021

A Floral and One Little Cutie

I am working steadily through stamps and digital images that I haven't used before. I think Darnell might get sick of me visiting the NBUS Challenge but I really want the mountain to reach hill proportions (though I think that maybe a never ending challenge)

This is a large stamped floral image and I really enjoyed colouring this. I have coloured it for the first time with Copics and I feel I have quite a bit of work ahead to get those wide petals looking good. Maybe if I added pencil I could get a better finish but I will continue to work on this stamp.

This stamp is called Bountiful Magnolias  from The Ton.

I added Wink of Stella then wiped some off and it looks just right now. To add extra sparkle on the dark brown embossed background I heat embossed some holographic embossing powder which just goes all round the edge of the brown cardstock.

I ended up fussy cutting the floral bouquet and adding with dimensional foam to lift it slightly and finished off with clear rounded gems. The embossed looking background was actually a pad of different coloured cardstock embossed with all different embossing folders.  I liked the idea but did find the embossing is quite light so not as impressive as backgrounds done with a proper embossing folder.

This next card was a quick card, coloured with Copics. She is one of the wonderful images from Mo's Digital Pencil and she was released in January. 
I am a Patron of Mo's so every month is very exciting getting an image before it is released and another that is exclusive to Mo's patrons in Full Bronte also 10% discount on top of other discounts being offered at the time. The getting images earlier doesn't make much difference to me as Im always so far behind in my colouring but I do love each and every image I get. There are also other Tiers so you don't have to spend the same as me but I love the fact that I could be helping out a business that I really love as well.

On the close up you can see I did more heat embossing around the edge of the card, this time with a sparkle pink embossing powder I got from Hero Art. I did her shoe laces as well but they turned out rather messy as I was in too much of a hurry.

Such an easy image to bring to life, and love that sentiment.


Okay thats it for me so hopefully I'll see you here again soon.


Crafty Hugs


Aileen


  We went out for lunch today with the kids and their children. We also had a huge change in weather just for day it was like a real winters day. Rain, rain and more rain and cool temperatures.   
We went German today and it was a very late lunch which we then had to convince Elysha and all the littles was really dinner. It was an amazing lunner (lunch and dinner combined) and I can say we will be back again to try more dishes.

Back to when I was getting dressed, I put my boots on, struggling with the short zipper thinking to myself my hands must be getting worse. Then I looked at my booted feet sitting in front of me and it suddenly clicks, those boots are on the wrong feet with a definite turn at the top in the wrong direction. Don't ask me how they fit but they did. Yep I'm really getting old and yes Elysha thought it was super funny and couldn't wait to tell her brothers with the most exaggerated signs I have ever seen. 

 
Here we go Darnell  another entry for the NBUS Challenge with the Floral stamp even though both are NBUS

Friday, 12 March 2021

Emily's Flowers

I decided to do another card for The Flower Challenge Blog as I really enjoy colouring with purple.

This stunning looking bloom was drawn by Emily Midgett and she released  some images in limited edition as a one off item and I was luckily able to purchase a copy for both copic and watercolouring in a small number of images. I will share others later. Emily is an amazing floral artist and designs for quite a few different companies and is also very busy on Design Teams of quite a few companies as well. She is also the mother of two sets of twins the latest born last year and I am totally blown away by this amazing young woman.

I have coloured using my RV colours. Once I was happy with the colouring I added Wink of Stella to the heavier coloured areas of the flowers. It was a new brush so there are a couple of areas I was a bit heavy handed but I can brush off the excess so I'm not worried.

Here you can see the sparkle. I placed the image in a double stitched frame of a purple card base.
 I finished it off with some purple gems and these beautiful delicate die cut "birthday wishes'

I think I'll add this over on The Flower Challenge Blog so I can share it more.


And after a couple of years missing from Challenges I think I will also join Darnell at NBUS card challenge for March as the die cut sentiments come from a never before used die set from The Ton. 


This die set that has quite a few die cut words  (all ones you use regularly) and also the outline to add behind if you want is just brilliant. I went mad and cut out lots of them, they all go through the machine at once as its a single plate for the words and another for the outline. I did them in white and black and lots of mirror card. the only down side I found was that I did need to use a metal shim to get a good cut and I did put each through twice to guarantee a clean cut. There are also extra ...... yes dots , we all manage to loose those dots so these are extras, perfect.


Thank you so much for dropping by I hope to see you again soon.


Crafty Hugs

Aileen


Tuesday, 9 March 2021

Hello Lovely


This beautiful floral is a digital from Graciellie Design and called Beautiful Bloom I think,
the link takes you straight to it. Always remember  she has amazing specials all throughout the year as well so if you see things you like and cant afford just wait for a special.

Okay now I have coloured the flower with red Copics starting with R14 and going to R59 for depth in the shadows.

The sentiment comes with the image as well as a pile more sentiments.
I decided to do really light colours in the BG 0000 to BG10 and also G0000 and just pulled the colours in all different directions little patches everywhere then going over them again no control or pattern and even used Colourless 0 to lift colour if I felt it was too heavy.

I added this panel to a white cardbase that I attached silver glitter washi tape each side of first and finished off with these wonderful pale green gems that tend to reflect the colour they are sitting on. 

I love this flower as its a great one to practice Copic layers and blending into folds on.

I hope you have enjoyed your visit and come again soon


Crafty Hugs

Aileen


For those who visit regularly.  

  I would like to thank those that read my post asking people what they use for social media and lack of responses. Therese what you said is all so true and you made me think about the fact that this is my only sure way of being able to look back at cards from the past that is mine. I hear you loud and clear. I will continue and just share what I feel like at the time.


Thank you

Friday, 5 March 2021

The Flower Challenge #54 Colour Shades of Purple


It's time for the next challenge, we are using shades of purple for this one but you can do natural leaf colouring and centres but try and stay with the purples we are asking for for this challenge.

Also remember you need to mention our challenge when you do your post and if possible add
the Challenge badge.
 We are using digital images from Beccy's Place I decided to use one of Beccy's freebie images.


This beautiful freesia was just so beautiful to work with. I printed it up as light as I could manage on my computer and went with a quite enlarged version.


I originally coloured with the flower cup in purple and the petals and closed bud in the background in a very bright pink colour. The purple cups are copic only. I then went over the pink colouring with a range of purple pencils, slowly and lightly as I built up the purple colour.

I was really pleased with how the the leaves turned out to. I then die cut using a Honey Bee 
die that gives the outline an old parchment look. Added a lilac layer slightly larger then finished off with a purple layer and the 'Beautiful' die cut and sequins.

Thank you for coming to have a look, Its now time to go check out what the Design Team has been up to on The Flower Challenge Blog and our Guest Designer Colleen Balija who makes the most amazing and inspiring cards. So so much beauty.

See you all again soon.

Crafty Hugs

Aileen


Thursday, 25 February 2021

Floral from Pinkfresh Studio on Vellum


Check out this amazing background stamp from Pinkfresh Studio 
I have again stamped and heat embossed on Vellum, this time with white
embossing powder.

Coloured with Zigs and Wink of Stella to spread and thin.

I added a pale green Zig background so you could see the white embossing
then placed straight onto a white card base. Added a thin line of silver glitter
washi tape each side.

No sentiment as it can be used for anything. I keep saying to myself, back to other colouring Aileen, but I really do enjoy using the zigs as they make for quick colouring that looks so bright and vibrant.


Out of interest can You take the time to leave a comment and tell me
a) Are you still posting on your blog as well as Facebook and Instagram ?or
b) do you stay with one group and not bother with the others?
c) Are you finding comments few and far between?

I am trying to get right back into regular posts and wonder if I have lost lots of my audience because of my break from cardmaking or are people happy to look on Instagram and not bother with the blog.

I try to keep my posts light and informative and share a story or joke but then I wonder if there are actually people reading or just looking at the card, if that. Some blogs I go to have an amazing number of people commenting and I wonder if its because they only blog? Or could it be they are going in challenges which I haven't gone back into yet? Or maybe its just my posts are too off track. 

What a quandary lol nah not really its just puzzling me and has me thinking Instagram is probably enough. 

Tuesday, 23 February 2021

Dancing & Roses

 I have quite a few cards in this post as I did a floral card and I also made a set of cards for my granddaughter to use.


You will see all of these down further where I have taken individual shots of each. The inspiration for these came from a card I received from a wonderful friend of mine, Therese, who makes the most amazing cards and every now and then I get one that just screams copy and try your own ideas.
If you would like to go check out Therese's amazing cards  I am going to share her link but you have to promise to come back ok:)


Before going to the dancers I wanted to share another card with the colouring with zigs on vellum.
This is the Big & Bold rose from Colarado Stamps. I just love using their Big & Bold line as they stamp so beautifully and are such a joy to colour.

Here you can see the sparkle on the rose and IRL the whole rose sparkles and does
look brighter than you are seeing in these photos. The image is stamped and heat embossed in silver.

I have then used Zig markers darkest colour with lightest colour to move the colour then lift and complete colour with a 'Wink of Stella' brush that adds all the sparkle. No water used so no warping. Added the vellum layer to a white card base and just attached with douple sided tape hidden behind the images.

Finished off with this beautiful 'hello friend' die cut from mmmm sorry cant think of where from and not home to check.
Anyhoo I finished off with some lovely little smooth sparkles.


Now this is the first one I stamped and it is exactly how Therese had done hers other than the sentiment. I also coloured the tutu heavier as thats just me. The tutu is stamped separately and after I coloured them I fussy cut them.

The next card I decided to go portrait and add full image.

Then this one with one dancer and shoes on.

Then this one (which is my favourite I think). Legs only. Sentiment
'Dancing is like dreaming with your feet'

Ok so thats it today, I love that I used the set for more than one card as I seem to do so often. 

Also I don't know if you notice but these cards I made using Neenah  Solar White 110#,  bases and Copic coloured panels. I wanted to see what I thought of this. 

I will need to experiment more as these cards are only lightly coloured so couldn't really say if it is as good as the paper/cardstock I usually use for copics. It was certainly a different feeling when applying the layers, I cant explain it other than it just feels like the copic drags a bit on it but as I said I do need to colour a lot more. But I must say I love the thickness and the wonderful colour of this cardstock. I would have to use the thinner one I think for fussy cutting as I struggled a bit with this thicker card. Will also need to see how it goes in the Scan n Cut.

Cost wise it was very similar in cost to my X-press it Blending card working out I think at about 60 cents a sheet. I would be using more as I would like to use for the cardbase as well where with the X-press It I only use for coloured images and add to a cardbase.

Another thing to take into consideration as well is that the Neenah 110# is not always available here in Australia and not as easy to get as the X-press It Blending card.

What I need to do is colour the same image on both types and share the end results, now all I need to do is remember I said I would do this then you will see for yourselves.


Let the experiments begin

Crafty Hugs


Aileen