Translate

Friday, 20 November 2020

Christmas Cards #3

Another three Christmas cards to add to the ever expanding bundle.
This first  card started with a very pale apricot coloured watercolour panel. 
Got some glitter paste and stirred in some distress oxide till it looked fine to me. Used the
'HOHOHO' Christmas stencil and then added the glitter past that had an orange look to it. 
 

Once it was dry I sat and pondered life trying to decide what I wanted to do with
this panel. I decided to attached to a white card base then looked through my
coloured Christmas images.

I decided these sweet mice and the hat looked perfect so I attached with dimensional foam
to sit them a little higher. Happy as with this.


Next one is even easier. This is just a couple of colours of Distress Oxide blended together then flicked water on. After I was happy with the look I attached to a white card base.


Close up to show off the pretty little pink sparkles.

Stamped and white heat embossed this sweet sentiment and snowflakes. Totally blank on the brand sorry. If anyone wants to know I will look it up for you, otherwise let's just admire. Added an odd number of sparkly gems to keep in flow.


I just love the look on this fella's face. After stamping and colouring with Copics I decided to
add a funny sentiment I had.

I think the sentiment goes perfectly with that attitude. And finished off with a HOHOHO
pattern paper. Added to a pale blue cardbase and another one bites the dust.

Thank you so much for coming to visit and I hope you enjoyed what you go to see and come visit again soon.

Crafty Hugs


Aileen


Monday, 16 November 2020

The Flower Blog Reminder #50 Add a Sentiment


I just could not resist this background stamp. Isn't it amazing. 
So easy to colour and just so eye catching.

I coloured with Copics, all nice light colours. Then added the background 
with a B02 blue colour.Had to be rather careful but it wasn't as hard
as I thought it would be and I love this look. I will be doing this again.

I used a strip die to cut around the edges so it looked like I had used a large square die. 
I had nothing large enough in a square die to give a nice edge and not loose too much of
the image. ( layered on a bright yellow cardbase.
Then I added a die cut 'Surprise that I layered 4 times, last in gold mirror card then found 
a strip that had birthday wishes on it and trimmed down to go on the card.


I'm very happy with how this turned out. 
Don't forget to go check out the rest of The Design Team
over at The Flower Challenge Blog.

Thanks so much for coming to visit and I hope you come again soon.


Crafty Hugs


Aileen


Saturday, 14 November 2020

Cgristmas Cards #2 & What to do With Your Loose Glitter

This post contains another three cards. 
Image from Mo's Digital Pencil, perfect for Christmas in the Summer.
Coloured with Copic, even made sure she/he had a bit of a tan. When I had finished colouring 
added sparkle to the hat and used white Copic ink on the waves to create a foam look.

Check out the sparkle on the hat. Love it.

Added a layer of fun foam to the back of the coloured image to pop it up a bit. Attached to a blue cardbase. Finished off with a sentiment from Paper rose  printed sentiment set.

This card I die cut last Christmas so I am struggling to remember the brand, my apologies.
I cut directly from the front of the card. I had made a pile of glitter backgrounds last week
so I found a couple I could use that looked nice with this die cut.


Check out the sparkle on this piece. I cut the panel to fit the back of the diecut then added another layer
of white card to cover the glitter panel and give the back of the panel a nice tidy look.


A stamped sentiment added to go with the wooden 'Christmas' sentiment that
I coloured with copics and added to an uncoloured background.

This card was done the same way except I had to add a little camouflage. Where that silver embossed snowflake is behind it you could see where I had added the glitter panel and it was just slightly added too low so there was a gap. 

Works perfectly, no way to see that the panel is actually sitting too low. And check out that beautiful sparkle.

Finished off with a die cut 'falala' that was cut from silver glitter paper.


A little information on the glitter panels.
A week or so ago I decided to investigate using my glitter which is not environmentally viable.
There has been a fair amount made of the fact that glitter is made from plastic and does not dissolve or break up so therefore causing issues within the environment.
It also appears that there have been a number of so called environmentally safe glitters made that are not necessarily safe so you need to double check that what you have bought is the real stuff.
Now the next point is disposing of your glitter, don't flush it or wash it down the sink. Don't just throw in the bin as loose product. If you want to throw it away one suggestion is that you mix it with a product like clay or resin,  and make something or  into a container that is not going to break open that has mod podge in it to mix with the glitter. 

Look for projects you would add glitter to that will be long lasting products not quickly disposed of objects.  I didn' t read that last till I had made these panels using up a fair amount of glitter so I suppose that means people who receive these cards need to keep them a long time.

But what I did do was I made these glitter panels by adding double sided tape sheets to cardstock, added the glitter then used a flat object to burnish the glitter into the tape. I found the fine glitter burnished well and I was able to get to no glitter coming off when tapped.

The coarse glitter just kept dropping glitter so I decided to try some clear embossing paste over the top. Its perfect, no glitter coming off now and the sparkle is still coming through perfectly. I must admit at first I was a bit dubious as the cardstock got very limp but once dry it was fine.

I now have a large number of sparkle backgrounds for cards in all the colours you can think of. I have decided to go back and add embossing paste to the fine glitter panels as well as this means they are double sealed and less danger to the environment. I am using up that stock of glitters that I have.

Now you know what to do with your glitter if you still have a draw full.

Thank you so much for coming to visit and I hope you come again soon.

Crafty hugs

Aileen

The glitters I used are from a collection I got from WOW with coarse and fine in similar colours and I dont know if they are still being sold. I hope they have found away to make environmentally safe glitter in these colours because they do look amazing. 


Friday, 13 November 2020

Christmas Is Coming #1

Since I have so many Christmas cards still to come I have just decided to call them all Christmas is Coming  followed by a number so you know its a new post and it saves me trying to come up with titles.

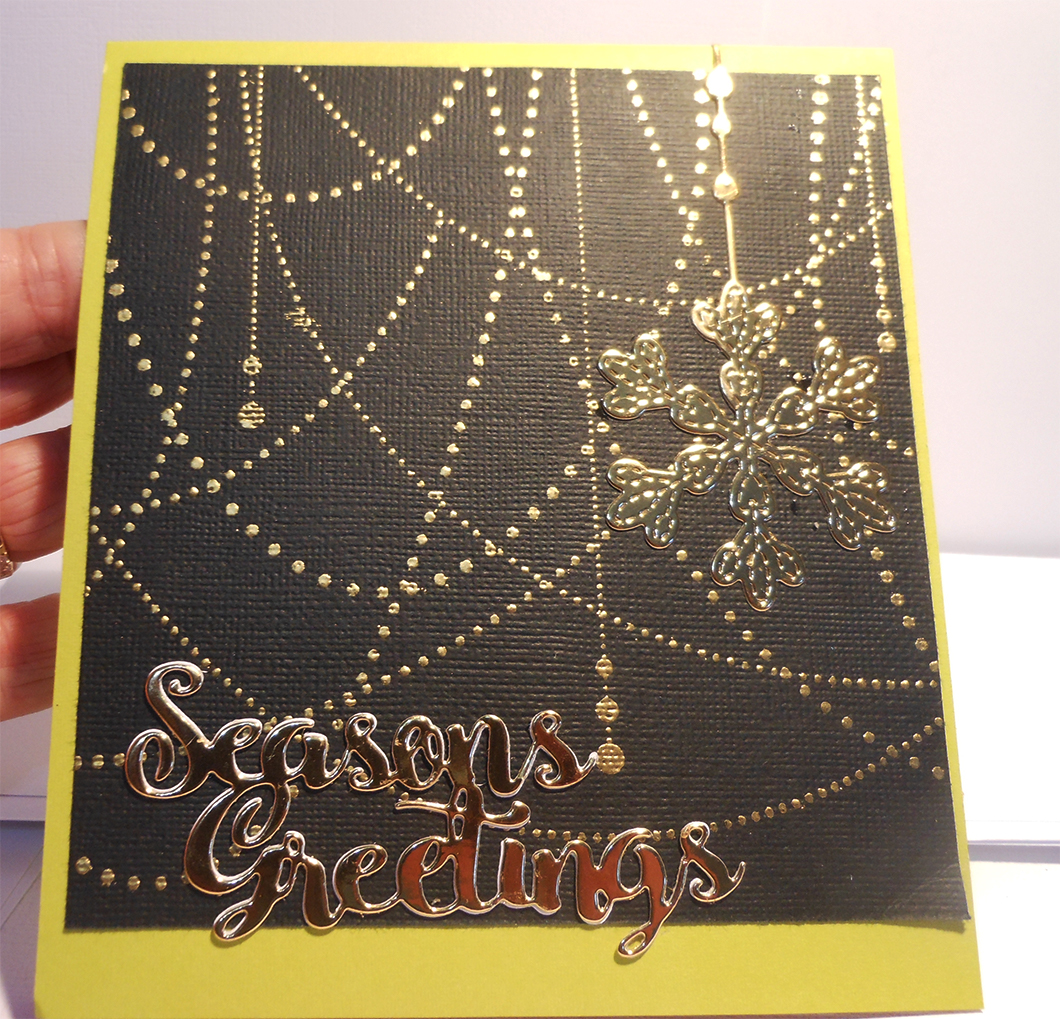
These next two cards are totally easy as this is a background stamp.  This stamp is called
Garland Bold Background and when I looked it up in google images I found where people had also used it as a valentine background adding little hearts to the ends of the chains and that was also brilliant. 


Very easy to stamp on this black cardstock making sure to use the anti static pillow first.

For this I have added a hanging snowflake diecut which is from Memory Box and it just finished off the design perfectly. I trimmed down the stamped image and added to a bright green cardbase and finished it off with a 'Seasons Greetings' sentiment.

Same idea for this one except I stamped onto blue vellum. Cut to size and added to a white cardbase.

Added the hanging snowflake on the left this time and this one was cut from silver glitter
cardstock. The Sentiment is from Stamplorations 


Love how they turned out.


Another easy peasy card, coloured this cute as Elf from MFT BB Santa's Elves

Added a bit of sparkle to the hat and cuffs


Then I die cut this snowflake edge from blue/green glitter paper and added the
strip down the side of the card and silver mirror card die cut 'Be Jolly' also from stamplorations.

Thats it for today. Thank you so much for coming to visit and I hope you come again soon.


Crafty Hugs

Aileen


Friday, 6 November 2020

Christmas Cards Rollout


The Christmas card rollout continues. Todays cards so easy.


Die cut decoration from Simon Says done in gold mirror-card. Added a pink mirror-card  die cut 'Joyeux Noel. The redcard is actually a bit darker than its showing in the photos.

Not sure where I got the 'Joy' die but it works perfectly there.
I had some bows from the $2.00 shop foreverrrrrrrr and finally decided
they had to be used. So white and gold for this card with foam tape removed and
replaced as it had expired.

Same for the pink bow, replaced the foam tape, coloured the pink with a light coat of copic, looks
amazing. Then raided by gems, those I will use that one day well I sure used them, big beautiful glittery chunky looking pink based ones for this card and white based for the other card.


Three  more cards using that wonderful large snowflake set from Tim Holtz.
These were done on one black, one dark green and one blue cardstock.


Gold mirror-card and gold glitter and those wood words double gold embossed.

Gold glitter card with bronze mirror-card and gold embossed (twice) wood words.

Green glitter cardstock with bronze mirror-card
on dark green looks amazing.


My slowest and longest parts of my cards are the decision on sentiments,
 I never realised just how much procrastination can go into sentiments - 
size, 
colour, 
emboss, 
stamp, 
diecut, 
vellum, 
on cardbase 
or seperate. 
It doesn't matter how much you stamp in preparation, die cut in preparation, purchase in 
pre-made  you then have to look through it all and of course you just saw that amazing new release from .......... and all you can visualise is how much better it would look with those new ones that you promised yourself you wouldn't buy cause you have so much already ( but its smaller, double layered, unique in one of a million ways and) 

you finally make a choice and BAM it's perfect now to the next card.


Okay so I'll leave you with those thoughts and hopefully be back again tomorrow with more. That postal deadline is getting closer as I have made that decision everything must be finished by next weekend to get to where it's going on time.

This weekend Im off to see my grandsons in Goulburn which is roughly half way for us to catch up. Isn't it wonderful that they rang me and want to catch up for lunch and a chat with me. They are 16 and 18 and I am feeling that life is good.

John (the husband) is having what they call 'A Crapper' on the Saturday and no, to all you Aussies out there, I am not talking toileting........
John builds guitars, and is a Luthier so does repairs, frets etc and has over the years played in some local bands. He has collected a lot of old friends who have been in bands with him, professional backing bands, singers and amazing players  etc and they love to get together a few times a year.
There is a lot of reminiscing, drinking, eating, playing and singing.
The playing is getting less as they get older and the reminiscing becomes wilder and funnier and really they all just talk a lot of crap and thats why the call it a crapper. Ohh and its very very loud.

Old man is very happy.


See you all next time, thank you so much for coming by

Crafty Hugs

Aileen


Thursday, 5 November 2020

CASe Me a Christmas Card


Today I am joining Michelle with her annual Christmas Card Challenge. This year Michelle has changed it up a bit where instead of each designer giving her a theme for our cards, 
we are CASeing each other.

I could choose from any card on Michelle's blog, it didn't have to be a Christmas card but it had to become a Christmas card. Have I confused you????

No.....good. Well I chose a Christmas card anyway but I went back to 2015 as each time I picked something someone else had chosen it already. So of course you go back.


and I have tried to follow the idea of what CASeing is all about.


List:White cardbase, portrait setup. Distress ink blending blue tones, White embossed snowflakes, Die cut shape for top of card, black stamped sentiment along edge.
Include: Distress Ink Blending in Blues, Snowflakes, Shaped panel cut to go over white cardbase, sentiment.
Modify: Instead of heat embossing snowflakes did silver diecut snowflakes. Sentiment heat embossing in silver on Vellum. Cardbase white but landscape rather than portrait.
Exclude: White Heat Embossed snowflakes, Black stamping
Spin: Silver Diecut snowflakes rather than White heat embossing and blue colours rather more widely spaced. Silver embossed sentiment on vellum.


Because it was a large panel that I made I was able to make two cards and you can see the different blues more clearly when they are beside each other. I used two different die shapes to trim the panels.
With this photo you can see one of the snowflakes has been layered with vellum as well and there are some wonderful clear gems but I dont think I waited long enough for the glue to disappear under them.
I also sprayed some glimmer spray which of course blobbed in some spots.


I loved doing these so much I made a couple more panels in these colours and other colour mixes so I can use up the 1,999 other snowflakes I have die cut. These snowflakes are a combination of MFT, Reverse Confetti and.........no cant remember.

I love doing this each year and always look forward to getting that message from Michelle asking if I want to participate. She is such an inspiration to me and has a blog I have followed for many years. Actually I think she maybe in that fist half dozen I started out following when I got interested in card making.

Thank you so Much for coming to have a look and please don't forget to check out Michelle's blog as she has also CASed one of my cards.

Crafty Hugs

Aileen

The Flower Challenge #50 Use a Sentiment


New Team Member so it's time to update our team picture. Here you see us all.
It's always so sad when we have people leave the team and so great when someone else
wants to give it a go.


This month would have to be classified as super easy. Flowers of course and they need to be the main focus, the first thing you see when you look at the card. Then add a sentiment, doesn't matter what the occassion just add a sentiment.


Now I hope you arent getting bored with my vellum cards but this stamp just screamed vellum.
Stamped and heat embossed the perfume bottle, from Colorado Craft Supplies, in silver. Zig watercolour brush-markers (no water) using lighter colours to move around dark colours and a little Nuvo Shimmer glitter for sparkle.


I heat embossed sentiments inside the perfume bottle, down the side and across the top. Before I attached the vellum I realised the sentiments would not show up clearly with the white cardbase
so I decided to add some Distress Oxide in a thin strip which you can see here I am holding the 
vellum back with my tweezers.


First I added Twisted Citron then I decided to add cracked pistachio as well. Once I was happy with the blend I added the vellum and a few cabochon in a beautiful blue/green colour.

So easy to colour and love the look. Thank you so much for  coming to visit and now its time to go to The Flower Challenge blog to see what the rest of the team have been up to. Get some inspiration going and join us please.


Crafty Hugs

Aileen


Sunday, 1 November 2020

Christmas A Time For Making Memories


Quick and easy card as I had already coloured this sweet gnome. He's another
of Mo's Digital Pencil images and has a very cute face. I decided to put him
inside a frame.


I used a white card base and cut out the frame you see outlined here and again in Gold mirror
card then added the gold frame back into the card. Lined up my gnome and taped in place
then added a full white panel at the back inside the card. Of course it would have been easier to just 
die cut the gold frame and add the image then attached to the card but that logic always
comes to me well after all the fiddling lol.


I have added a beautiful gold heat embossed sentiment I did on vellum
and wrapped toward the back of the card and inside. Finished off with a star
that was cut from the same frame set then a number of holographic little stars
I was given.

All done and going well, very please as I am well and truly on track for Christmas with ones
 like the previous giant snowflake card being made in a few different colours and cardstocks
like maybe another 10, I think.

Thank you so much for coming to look and as always I appreciate any comment left.
Hope to see you again soon


Crafty Hugs


Aileen